
Why would you need to update Author and Modified Dates
As part of a recent migration project, I built some custom tooling to help move data (mainly files) from a legacy platform to SharePoint Online. When moving from file servers, SharePoint On-Premises from another Microsoft 365 tenant, there are plenty of great tools out there to do the heavy lifting for you, but sometimes you need to move data from a source environment that’s old enough or rare enough that there simple aren’t specific migration tools for the job.
In this scenario, there’s quite a bit to keep track of – these migration tool vendors do a very good job at offering high-fidelity migration tools to make the user experience better post migration. While I will admit, I’m not going to have the time or knowledge to match the level of polish that those tools achieve, many of the same methods used by vendors are available to a determined admin to enhance their own projects.
One of the areas where fidelity can be improved is by bringing across metadata such as the author / modified by fields and the modified / created dates. Reflecting the actual data from the source system for these fields rather than the account used to import the data and the date of the migration can vastly improve the user experience.
Prepare
When it comes down to more specific or advanced tasks within SharePoint Online, the PnP PowerShell modules is a fantastic tool to balance simplicity with functionality. While I tend to use the Microsoft Graph API for many of the tasks I perform within SharePoint Online, unfortunately this is one task that’s not supported through Graph.
To install the module on your device, run the following cmdlet:
Install-Module pnp.powershell -Scope CurrentUser
Tip: The “-Scope CurrentUser” parameter will install the module into your user profile. This is useful when working from a device that you do not have administrative rights on.
Getting the data
The first thing to understand with this task is how to identify the files in the library through PowerShell. Of course, you can look at the library in a web browser but your script needs to be aware of the content. In Figure 1 below, I connect to the site I want to modify through PnP PowerShell, get the Documents list (Document Library) and retrieve all files. I then loop through each file to output the full path and name of the item from the “FileRef” value.

Figure 1: Listing the contents and paths
I’ve also included the code below for anyone following along in their own environment.
Connect-PnPOnline -Url “<Your Site URL>” -Interactive
$DocumentLibrary = Get-PnPList -Identity “Documents”
$DocumentLibrary
foreach($item in $items){
write-host “Item is: $($Item.FieldValues[‘FileRef’])”
}
Finding a specific file is achieved by filtering, if we know the path from the previous commands, we use that to filter from the file or folder as shown in Figure 2.

Figure 2: Getting a specific file or folder by filtering
Again, I’ve include the code below to help if you’re following along:
$File = $Items | Where-Object {$_.Fieldvalues[“FileRef”] -eq “<Add your path here>“}
$file.FieldValues[“FileRef”]
Modifying the fields
Now that we know how to list and filter for specific items, modifying the fields becomes easy. First, let’s look at the existing values from the file I identified above. To do this, we look for the “Created”, “Modified”, “Author” and “Editor” values in the $File variable we created above (Figure 3).
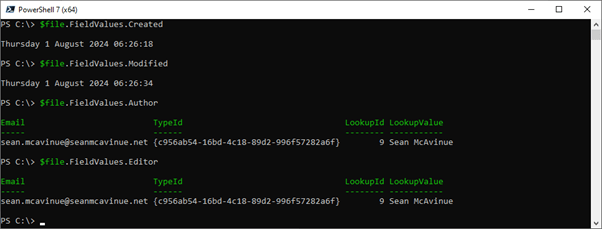
Figure 3: Checking the current Values
The values shown above are from the time the file was uploaded to SharePoint Online and link to my own account. For a migration, we will want to customize them to reflect the business users and original timestamps.
To update the values for this item, we prepare our new values. The dates and author variables are declared as shown in Figure 4 below. First, the values are set, then they are added to a hashtable for easy use with the update cmdlet.
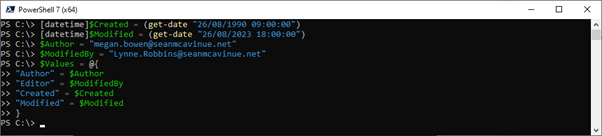
Figure 4: Prepare the new values
Here’s the code for this part:
[DateTime]$Created = (get-date “26/08/1990 09:00:00”)
[DateTime]$Modified = (get-date “26/08/2023 18:00:00”)
$Author = “megan.bowen@seanmcavinue.net”
$ModifiedBy = “Lynne.Robbins@seanmcavinue.net”
$Values = @{
“Author” = $Author
“Editor” = $ModifiedBy
“Created” = $Created
“Modified” = $Modified
}
Finally, we are ready to update the file! To perform the update, we use the Set-PnPListItem cmdlet with all the variables we’ve built so far. Rechecking the values from PowerShell shows a successful update (Figure 5).

Figure 5: Checking the values through PowerShell after modifying
Checking in the SharePoint Online site, in Figure 6, we see the values updated successfully and visible to users.

Figure 6: Values are updated and visible in the site
Modifying from a mapping file
Now that we have updated one file, the solution can be scaled to modify many files. I recommend the simplest way to do this is to use a mapping file in .csv format. I’ve prepared an example file (Figure 6) based on the list of files in my library.

Figure 7: Creating an example mapping file
Using this file as an input, we update the files in the library using the logic we’ve seen previously and a simple loop. Note in the ModifiedDate and CreatedDate fields I’ve used both dates with times and without. Our DateTime variables will take care of this for us by filling in the blanks if we don’t know the exact times. Figure 8 shows the code running.

Figure 8: Updating the data from a mapping file
Finally, checking our site again we see that everything is updated as we wanted (Figure 9).

Figure 9: The SharePoint data is updated as required
Summary
There aren’t a whole lot of use cases where you will need to modify the metadata mentioned in this article. The main one I can think of is during bespoke migrations where you won’t have a tool to help with the process. Still, even though these events are rare, they do happen. Having this at your disposal will make these events much smoother.
