
Update Your Environment Now To Make Sure Your Scripts Keep Working
The PnP PowerShell team have announced recently an upcoming change to how the PnP module authenticates that may well break many PnP PowerShell scripts. To summerize the announcement (Full announcement here), the Multi-tenant PnP Management Shell multi-tenant app, used to allow modern authentication for PnP PowerShell will be deleted on September 9th 2024. In place of the multi-tenant app, tenant administrators will need to create their own app registration with the permissions required to authenticate against.
This change makes sense from a security perspective, allowing tenants to have their own app provisioned with the permissions they need. That being said, the deadline is tight for busy administrators to get ready for the change.
In this article, I’ll bring you through what you need to do to make sure your tenant is prepared and your scripts are updated before September 9th.
Authenticating to PnP PowerShell Using The Multi-Tenant App
First, let’s look at the most common way administrators connect to PnP PowerShell currently. In most cases, we use delegated permissions to authenticate using the Connect-PnPOnline cmdlet as shown below:
Connect-PnPOnline -Url "https://<TenantName>-admin.sharepoint.com -Interactive
In the above code, we connect to the tenant admin site using delegated permissions and modern authentication. It’s a pretty simple connection method that’s similar to many other common modules such as the Microsoft.Graph module.
We can validate this authentication from the sign-in logs in Microsoft Entra and see that our connection uses the multi-tenant PnP Management Shell app as shown in Figure 1.

With the multi-tenant app being removed, this method will no longer work in the future.
Update You PnP.PowerShell Module
As a best practice, before continuing with the steps in this article, make sure you have the most up to date release of the PnP.PowerShell module. You can update the module with the below cmdlet:
Update-Module PnP.PowerShell
While unlikely if you’re reading this article, if you don’t have the module installed, you can install the latest version with the following cmdlet:
Install-Module PnP.PowerShell
*Important Note: Make sure to use PowerShell 7 for PnP PowerShell as PnP PowerShell does not support PowerShell 5.1 from version 2 of the module
Register Your Own App
Luckily, the PnP PowerShell team have made this transition easy with the Register-PnPEntraIDApp cmdlet (in itself, an alias of Register-PnPAzureADApp cmdlet). This cmdlet is similar in purpose to the preparation steps I build for the Tenant to Tenant Migration Assessment in that it will register the appo for you in Microsoft Entra ID and optionally, created a self-signed certificate for application-level authentication. You can also create your own app if you wish and use that but I won’t go into the details here as I have many articles about creating registered apps in Microsoft Entra.
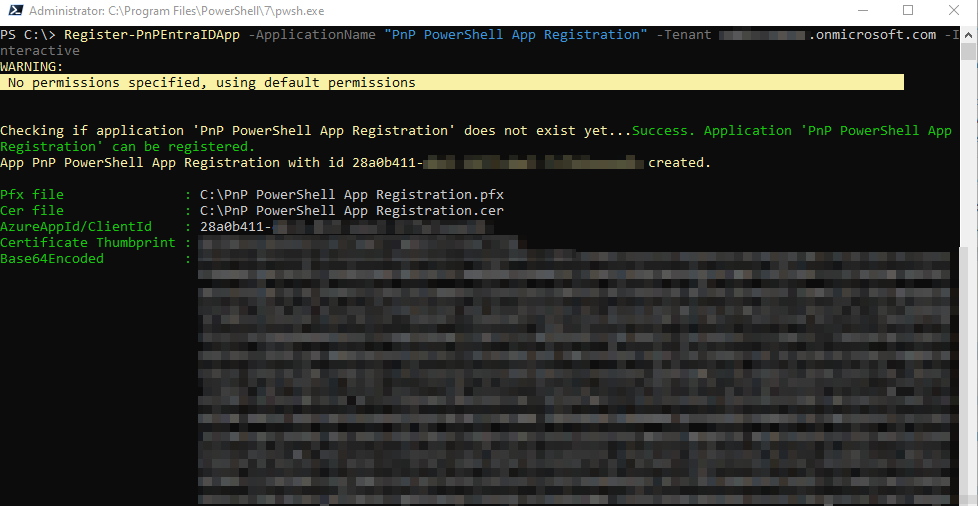
To register the app in your tenant, run the cmdlet below:
Register-PnPEntraIDApp -ApplicationName "PnP PowerShell App Registration" -Tenant <TenantName>.onmicrosoft.com -Interactive
When tunning the cmdlet, several things will happen:
- You will be prompted to sign-in to your tenant
- The app will be provisioned with the default permissions (more on this later)
- You will be prompted to sign-in again to grant consent to the permissions
- A certificate will be created and the public and private keys saved to your machine. The public key will also be uploaded to the Entra app
- Finally, you will be provided with the output shown in Figure 2
Unpacking What We Did
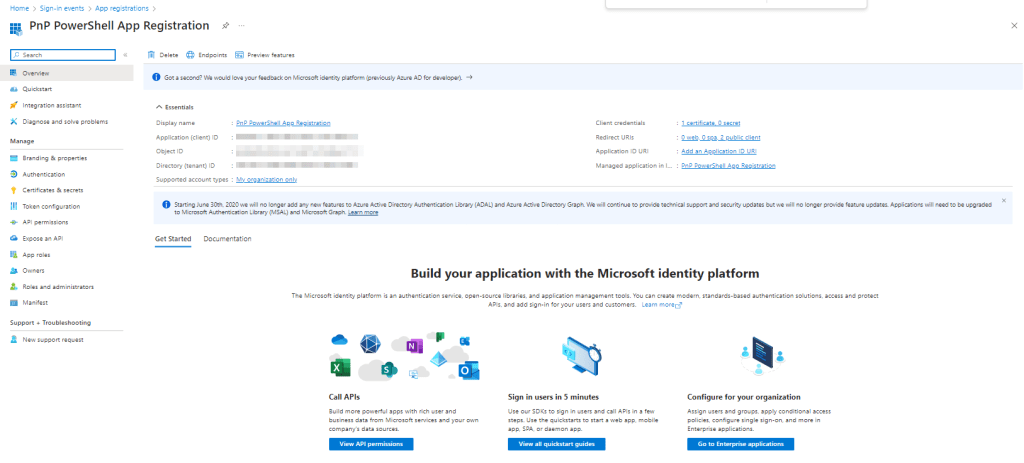
The first thing to note when we run this, is that the new app with the name we specified has been created in Microsoft Entra ID. From the Entra ID admin center, navigate to “Applications” -> “App registrations” and you should see the app created similar to the one shown in Figure 3.
Within this app, there are a few things to note. First, on the “API Permissions” page, we can see the default permissions for the app have been added and consented (Figure 4).
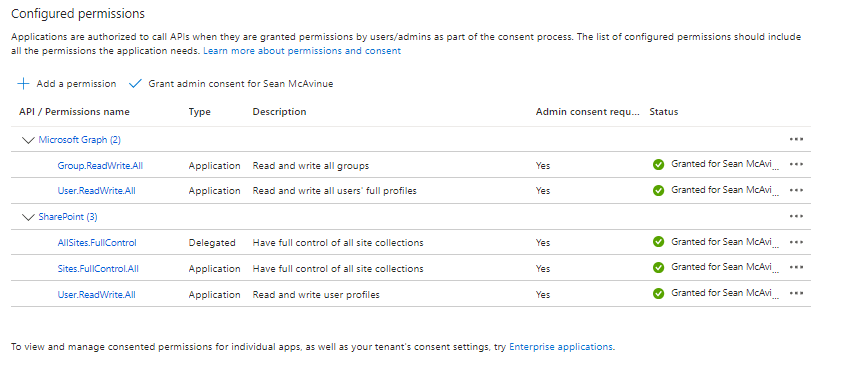
Comparing the permissions granted to the permissions that are part of the multi-tenant app (visible from “Applications” -> “Enterprise Applications”, this is a much smaller list of permissions. We can add to this list as required by selecting “Add a permission” from the top of the page. When adding permissions, don’t forget to consent also!
On the “Certificates and Secrets” page, we can also see that the certificate that has been created on our device has been uploaded to the app (Figure 5).

The Registration Process
Another item to note is that the registration cmdlet uses Azure PowerShell to provision and this can be validated from the Entra sign-in logs as shown in Figure 6.

Unlike the PnP Management Shell app, this multi-tenant app will not be deleted and will be used to provision your own app in your tenant. For anyone interested in how this is done, you can check out the code on GitHub here.
Other Registration Parameters
The cmdlet example I gave above is the minimum required to provision the app. Before we move to authentication, let’s take a look at the other parameters available and what each one does.
- Username: The username you want to connect with (Not needed when using the Interactive switch)
- Password: The password you want to connect with (Not needed when using the Interactive switch)
- DeviceLogin: Uses a device login flow (Not needed when using the Interactive switch)
- ApplicationName: The name of the new app registration
- CertificatePassword: The password for the private key of the certificate, can be used for both preexisting certificates and to set the password on a new certificate
- CertificatePath: The path of an existing certificate to use (should point to the private key (pfx file) and specify the password
- CommonName: A common name for the self-signed certificate
- Country: The country value of the self-signed certificate
- Locality: The locality value of the self-signed certificate
- Organization: The Organization value of the self-signed certificate
- OrganizationUnit: The OrgnizationUnit value of the self-signed certificate
- State: The State value of the self-signed certificate
- ValidYears: The validity period in Years for the self-signed certificate
- OutPath: The path to save the self-signed certificate, if not specified the current directory will be used
- Store: A local certificate store to save the certificate in (Only valid for Windows)
- Tenant: The tenant you are connecting to
- GraphApplicationPermissions: A comma separated list of Graph Application Permissions to add to the app
- GraphDelegatePermissions: A comma separated list of Graph Delegated Permissions to add to the app
- SharePointApplicationPermissions: A comma separated list of SharePoint Application Permissions to add to the app
- SharePointDelegatePermissions: A comma separated list of SharePoint Delegated Permissions to add to the app
- NoPopup: Prevents the web pages automatically opening, using this parameter you will open the URLs manually (Only available on Windows)
- LogoFilePath: A path to a logo for the app registration
Authenticating To The App
Now to look at what needs to change in your scripts to use your shiney new app. We saw previously that when we use delegated permissions we use the cmdlet below to authenticate interactivly to the admin site:
Connect-PnPOnline -Url "https://<TenantName>-admin.sharepoint.com -Interactive
To amend this to use our new app, we need to add the ClientID and Tenant parameters, taking the ClientID value from the output of the regiration cmdlet or from our app overview page from Figure 3 above.
Connect-PnPOnline -Url https://<TenantName>-admin.sharepoint.com -Interactive -ClientId "<App Client ID>" -Tenant <TenantName>.onmicrosoft.com
In Figure 7, I connect to the tenant using the details of the app I created and then run a simple cmdlet to confirm I am connected successfully.

If you want to connect with application permissions, you can use the certificate created earlier. The easiest way to do this is to import the certificate into the local store for the user as shown in Figure 8. This can also be done during registration using the -Store parameter described above.

Now, to connect using the certificate for application permissions, we use the thumbprint of the certificate and pass it through to the -Thumbprint parameter instead of using the -Interactive parameter:
$CertificateThumbprint = "<Your Certificate Thumbprint>"
Connect-PnPOnline -Url https://<TenantName>-admin.sharepoint.com -Thumbprint $CertificateThumbprint -ClientId "<Client ID>" -Tenant <TenantName>.onmicrosoft.com
Connecting in this way will authenticate using the certificate and use application permissions. The connection cmdlet is shown in Figure 9.

We can also authenticate without importing the certificate using the below syntax:
Connect-PnPOnline <TenantName>.sharepoint.com -ClientId "<Client ID" -Tenant <TenantName>.onmicrosoft.com -CertificatePath '<Path to your Certificate>' -CertificatePassword (ConvertTo-SecureString -AsPlainText -Force "<CertificatePassword")
Summary
Nothing stays still for long in the world of Microsoft 365. Administrators always need to be on the lookout for changes that may impact their processes. In addition to this change, I recently wrote about a change on the Microsoft side which means administrators will need to take action to enable secure authentication for their emergency access accounts.
With the constant change for administrators, it’s important to stay on top of it and make sure you don’t run into problems. At least this change is relativly painless and shouldn’t take you more than a few minutes to update in your scripts!
