
The Graph API is an amazingly powerful tool for both developers and admins to achieve some really cool things in Microsoft 365. There are multiple ways to leverage it using multiple languages but for somebody coming from an infrastructure background, that wants to manage, report or automate tasks in Microsoft 365, PowerShell makes the most sense as a lot of us will already be very familiar with it.
Initially trying to understand how to work with the Graph can be intimidating as there are a number of new concepts to understand. I’ve put together a list of my top 7 tips for working with Graph in PowerShell which should help you get started leveraging it in your day to day work.
Tip 1: Setting Up An Application Registration
When we work with Graph, we need to scope our activities and permissions using an application registration. This allows us to request access tokens with the appropriate permissions assigned and have a basis for our authentication and expose the APIs. There are a few things to note when setting up a new App Registration in the Azure AD Portal.
We first set up the App Registration from the Azure AD Portal under “Application Registrations” -> “New Registrations”. Give it a descriptive name and for running scripts in your own environment, you will only need to set the supported account types to “Accounts in this organizational directory only”. Finally, the Redirect URI is used when we have an application interacting with Graph but since we are just using PowerShell, set this to “https://localhost”. (The value isn’t overly important as long as it doesn’t point to an application but localhost is a safe bet)

With the Application Reg created, let’s first give it some permissions. For this instance we will give it the “User.Read.All” permissions for both Delegated and Application Permissions (more on that below). To do this, Open the “API Permissions” tab and select “Add Permission”. In the pop-out, select “Microsoft Graph” and choose between Application and Delegated Permissions, we will do this for both. Once you select the permission type, choose the permission you want to add. Add in “User.Read.All” and repeat for both Application and Delegated Permissions.


With the permissions in place, we need to ensure to click the “Grant admin consent” button to grant consent to the app for our environment.

Tip 2: The Difference Between Application and Delegated Tokens / Permissions
When we grant permissions or request a token from Azure AD, we will see two different token types: Delegated and Application. It’s important when we are writing Graph queries that we consider which we use. Delegated Tokens allow us to act on behalf of a user while Application Tokens do not have a user account linked and run as the Application Registration we created.
In the previous tip we looked at how we can grant permissions using either the Application or Delegated context but let’s take a look at the impact of choosing one or the other.
When we choose an Application Token, the following is true:
- We can run our script / application without interactive user authentication
- We can use an Application Secret for authentication
- We can’t perform user specific tasks such as assigning sensitivity labels
- We can act as admin and access all sites, mailboxes etc. in the tenancy
When we choose a Delegated Token the following is true:
- We require user authentication to be granted a token
- We are scoped to the users own access / roles / membership
- We act on behalf of the user so everything we do is done by that user (eg send email)
It’s also good to review the documentation to ensure the tasks we want to perform are supported in our chosen context. For example, I recently automated the creation of Planner in my Planner Migration Tool and as we see from the documentation, the Create plannerPlan API is only available using delegated permissions. In practice we see that the delegated account is used to create the Plan.

Tip 3: Requesting an Application Access Token
To request an Application Token, we need to have the following pieces of information ready:
- Application (Client) ID
- Directory (Tenant) ID
- Application Secret
The first two we noted down in Tip 1 when we set up our app registration. The final parameter we need is the App Secret. We can get an App Secret by opening up our App Registration from the Azure AD Portal and opening the “Certificates & Secrets” Blade. From here we can click the option for “New Client Secret” and give the new secret a name and expiration. It’s good to expire secrets often to reduce the risk of it being compromised.
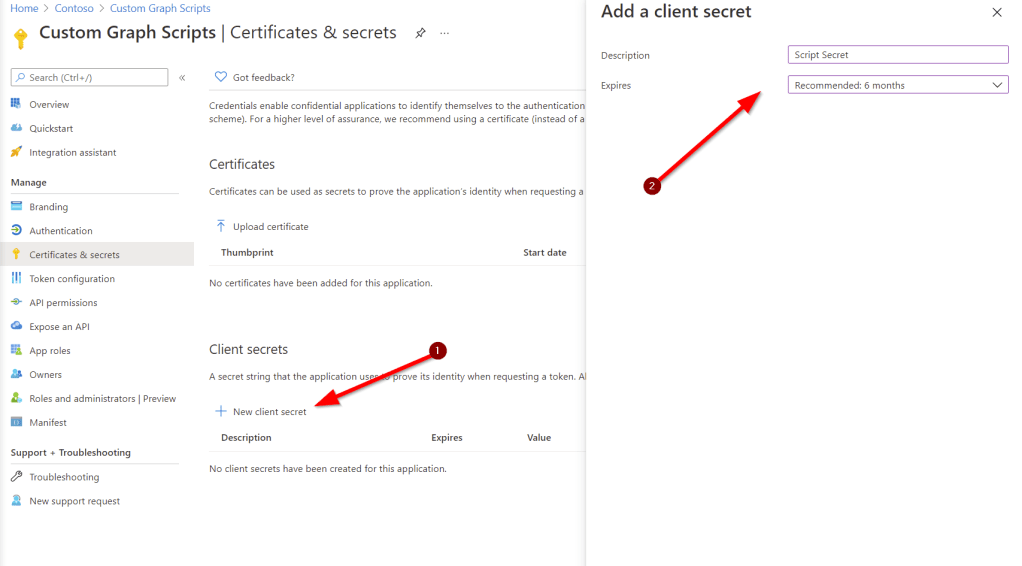
When the secret is created, copy the secret value to a secure location for use in your connection. Make sure to copy it now as it will no longer be available once we navigate away from this page.

With all three parameters in hand, we can request an Application Access Token (returned as the $Token variable) using the script block below. In this code, the parameters we collected above are save as the $ClientID, $TenantID and $ClientSecret respectively.
    $uri = "https://login.microsoftonline.com/$tenantId/oauth2/v2.0/token"

    # Construct Body
    $body = @{
        client_id     = $clientId
        scope         = "https://graph.microsoft.com/.default"
        client_secret = $clientSecret
        grant_type    = "client_credentials"
    }

    # Get OAuth 2.0 Token
    $tokenRequest = Invoke-WebRequest -Method Post -Uri $uri -ContentType "application/x-www-form-urlencoded" -Body $body -UseBasicParsing

    # Access Token
    $token = ($tokenRequest.Content | ConvertFrom-Json).access_token
We can also simplify this process with the MSAL.PS module.
Tip 4: Requesting a Delegated Access Token
When requesting a Delegated Access Token, we don’t need a Client Secret like we do with an Application Token, instead, we need valid user with the appropriate permissions to perform our task. We still need the Application and Client ID though.
I’ve actually posted about this before in detail here. As with the previous tip, using the MSAL.PS module makes it easier, that is details in the post too!
Tip 5: Formatting Your First GET Request
Now that you have a token, it’s time to create a request. Let’s create a request to return all users as this supports either Application or Delegated Permissions. To start we need to locate the API endpoint we want to query, we can get this from the docs page for List Users.
From the doc, we see that the endpoint is “/Users”, we add this to the default Graph query Uri for v1.0 which is “”https://graph.microsoft.com/v1.0/” and our URI becomes “”https://graph.microsoft.com/v1.0/Users”. That’s the endpoint we want to query to return users. Save that path as a variable like below:

Then we use the “Invoke-RestMethod” command to send our REST query to Graph. The format of this command is:
Invoke-RestMethod -Headers @{Authorization = "Bearer <Our Token Value>" } -Uri <The API Endpoint URI> -Method Get)
This will run a “GET” request against the endpoint we specified, the command all together looks like the below. Note that we are saving the output in a $Results variable so we can process later.

When we check the $Results variable we see context data and values. Expanding the values give us our list of users, success (kinda, check out the next tip!)

The exact commands used above were:
$apiUri = "https://graph.microsoft.com/v1.0/users"
$Results = (Invoke-RestMethod -Headers @{Authorization = "Bearer $($Token)" } -Uri $apiUri -Method Get)
Tip 6: Paging Results
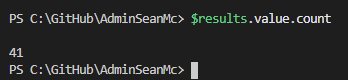
If we check the results given back in the last command we see we have 41 entries. In our test tenant this is correct however when we have a large number of results, we will need to navigate the result “Pages” to get them all.
We can see this when we run a larger query like getting mails from a mailbox as below:

We only return 10 results, we definitely have more mails than that in our mailbox tough. When our results are paged, we will get a value for “@odata.nextLink” returned as part of our results variable. This is the query to run to get the next page of results. This is substituted for the URI we originally queried as below:


We can continue paging until the “@odata.nextLink” value is no longer present to get all of our results.
I’ve put together the below function to make this nice and easy which you can use:
function RunQueryandEnumerateResults {
    <#
    .SYNOPSIS
    Runs Graph Query and if there are any additional pages, parses them and appends to a single variable

    .PARAMETER apiUri
    -APIURi is the apiUri to be passed

    .PARAMETER token
    -token is the auth token

    #>
    Param(
        [parameter(Mandatory = $true)]
        [String]
        $apiUri,
        [parameter(Mandatory = $true)]
        $token

    )

    #Run Graph Query
    $Results = (Invoke-RestMethod -Headers @{Authorization = "Bearer $($Token)" } -Uri $apiUri -Method Get)
    #Output Results for debug checking
    #write-host $results

    #Begin populating results
    $ResultsValue = $Results.value

    #If there is a next page, query the next page until there are no more pages and append results to existing set
    if ($results."@odata.nextLink" -ne $null) {
        write-host enumerating pages -ForegroundColor yellow
        $NextPageUri = $results."@odata.nextLink"
        ##While there is a next page, query it and loop, append results
        While ($NextPageUri -ne $null) {
            $NextPageRequest = (Invoke-RestMethod -Headers @{Authorization = "Bearer $($Token)" } -Uri $NextPageURI -Method Get)
            $NxtPageData = $NextPageRequest.Value
            $NextPageUri = $NextPageRequest."@odata.nextLink"
            $ResultsValue = $ResultsValue + $NxtPageData
        }
    }

    ##Return completed results
    return $ResultsValue


}
This will take care of all the paging for you and return a fully appended variable.
Tip 7: Working with JSON
For the last tip, we will look at the format of the results we are provided when we query Graph we get a deeply nested object structure. This is great when we want to navigate through the results in PowerShell however when we move on to creating new objects or updating existing objects, we need to send the body as JSON. In my recent Conditional Access Report, I pulled all details of Conditional Access Policies our to a variable but this can’t really be represented as an export or used to create a new policy.


To convert this into an easier to export format or to prepare for the creation of a new entry, we can use the “ConvertTo-JSON” and “ConvertFrom-JSON” commands. In the below screenshots you can see how this can help us formatting the data we get back:

This output is much easier to read and also helps when we want to create a new object.
Summary
I may do a follow up to this post looking at POST and PATCH commands and there are numerous examples in my previous posts you can check out. These tips should help you to get started using PowerShell and Graph together to get some really powerful results!
Also make sure to check out the documentation on the Graph API Endpoints which can help give you an idea of what you can accomplish with Graph / PowerShell once you get the basics down!
Microsoft Graph REST API v1.0 reference – Microsoft Graph v1.0 | Microsoft Docs

Pingback: Search and Delete and Emails from Exchange Online with Graph API and PowerShell – Sean McAvinue
Pingback: Removing Duplicate Contacts from Exchange Online Mailboxes with Graph API – Sean McAvinue
Pingback: Migrate Microsoft Team and Private Channel Members with Graph API and PowerShell – Sean McAvinue
Pingback: Using Certificate Authentication with Graph API – Sean McAvinue