I recently wrote an article about how we can add a disclaimer to email messages outside of business hours to promote a healthy work / life balance. I then received a question asking if we can achieve something similar for Teams messages. While we can’t add a disclaimer, we can leverage Microsoft Cloud App Security (MCAS) Session Policies to prevent messages after hours using Power Automate to manage the schedule.

To achieve this, the below configuration needs to be put in place.
- Create an MCAS Session Policy
- Create a Conditional Access Policy
- Create a Power Automate Flow
In this post, I’ll explain how to configure each of these steps.
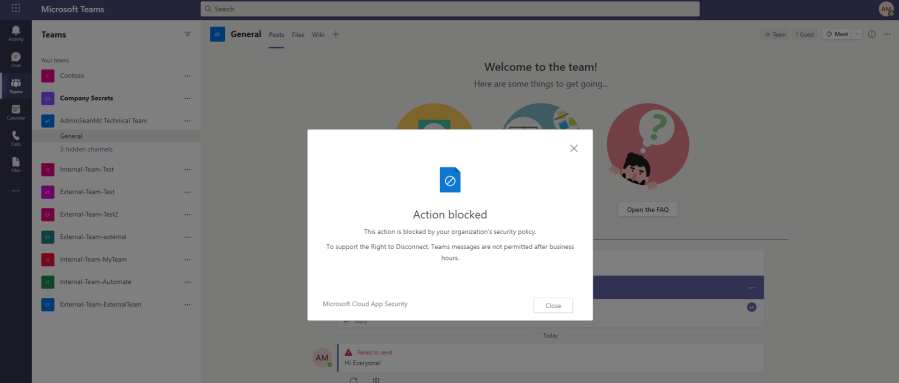
Note: Unfortunately this functionality is only available for the Teams web client currently, for Teams Mobile and Desktop Clients an Access Policy can be used to block access completly.
Create an MCAS Session Policy
To create the policy to block Teams messages, open the Cloud App Security Portal and create a new Session Control Policy. Select the Policy Template “Block sending of messages based on real-time content inspection” and configure the policy similar to the one detailed in Figure 1:
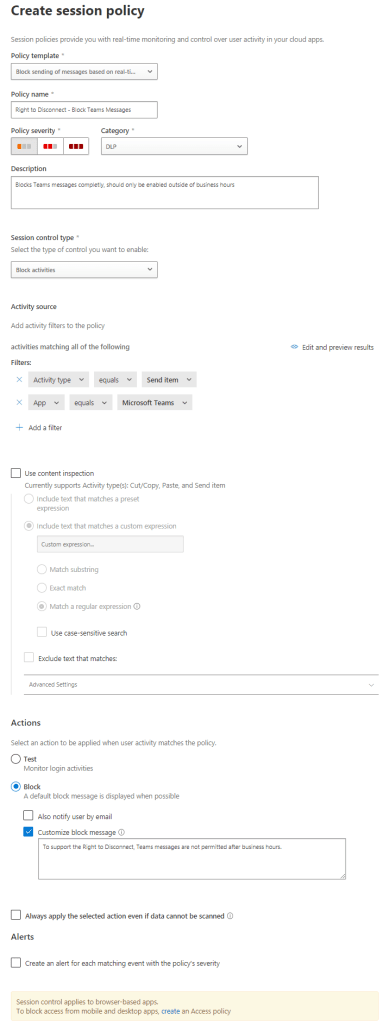
Note when creating this policy that it is best to disable it initially to prevent user impact.
Create a Conditional Access Policy
Next, to route web session for Teams through MCAS, set up a Conditional Access Policy for your in scope users. The settings required are detailed in Table 1 and Figure 2 below:
| Setting | Value |
| Include Users | Select the in scope users / groups |
| Include Cloud Apps | Microsoft Teams |
| Session | User Conditional Access App Control |

Create a Power Automate Flow
With the MCAS and Conditional Access Policies in place, create a new Power Automate Flow to schedule the policy enablement. Select the Flow template “Build a scheduled cloud flow” and set the schedule to the time you want the policy to be enabled (Figure 3).

Add a single action to the flow, selecting the “Enable Cloud App Security Policy” action. This action will require two parameters, “Connection Name” which is a descriptive name for the connection to MCAS and “API Key”. The API Key value is required to authenticate to MCAS to update the policy and can be obtained by opening the MCAS portal, selecting the settings menu and opening “Security Extensions” (Figure 4).

On the API Tokens tab, select “Add token” and give the token a descriptive name and click “Generate”. Copy the API Token that is displayed (Figure 5) and add it as the API Key in the Flow.

Once the API Key is added, the Flow action will prompt for a “Provider Policy ID”, this is the ID of the policy to enable. The easiest way to get the ID of a policy is using the MCAS PowerShell Module and using the command Get-MCASPolicy similar to Figure 6.

Once the flow to enable is in place and tested, create a second flow, using the exact same steps to disable the policy at the start of the work day. With both Flows in place and scheduled, the policy will enable and disable each day, allowing users to work away during business hours but not after hours.
Summary
Promoting a healthy Work / Life balance is more important than ever with technology and working from home enabling an “always on” mentality. Unfortunately we don’t have this amount of flexibility with the Teams Mobile and Desktop clients however access could be blocked completely to those apps using an MCAS Access Policy with the same configuration as above for activation and deactivation.

Pingback: Right to Disconnect and Display for Users – 365 admin service