
Assessing data access in your SharePoint and Teams environment

As I explained in my previous article, data access permissions is an important consideration as part of any deployment of Copilot for Microsoft 365. Getting visibility of how data is permissioned across your SharePoint and Teams environment can be a challenge for many organizations but is often required to gain confidence before deploying Copilot for Microsoft 365. To help with this challenge, I have created a PowerShell and Power BI-based assessment (available on GitHub here) that you can run easily in your environment to start filling in the blanks on data permissions.
Prepare the environment
I have spoken about the “why” in my previous article so here I’ll get straight into the “how”! As I mentioned, the assessment files are available on GitHub. The first step is to download the files to folder C:\DataAssessment on your device, this will be the working directory (Figure 1).
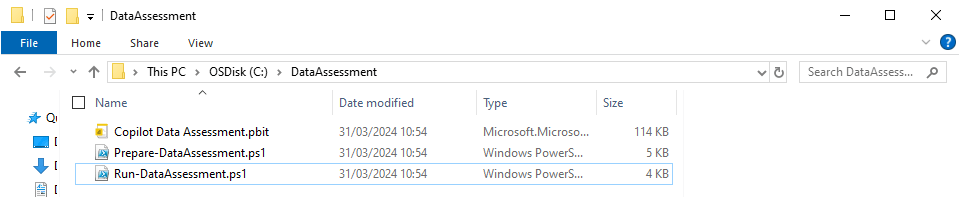
Once downloaded, your will see three files in the directory:
- Copilot Data Assessment.pbit – This is our Power BI template for the report. It is useless without the data from the tenant so I will come back to this later.
- Prepare-DataAssessment.ps1 – This PowerShell script prepares the tenant by creating a new App Registration with the appropriate permissions and uploading a self-signed certificate for authentication.
- Run-DataAssessment.ps1 – This PowerShell script authenticates using the App Registration created in the “Prepare” script, and creates the report.
The assessment uses the Microsoft Graph PowerShell SDK, before running the scripts, make sure the SDK is installed and up to date. For more information on the Graph PowerShell SDK, check out this series of articles.
With the SDK installed, the environment can be prepared. Run the Prepare-DataAssessment.ps1 script in PowerShell. The script creates a new App Registration in your tenant so will ask you to sign in and if you have not used it before, will prompt for consent to the Application.ReadWrite.All permission as shown in Figure 2. This permission is required to create the App Registration using the Microsoft Graph API.

The script will also create a new self-signed certificate and upload it to the new App Registration. This certificate will be stored in the personal store of the current user on the device.
When the App Registration is created, you will also see an authentication window open asking you to consent to the Sites.Read.All permission. This is the consent for the App Registration to access SharePoint sites (Figure 3).

If you miss or close this window, the consent can be granted by navigating to the application “Tenant Data Assessment Tool” in Microsoft Entra and manually granting consent on the “API Permissions” tab (Figure 4).

When the preparation script finishes, you will see an output with the Client ID, Tenant ID and Certificate Thumbprint to use with the Run-DataAssessment script (Figure 5). Copy this information to a secure location and hit enter to clear the screen.

Running the assessment
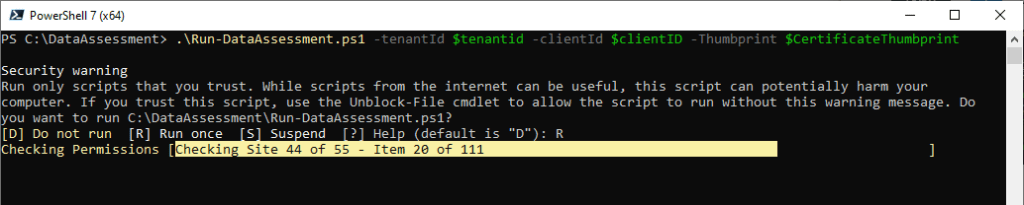
The assessment is run by providing the outputs of the preparation script when running the “Run-DataAssessment.ps1” script as shown in the example below:
.\Run-DataAssessment.ps1 -tenantId $tenantid -clientId $clientID -Thumbprint $CertificateThumbprint
As it runs (Figure 6), the assessment script will collect all SharePoint sites (Including Teams and Private / Shared Channels) in the tenant and scan each item in each document library for permissions.
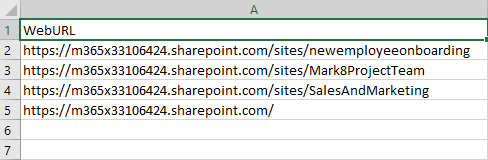
In large environments, traversing every item in every SharePoint site can be a lengthy process and often admins are only interested in specific sites. To account for this, the script also supports providing a list of sites using a CSV file.
To create the CSV file for a scoped assessment, only a single solumn is needed named “WebURL”. This should contain the URL for each site to be scanned as shown in Figure 7.
Running the assessment using an input file is done using the -CSVPath parameter and providing a path to the input CSV file prepared above as shown in Figure 8.

.\Run-DataAssessment.ps1 -tenantId $tenantid -clientId $clientID -Thumbprint $CertificateThumbprint -csvPath "C:\DataAssessment\InputFile.csv"
The outputs will then be exported to a new file in C:\DataAssessment named DataAssessment.csv. This file contains a list of all items scanned and information about sharing links, direct permissions and group permissions for each item. While the file itself can be useful if you know your way around Excel filtering and data summerization, it is mainly used as the input for the Power BI template “Copilot Data Assessment.pbit”
Reviewing the report
With the DataAssessment.csv file in place, opening the Power BI template “Copilot Data Assessment.pbit” will import the data and show a report built on the insights from the assessment. The report is split into multiple sections as described below:
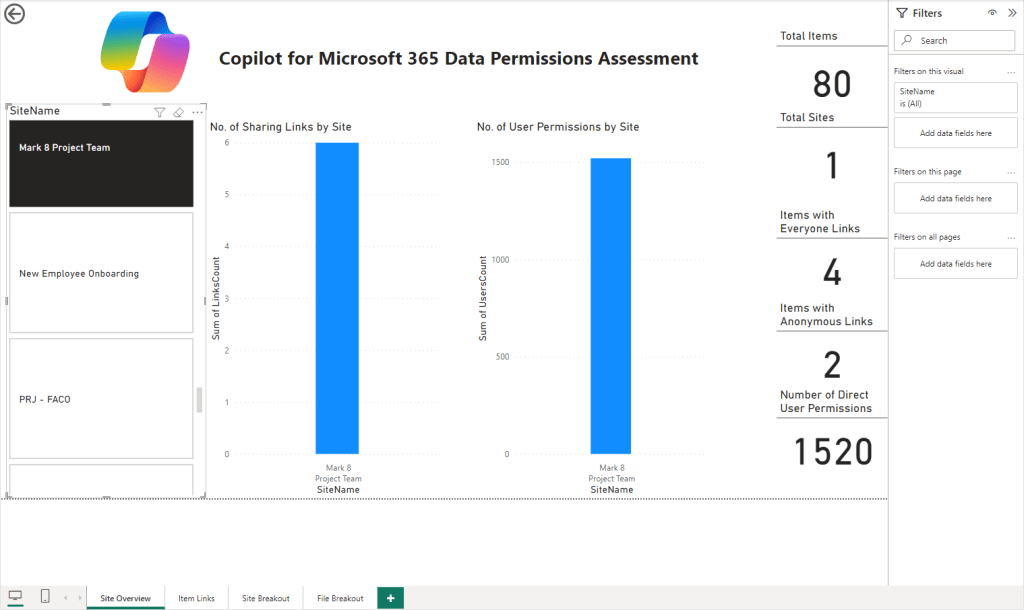
Site Overview
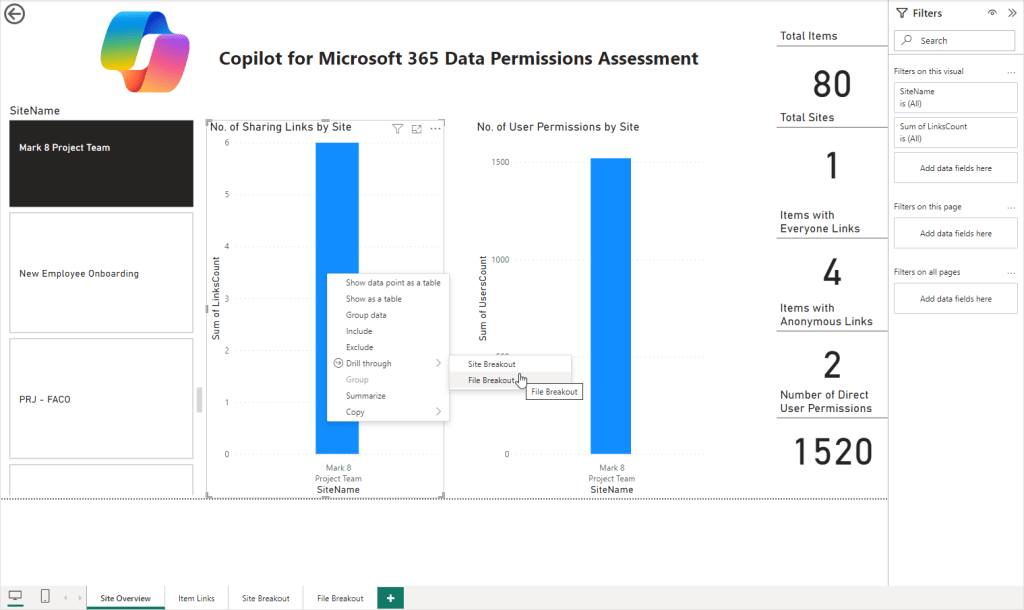
The Site Overview page gives high-level data around the number of items and sites scanned and the items identified on a per-site basis (Figure 9).

Using the pane on the left, the results can be filtered to specific sites as required to narrow down the data to key areas as shown in Figure 10.
Right clicking on a specific site within the report provides the option to “Drill through” and filter either the “Site Breakout” or “File Breakout” tabs based on the selected site (Figure 11).
Item Links
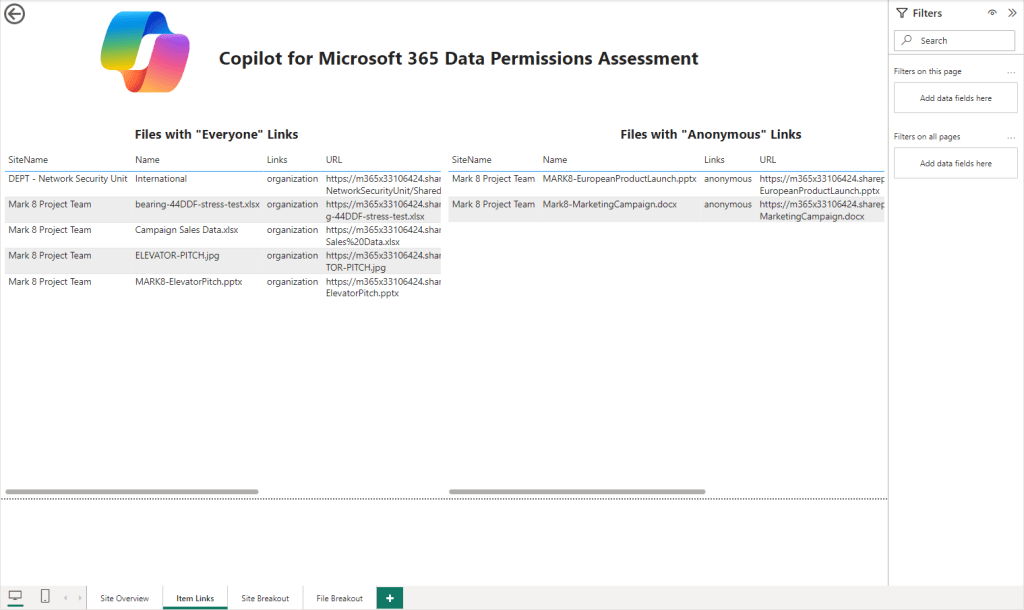
The “Item Links” page shows two tables outlining any items containing links shared with “Everyone in the organization” and Anonymous links respectivly (Figure 12). This can be useful to hunt down where there may be open links available to specific items.
Site Breakout
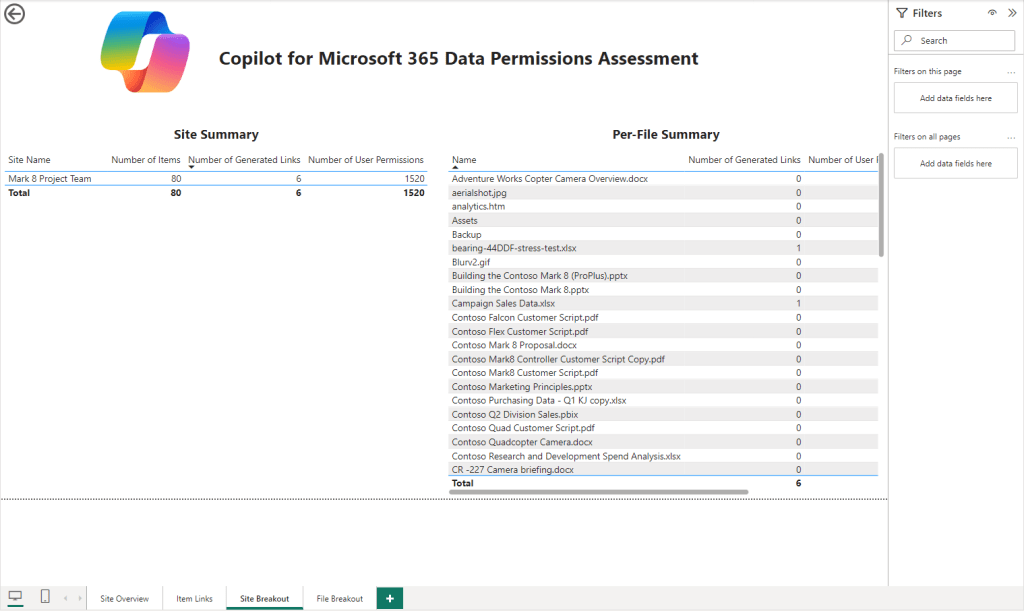
Initially the “Site Breakout” page will be blank. To make this page useful, navigate back to the “Site Overview” page, right click on a site in the column chart and use the “Drill through” option outlined previously. This will populate the “Site Breakout” page with detail of the items within that specific site including a summary for each file of links, user permissions and group permissions (Figure 13).
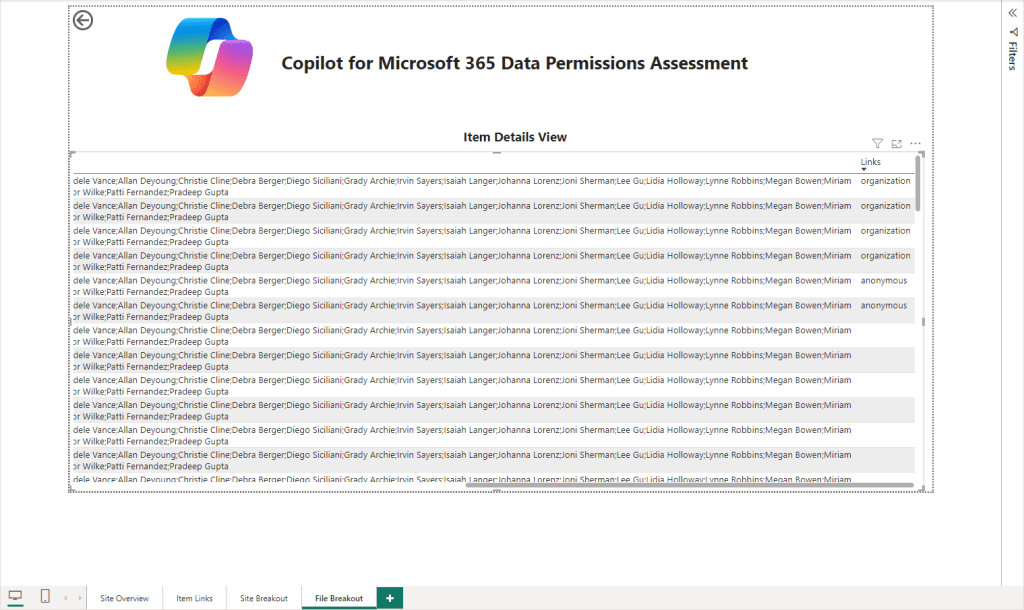
File Breakout
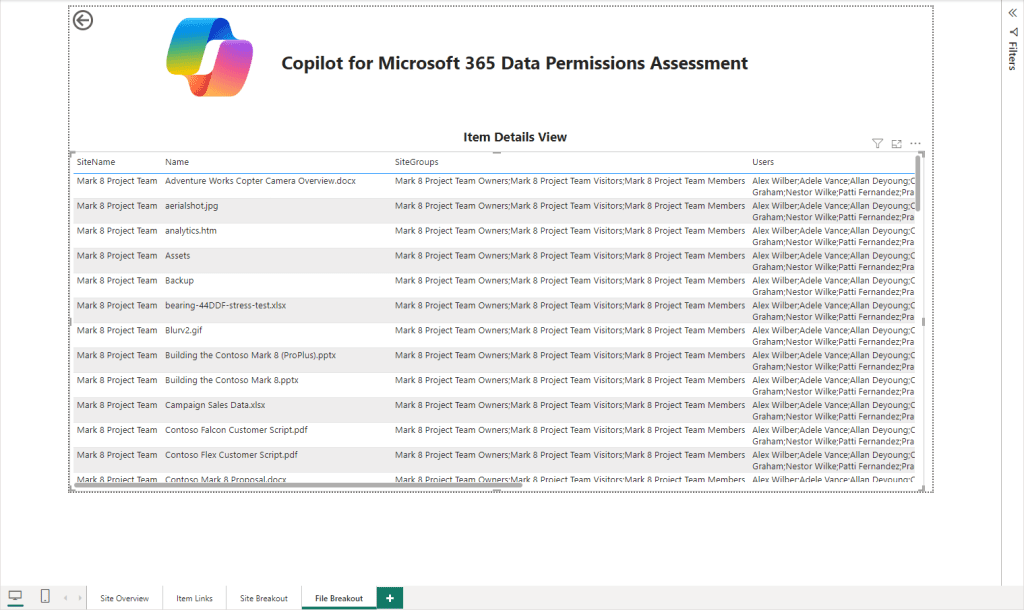
Similar to the “Site Breakout” page, the “File Breakout” page requires you to Drill through from the “Site Overview” page. The “File Breakout” page provides the next level of detail, listing each item and any groups who have permissions, users who have direct permissions and the configuration of any links generated (Shown in Figure 14 and 15)
Summary
The assessment and report outlined here provide a level of insight into the data in your tenant in an easy to navigate way, helping to sift through large amounts of data in an efficient manner. This is a good start but there are many more insights which can be derived from this assessment. It’s very much “Version 1” at the moment and a proof of concept for what can be built with the Graph API and Power BI to support people understanding the implications of deploying Copilot for Microsoft 365 in their environment. I encourage any feedback or update requests to bring the assessment to the next level. I also encourage people to add their own functionality and perhaps create a pull request to get that added to the GitHub repository.
Copilot for Microsoft 365 is an extreamly powerful tool, hopefully this assessment can help people understand their data a bit better to be more prepared for deployment of Copilot.

Pingback: How Does Copilot for Microsoft 365 Access Data – Sean McAvinue
This is super handy – thank you!
I ran against a test tenant and all was great, I then wanted to run against another tenant but when running the prepare script I was told the app already existed and I needed to delete it.
Am I missing something or is there something i need to delete somewhere on my PC to remove the association to the existing tenant? – I found that removing the app registration from my dev tenant allowed me to run the prepare script again but I don’t want to have to do that each time I wish to run the tool against a new tenant.
LikeLike
Hey Mark,
If you want to run it again you don’t need to run the “prepare” script again. You just need to use the same tenant Id, client Id and certificate thumbprint. If you want to run against a different tenant then you need to run the “prepare” script again but as you are logged in you may need to run “Disconnect-MgGraph” to sign out of the previous tenant.
LikeLike