
AI isn’t just for developers
Much of the day for Microsoft 365 tenant administrators is spent managing different aspects of workloads. The tool of choice for managing Microsoft 365 is often PowerShell. In fact, If you browse Practical365.com, you’ll find hundreds of articles that include PowerShell examples of practical automation in action. Managing Microsoft 365 and having at least a fundamental knowledge of PowerShell (understanding syntax and how to use the Graph PowerShell SDK for instance) go hand in hand.
When considering AI, there are AI solutions built into the Microsoft 365 platform such as Microsoft 365 Copilot and Copilot Studio which focus on Low-code / No-code development of agents and tools. Looking beyond low-code, Microsoft’s answer to a fully featured AI platform is Microsoft Foundry (formerly Azure AI Foundry and Azure AI Studio before that). Microsoft Foundry is a platform to build, customise and deploy AI models and Agents.
Microsoft Foundry is focused on pro-developers, with examples in SDKs and tutorials generally provided in Python and JavaScript. However, it’s still possible for tenant administrators to use PowerShell to interact with Foundry models and Agents. In this article, I explain how to set up your environment in Microsoft Foundry and how to use PowerShell to interact with AI models in some practical ways.
Setting up the Microsoft Foundry resource
The first thing you need to work with Microsoft Foundry is an Azure Subscription to create the Foundry Instance and associated model deployments. Depending on the model you want to deploy, make sure to first check the region availability documentation to ensure you provision in a supported region. For this example, I’m using GPT-4.1, so the East US region is fine but when building in production, it’s important to consider your organisations requirements for data processing.
Once you’ve identified your deployment region, create a new Microsoft Foundry resource within the Microsoft Azure portal (Figure 1).
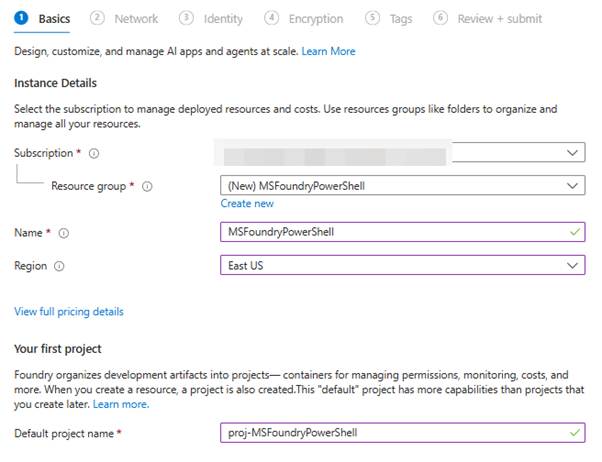
Figure 1: Deploying the Microsoft Foundry resource
On the remaining configuration pages, we will leave the default values for this example. However, it’s important to consider the right configuration for your environment when deploying to production.
Deploy a model
Deploying the Microsoft Foundry resource does not deploy any AI models. Microsoft Foundry is a platform to deploy models. Once the Microsoft Foundry resource is available, navigate to the Microsoft Foundry portal by clicking the link on the resource in the Azure portal or by navigating to https://ai.azure.com/.
In the Microsoft Foundry portal, to deploy a model, open the “Models + endpoints” page from the navigation bar (you may need to click “More” to find it). From the Model deployments page, click “Deploy model” and “Deploy base model”. Select a model in the popup page and click “Confirm”. Finally, on the deployment page, give the model deployment a name and deployment type and click “deploy” (as shown in Figure 2).

Figure 2: Deploy the model
Once the model is deployed, Copy the Target URI and API Key which will be used to connect to the model (Figure 3) somewhere you can access them again, like Notepad.
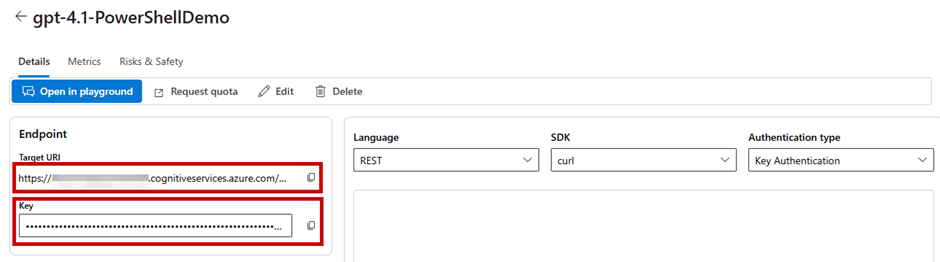
Figure 3: Take note of the Target URI and API Key from the model deployment
Running the first query
To test querying the model, we use a simple PowerShell script using the Invoke-RestMethod cmdlet to send a message to the model. The body of the message contains the “messages” object, and inside that, we send our message “What is PowerShell?” using the “User” role which signifies this message is from a user.
Using the script below, update with your APIKey and Endpoint and run in PowerShell to get your first result!
##Add API Key and Endpoint
$APIKey = “<YOUR API KEY HERE>“
$Endpoint = “<YOUR ENDPOINT HERE>“
##Add API Key to Authentication Header
$Headers = @{
“Content-Type” = “application/json”
“api-key” = $APIKey
}
##Create a JSON Body for the Request
$Body = @{
“messages” = @(
@{
“role” = “user”
“content” = “What is PowerShell?”
}
)
“max_tokens” = 1000
“temperature” = 0.7
} | ConvertTo-Json -Depth 10
##Make the REST API Call
$Response = Invoke-RestMethod -Uri $Endpoint -Method Post -Headers $Headers -Body $Body
##Display the Response
Write-host $Response.choices.message.content -ForegroundColor Green
Running the script sends the prompt “What is PowerShell?” to the model. The model response is similar to the output shown in Figure 4.
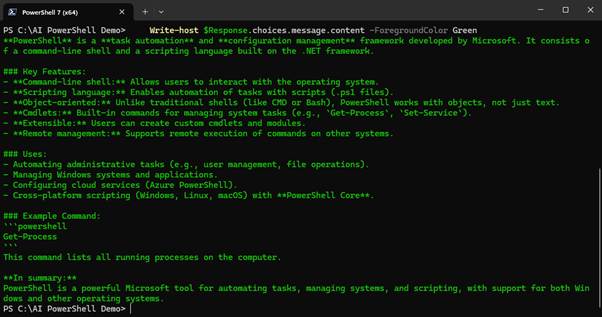
Figure 4: Output from the first prompt
Adding a system prompt
When you send a prompt to an AI model, the model responds using the model’s default context (How the model interacts based on how it was trained). To customise how the model responds to user prompts, it’s common to send a system prompt as part of the interaction. The system prompt is a set of instructions for how the model should respond. In the next example, the user prompt is the same as before, but now there is a system prompt (using the “System” role) instructing the model to talk like a pirate:
##Create a JSON Body for the Request with a system message
$Body = @{
“messages” = @(
@{
“role” = “system”
“content” = “Talk like a pirate.”
}
@{
“role” = “user”
“content” = “What is PowerShell?”
}
)
“max_tokens” = 1000
“temperature” = 0.7
} | ConvertTo-Json -Depth 10
##Make the REST API Call
$Response = Invoke-RestMethod -Uri $Endpoint -Method Post -Headers $Headers -Body $Body
##Display the Response
Write-host $Response.choices.message.content -ForegroundColor Green

Figure 5: Response including a system prompt
Multi-turn conversations
A single prompt and response might be enough to deliver the information you need. However, sometimes follow up questions or clarifications are needed. AI models are stateless, meaning they don’t store any prompts or outputs, the memory aspect of production AI tools such as Microsoft 365 Copilot is added by the tools developers. When we work directly with AI models (as opposed to Agents where context is managed out of the box), if it’s necessary to retain context over multiple messages, the context of the conversation must be stored and restated in the follow up prompt.
Information about previous responses in the conversation can be passed along using the “assistant” role. In my example, the results from the previous interactions are stored in the $Response.choices.message.content objectproperty. In the next example, the response is included in the message body to provide the conversation history and add a follow up question:
##Follow-up question
$FollowUpQuestion = “Can I use this to send prompts to AI models?”
##Create a JSON Body for the Request with a system message
$Body = @{
“messages” = @(
@{
“role” = “system”
“content” = “Talk like a pirate.”
}
@{
“role” = “user”
“content” = “What is PowerShell?”
}
@{
“role” = “assistant”
“content” = $Response.choices.message.content
}
@{
“role” = “user”
“content” = $FollowUpQuestion
}
)
“max_tokens” = 1000
“temperature” = 0.7
} | ConvertTo-Json -Depth 10
##Make the REST API Call
$SecondResponse = Invoke-RestMethod -Uri $Endpoint -Method Post -Headers $Headers -Body $Body
##Display the Response
Write-host $SecondResponse.choices.message.content -ForegroundColor Green
The code returns a context aware response to the follow up question “Can I use this to send prompts to AI models?” (Figure 6). Notice in this example there is no need to mention PowerShell because this context is picked up from the conversation history passed in the body.
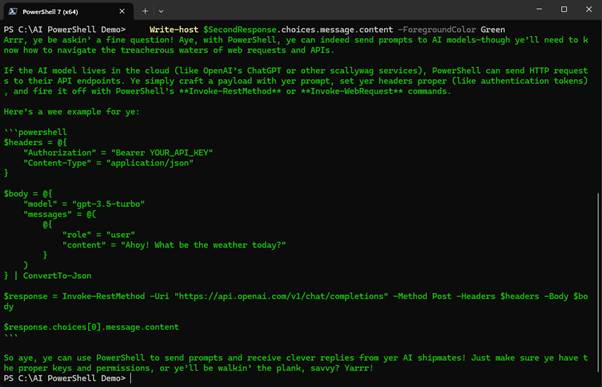
Figure 6: Multi-turn conversations through PowerShell
Managing the history of a conversation is important when working directly with AI models to get the right results. Long running conversations will also run into token limitations from the service (Each model comes with its own set token limitations) and drive additional costs so it’s important to understand when to use conversation history, production AI tools will often summarise and truncate conversation history to reduce token usage. If tenants interact with models through the Foundry Agent Service history is managed natively.
Bringing it together
Rather than rewriting the prompt logic each time, the best way to reuse the code to send a prompt is to package it into a function as shown below:
function Invoke-AIMessage {
param (
[Parameter(Mandatory = $false)]
[string]$SystemMessage,
[Parameter(Mandatory = $true)]
[string]$Message,
[Parameter(Mandatory = $true)]
[string]$ApiKey,
[Parameter(Mandatory = $true)]
[string]$Endpoint
)
##Add API Key to Authentication Header
$Headers = @{
“Content-Type” = “application/json”
“api-key” = $ApiKey
}
##Create a JSON Body for the Request
$Body = @{
“messages” = @(
@{
“role” = “system”
“content” = $SystemMessage
}
@{
“role” = “user”
“content” = $Message
}
)
“max_tokens” = 1000
“temperature” = 0.7
} | ConvertTo-Json -Depth 10
##Make the REST API Call
$Response = Invoke-RestMethod -Uri $Endpoint -Method Post -Headers $Headers -Body $Body
Return $Response.choices.message.content
}
This function uses the same logic as the previous examples and supports the following parameters:
- Message: This parameter is required and defines the message to send to the AI model.
- APIKey: This parameter is required and defines the API Key for the Foundry project.
- Endpoint: This parameter is required and defines the Endpoint URI for the model instance.
- SystemMessage: This parameter is optional and defines a system message to pass in the request.
Using the function, querying the model becomes a simple cmdlet as shown in Figure 7.

Figure 7: Using a function to make querying easier
With the function in place, passing data to analyse through PowerShell shows how a tenant administrator (or any other user like help desk personnel) can integrate AI flow into their daily tasks. For example, summarising the configuration of an Exchange Online mailbox as shown in Figure 8.
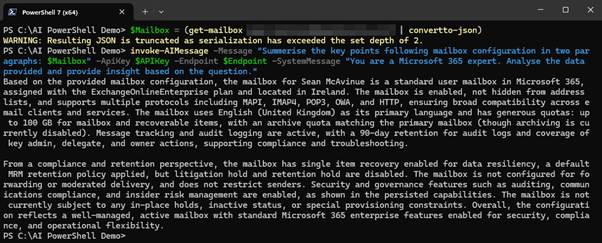
Figure 8: Passing data from other cmdlets into the function
Passing the information to the AI model using JSON format ensures a structured input and helps to improve the reliability of the output. In Figure 9, we pass a list of usage locations for the tenant to the model and ask it to summarise the detail.
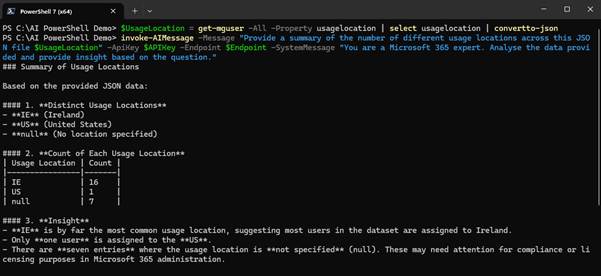
Figure 9: Passing Usage Locations for summarisation
Conclusion
Microsoft Foundry is built with developers in mind, but there is nothing stopping tenant administrators from leveraging Foundry models through PowerShell. It’s important to be aware that when using AI models in this way, there is a cost associated with each request based on token usage and which model you select.
The examples and tests used when creating this article consumed approximately 50,000 tokens which only equates to about $0.10. Even so, costs can add up quite quickly if left unchecked, particularly if added to long running or looped processes. It’s important to consider costs when planning solutions but with that said, there is a lot of value for tenant administrators to adapt AI within their day-to-day roles.
