
With the proliferation of Microsoft 365 as the collaboration platform of choice in the enterprise space, it’s rare to find a large organization that hasn’t undergone some form of tenant to tenant migration. This can be a result of mergers, acquisitions or divestitures. Microsoft have not previously had any native tooling to facilitate this and third parties such as BitTitan and Quest have built up some really slick products to help organizations manage this technical transition.
This has slowly begun to change with the Microsoft acquisition of Mover in 2019 to help facilitate file migrations to Office 365. Microsoft seem to be making more native migration functionality available as part of the service. The most mature of the migration tools is also the oldest, the native Exchange on-premises migration tools using Exchange MRS functionality. This has also been improved recently with the availability of the Exchange modern hybrid configuration, removing the need to open up on-premises endpoints to the cloud by leveraging application proxy technology.
This Exchange functionality has now been extended to cross-tenant migrations allowing the migration of mailboxes from one tenancy to another using the familiar Exchange migration tools.
Prepare for Migration
First we need to set up our environments for the tenant to tenant migration. To understand the configuration, Microsoft have published the below diagram which explains the process in detail:
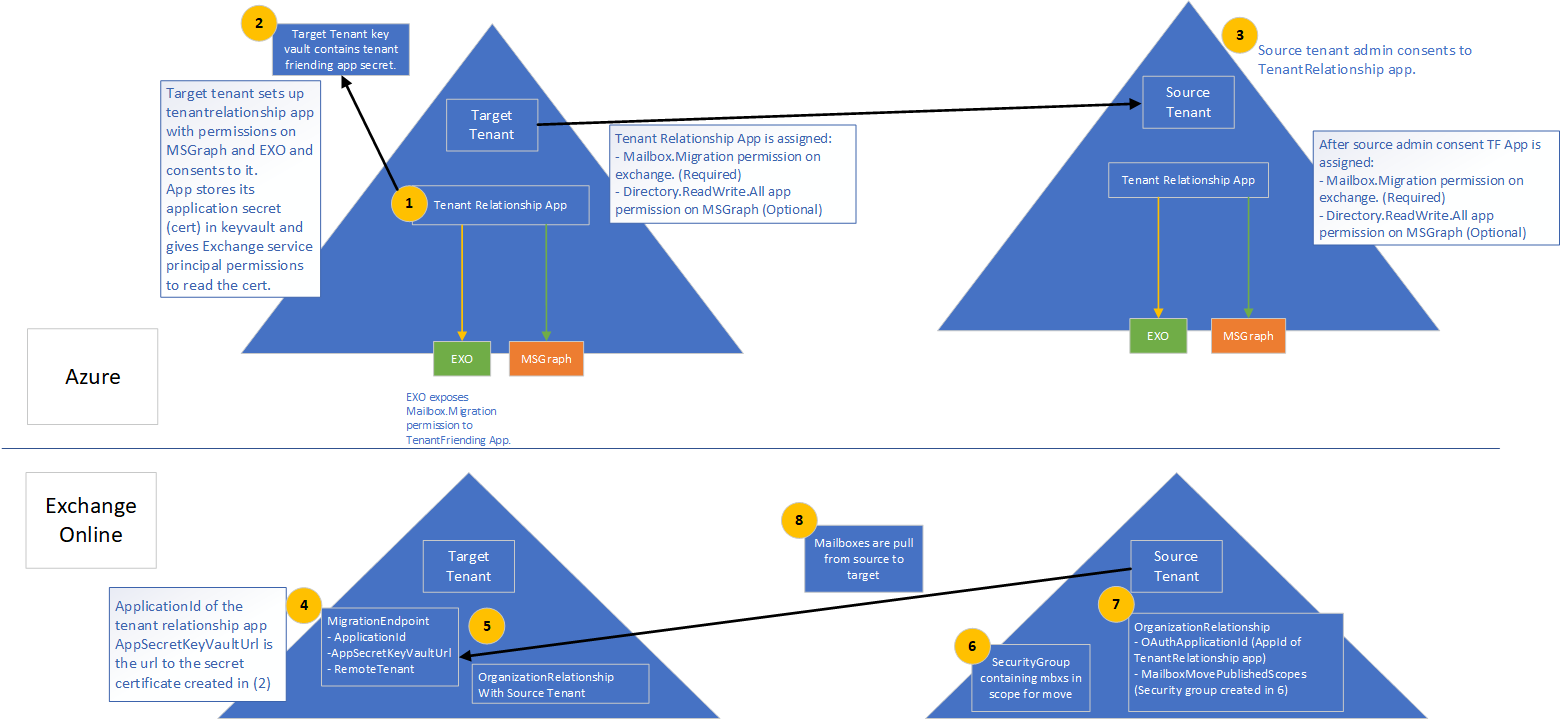
So from this diagram, we can see the high level componants of the migration infrastructure are:
- A Tenant relationship application registration in the destination tenancy with the below API permissions
- Exchange: Mailbox.Migration
- Graph: Directory.ReadWrite.All
- Azure KeyVault stores the app secret details for this app
- The Source Tenant grants consent to the tenant relationship app created in the destination tenant
- A two way Organization Relationship
- A mail enabled security group in the source tenant to scope mailboxes for migration
Luckily, Microsoft have automated a lot of this setup with PowerShell scripts located on GitHub:
Source – SetupCrossTenantRelationshipForResourceTenant.ps1
Target – SetupCrossTenantRelationshipForTargetTenant.ps1
Prepare the Target Tenant
To prepare the target tenant, download the SetupCrossTenantRelationshipForTargetTenant.ps1 script.
To run the setup script, ensure you have the ExchangeOnlineManagement, AzureAD (the Preview Module doesn’t seem to work) and AzureRM PowerShell modules installed, if you don’t, you can do that with the below commands:
Install-Module ExchangeOnlineManagement
Install-Module Az
Install-Module AzureAD
Once the modules are installed, connect to Exchange Online with:
Connect-ExchangeOnlineNow we can finally run the first script. The following paramaters are required to run:
- -ResourceTenantDomain The mail domain of the source tenant
- -ResourceTenantAdminEmail The email address for the admin account in the source tenant. Ensure this account has a valid mailbox.
- -TargetTenantDomain the mail domain of the target tenant
- -ResourceTenantId The source tenant Azure AD Directory ID
- -SubscriptionId The Subscription ID to create the KeyVault in
- -ResourceGroup A name for the KeyVault Resource Group
- -KeyVaultName A name for the KeyVault
- -CertificateName A name for the certificate
- -CertificateSubject A certificate subject name: “CN=admin_seanmc”
- -AzureAppPermissions The permissions to grant: Exchange, MSGraph
- -UseAppAndCertGeneratedForSendingInvitation
- -AzureResourceLocation The location for provisioning the KeyVault
.\SetupCrossTenantRelationshipForTargetTenant.ps1 -ResourceTenantDomain <Source Tenant mail domain> -ResourceTenantAdminEmail <Source Tenant Admin Account Email> -TargetTenantDomain <Target tenant domain> -ResourceTenantId <Source Tenant Directory ID> -SubscriptionId <Azure Subscription ID> -ResourceGroup "CrossTenantMoveRG" -KeyVaultName "adminseanmc-Cross-TenantMovesVault" -CertificateName "adminseanmc-cert" -CertificateSubject "CN=admin_seanmc" -AzureAppPermissions Exchange, MSGraph -UseAppAndCertGeneratedForSendingInvitation -AzureResourceLocation "North Europe"This script will prompt for destination tenant credentials twice during its run and then will pause, asking for you to grant consent to the new app registration. In Azure AD App Registrations, open the new app and grant consent to the API permissions.

When consent is granted, hit enter on the script to continue and set up the Organization relationship.
Finally, note down the Application ID that is saved to the $AppID variable in the PowerShell session. If you miss this you can get it from the Azure AD app registrations page also.
Prepare the Source Tenant
Now that the destination tenant is configured, we can move on to the source tenant. When running the previous script, we were asked for an admin email address in the source tenant. When we log into this account we will find a B2B invitation from the destination tenant admin. Open this mail and accept the invitation.


Next, accept the permission request from the application to allow it to pull mailbox data.

With the permissions in place, we now create a mail-enabled security group to manage our migration scope. All mailboxes to be migrated will be part of this group. To create a group you can run the below Exchange Online PowerShell Command in the source tenant.
New-DistributionGroup t2tmigrationscope -Type securityThen add any in-scope mailboxes to the group with the below command.
Add-DistributionGroupMember -Identity t2tmigrationscope -Member <Mailbox to add>With our scope in place, we can now prepare and run the source tenant preparation script. To run the script, we need the following parameters:
- SourceMailboxMovePublishedScopes – This is our mail enabled security group created previously
- ResourceTenantDomain – This is our source tenant mail domain
- TargetTenantDomain – This is our target tenant mail domain
- ApplicationId – This is the Application ID we noted during the target configuration
- TargetTenantId – Azure AD Directory ID of the target tenant
With all of this information to hand, run the script SetupCrossTenantRelationshipForResourceTenant.ps1 as below:
SetupCrossTenantRelationshipForResourceTenant.ps1 -SourceMailboxMovePublishedScopes <security group identity> -ResourceTenantDomain <source tenant mail domain> -TargetTenantDomain <target tenant domain> -ApplicationId s<AppID> -TargetTenantId <source tenant directory ID>When this is complete we have all permissions in place and our Organization Relationship is in place so we can move on to preparing our users.
Prepare Destination User Accounts
To migrate a mailbox cross-tenant, we need to have a valid mail user in the destination tenant. There are several attributes we need to ensure align between the two to make sure the migration is successful. To gather the required data, run the below command against the mailbox(s) you wish to move in the source tenant.
get-mailbox <mailbox> |select exchangeguid,archiveguid,legacyexchangedn,userprincipalname,primarysmtpaddress This will give an output similar to the below.

Use this output to create a new mail user in the destination tenant. This setup can vary depending on if your destination environment is synchronized with Active Directory but for a non-synchronized environment, the below commands in Exchange Online PowerShell should create the user with the appropriate attributes.
New-MailUser <alias> -ExternalEmailAddress <source tenant email> -PrimarySmtpAddress <destination tenant email> -MicrosoftOnlineServicesID <destination tenant username>

PS C:> Set-MailUser debrab -ExchangeGuid <exchangeGUID from source> -ArchiveGuid <archiveGUID from source> -EmailAddresses @{Add="x500:<LegacyExchangeDN from Source>"} 

Finally, once these attributes are present, give the new user(s) a valid Exchange Online license. If everything was done correctly, no Exchange Online mailbox will be provisioned when the user is licensed.
With the account(s) created, finally all the prep work is done so we can now move on to testing migrations.
Start Cross-Tenant Migration Batch
Before starting the migration, we can create a comma delimited CSV file so we can import our batch. the CSV only needs a single column named ‘EmailAddress’ and should specify each target tenant email address for our user batch.
To create a new cross tenant migration request, we navigate to the new Exchange Admin Center at https://admin.exchange.microsoft.com from the destination tenant and open up the “Migration” section. From here we create a new migration batch and select “Migration to exchange Online”

Next we select the migration type “Cross tenant migration”

We can see the prerequisites we’ve worked through listed on the next page, since we’ve done all the work already, we can hit next.

On the next page, we select the migration endpoint our script configured and hit next.

Next, upload the CSV file we prepared earlier.

Finalize the standard move configuration settings.

Configure any scheduling we need to perform and finally hit “save” to kick off the migration batch.

When the batch is created, we’ll see the success page below and then we can check the status throughout via the migration batches or by PowerShell.


After a little while the migration is synced. We can complete it as we would with any other migration batch.

We have now successfully migrated from one Exchange Online Tenant to another with native tools. When this functionality goes GA, it could really change the way a lot of Organizations approach multi-tenant configurations and migrations. For more information on Tenant to Tenant migrations, see the official Microsoft documentation here: Cross-tenant mailbox migration – Microsoft 365 Enterprise | Microsoft Docs

Pingback: A Look at Office 365 Tenant to Tenant Migration Options – Sean McAvinue
All though this is a much better write up of the process compared to Microsoft, I am still getting Error after Error, And yet I have followed every single process to the letter.. Why hasn’t Microsoft develop an easier method then this
LikeLike
Hi Nigel, let me know the issue you are seeing and I can try to help. It is also a preview feature, in the future I’m sure there will be an easier method released.
LikeLike
The latest version of the script always asks “Supply values for the following parameters:
(Type !? for Help.)
AzureResourceLocation:”
LikeLike
Interesting, sounds like it’s looking for an azure region. Ill download the latest copy and try that myself and update.
LikeLiked by 1 person
Seemed that way to me, but I’m stuck there now. I have the impression that I’m doing something stupidly wrong, but I can’t figure out what… 😥
LikeLike
Ok, I downloaded the latest copy and you’re right, it’s different! For one, it seems to have changed from using the AzureRM Module to the “Az” Module for provisioning.
Secondly, and more to your issue, it now requires the AzureResourceLocation parameter. I got it working in my test by making sure to install the Az module (Install-module az -allowclobber) and adding a location to the end. For me it was:
-AzureResourceLocation “North Europe”
added at the end of the command but you can use whatever location you prefer such as:
-AzureResourceLocation “West US”
-AzureResourceLocation “West Europe”
That should get you up and running 🙂
LikeLike
I’ve also updated this in the post!
LikeLike
It’s strange that it didn’t work for me, even though I tried different syntaxes for the location and added the “Az” Module. How did you find the right syntax for the location definition?
LikeLike
I used “north Europe” for it as that’s my local region
LikeLike
Hi,
when I start a batch I get the error that the target mailbox cannot be found:
Migration rate:
Error: MigrationRecipientNotFoundException: A recipient wasn’t found for “xxx.xxx@xxx.co.id” on the target. Create a recipient of the appropriate type for this migration on the target and try again.
I did create the MailUser, set all the appropriate values and assigned a license (which is “stuck” in the we are provisioning a mailbox state).
So everything seems OK. Maybe my migration.csv file is wrong. can you share an example file here?
thanks a lot!
best regards, Martin
LikeLike
Hi Martin,
The CSV would not let you upload if it was incorrect however one thing to check would be that the user xxx.xxx@xxx.co.id exists as a mail user in the destination. You can verify by running “get-mailuser xxx.xxx@xxx.co.id” from Exchange Online Management Shell on the destination tenant.
LikeLike
Hi Sean,
thanks for this Article!
I have scenario with source tenant with cloud-only identities and target tenant synchronized from Active Directory.
I was able to correctly prepare both tenants, but now think about how to prepare target objects in onpremise to sync them by AAD connect.
Should I use new-mailuser or new-remotemailbox? If new-mailuser, it won´t be correct “hybrid” object, if new-remotemailbox maybe it will provision mailbox instead of mailuser prepared for migration?
Thanks Jan
LikeLike
Hey Jan,
New-mailuser is what you want as new-remotemailbox will provision a mailbox in Office 365. it’s probably easier if you migrate into cloud only accounts and then use soft/hard matching after the migration to link with AD.
LikeLike
This is a such a better write up of the process compared to Microsoft. I plan to carry out the migration tomorrow. Luckily i bumped in your Blog. Will be following this guide.
Hats off
LikeLike
How to sync users to target as mailusers when local ad is there in enviroment?
LikeLiked by 1 person
This can be done via local Exchange but an easier method would be to migrate into cloud only identities and then soft match to AD post migration
LikeLike
Hi Sean!
Thanks for the great article!
My question is when is the best time to change the MX records to point the new tenant? Before, during or after the migration?
LikeLike
MX records should be updated during the domain move but if you are going tenant to tenant then it most likely will not be required as they should point at EOL already.
LikeLike
When I execute the command to change the attributes in the new tenant from powershell online I get the error:
A parameter cannot be found that matches parameter name ‘ExchangeGuid’.
LikeLike
Your CSV file explanation helped immensely.
I am, however, receiving this error: InboundMailboxMoveCapabilityMissingException:Your organization does not authorize ‘pull’ or Inbound moves from the remote organization. Contact your administrator to confirm organization relationships are configured correctly.
LikeLike
I didn’t see this but I checked online and looks like it may be down to the organization relationship config. A comment on this page seems to have the same issue and explain resolution:
https://techcommunity.microsoft.com/t5/microsoft-365-blog/cross-tenant-mailbox-migration-in-now-in-public-preview/bc-p/1703540/highlight/true
LikeLike
I see that – thanks Sean!
The migration fails with: “Your organization does not authorize ‘pull’ or Inbound moves from the remote organization. Contact your administrator to confirm organization relationships are configured correctly.”
After digging I found that I have set the wrong ResourceTenantId when running SetupCrossTenantRelationshipForTargetTenant.ps1.
This resulted in wrong tenant id in the Organization relationship DomainNames property.
Changed it with
Set-OrganizationRelationship -Identity [RelationshipId] -DomainNames [CorrectResourceTenantID]
Works! 🙂
-Ernst ________________________________
LikeLike
I have users ready in my target tenant, I just need to migrate the mail items in. Is this not the process I would use? If the csv file only has one column with the target mailboxes, how does the migration know the source mailboxes it needs to pull from? Like a Gmail migration, it has 2 columns a source and destination…..
LikeLike
Hi Derek,
If you already have mailboxes in the target then you would need a third party migration tool to facilitate data transfer. This process only works for migrating entire mailboxes between tenants.
LikeLike
hey folks. im having an issue where when I run the migration Batch, i get this error:
Error: NotAcceptedDomainException: You can’t use the domain because it’s not an accepted domain for your organization.
Anyone familiar with this?
LikeLike
It sounds like the target address domain is not accepted in the tenant
LikeLike