
This post is part of the overall MS-700 Exam Study Guide. Links to each topic as they are posted can be found here.
In this section I will go through the following topics relating to security and compliance settings for Microsoft Teams.
- Plan Data Loss Prevention (DLP) policies
- Plan for conditional access and MFA for Microsoft Teams
- Plan information barrier policies
This post rounds out the Security and Compliance settings topic and looks at some features that can really add value to Microsoft Teams from a governance and compliance perspective. As with many of the features we’ve looked at so far, these topics don’t just relate to Teams and have benefits to the wider platform however in this post, I will be specifically looking at the Teams aspect.
Plan Data Loss Prevention (DLP) policies
Data Loss Prevention (DLP) has been a cornerstone of Microsoft 365 compliance for a long time. It specifically looks at data as it leaves the organization and allows admins to build out policies to protect against data leakage. For the basics of configuring DLP policies in Microsoft 365 check out this post.
When we talk about DLP specifically for Microsoft Teams, there are two areas where we have data potentially leaving the organization, Teams chat and channel messages and file sharing (from SharePoint). Let’s look at each of them separately.
Teams chat and channel messages
DLP for Teams chat and channel messages protects data that is sent to external users and guests in messages by detecting predefined types of information within the messages and blocking the entire message based on the policy applied.
As an example, let’s look at the following requirement:
“No messages containing credit card data is permitted to leave the organization via Teams chat or channel messages”
To meet this requirement we can set up a new DLP policy targeting all users for Teams chat and channel messages as shown in Figure 1. This can be filtered by changing the included accounts or adding exclusions to allow more granular control. There are templates available to help you get started quickly but I’ll user a custom policy so we can see all the available settings.

For this requirement, we don’t treat high or low volumes of information differently so we just need a single rule created. The rule in this case will specify when content is shared with people outside the organization and there is high confidence that it contains at least one credit card number as shown in Figure 2.

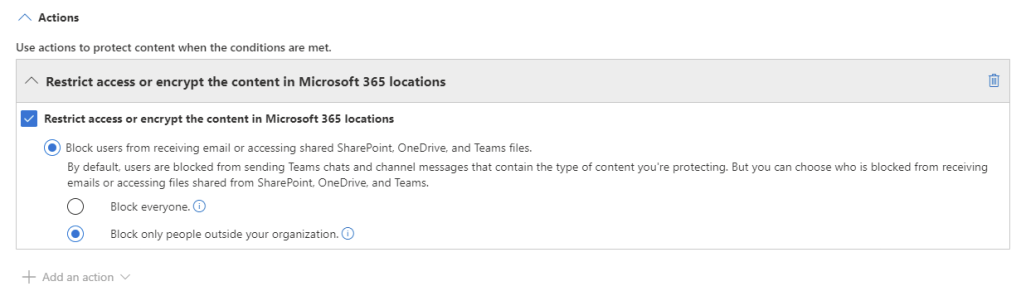
An action can be added to the rule to block the content for external users as shown in Figure 3.
Now when a user sends a message externally that is detected as having a credit card number, they will be informed that the message was blocked as shown in Figure 4.

On the recipient side, the user will also be informed the message was blocked by policy (Figure 5)

One thing to note is that the block occurs in close to real time but often not immediate so it’s important to set expectations. Similarly, the same attempt from a Teams channel with external members is blocked (Figure 6). Note that for Teams chat and channel messages, internal users are also blocked from seeing the message.

Teams file sharing
Teams file sharing is provided from SharePoint (and OneDrive for sharing outside a Team such as a chat) so to provide DLP to file sharing, we actually need to protect the back end SharePoint site. To get started, let’s update the requirement from the previous step a little:
“No content containing credit card data is permitted to leave the organization via Teams chat or channel messages”
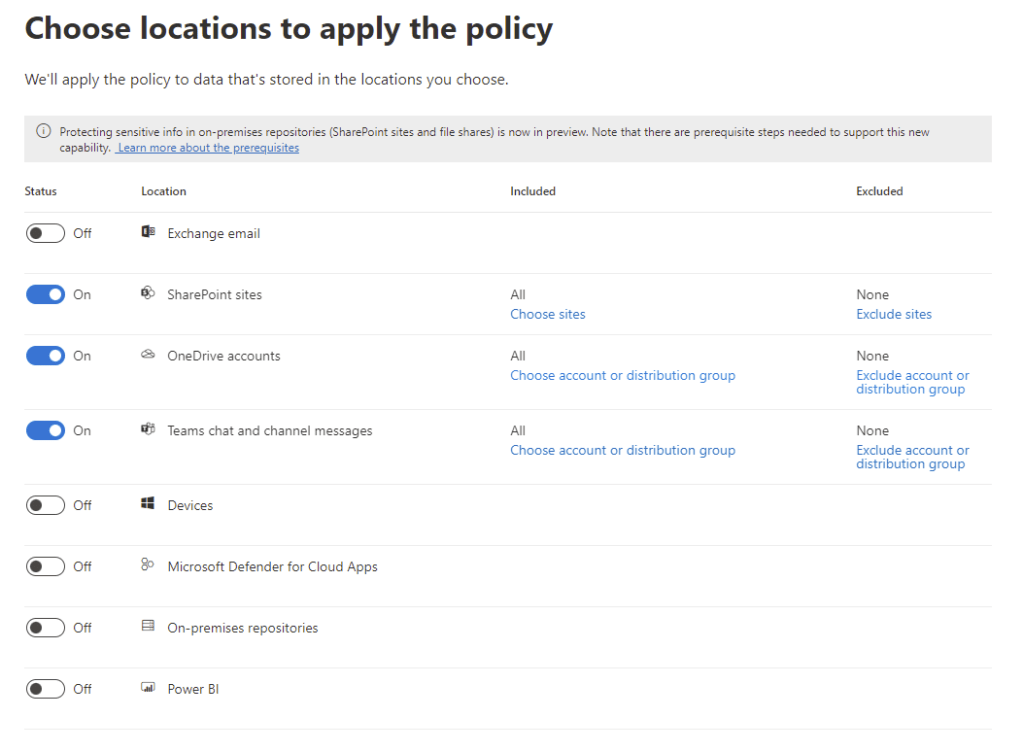
There is a subtle difference but our requirement now specifies all content, not just messages. To meet this requirement, we can either create a new policy or modify the one we just created. Well we know that SharePoint hosts Team based files and OneDrive hosts files shared from one to one or group chats so in Figure 7, I’ve modified the existing policy and added in all SharePoint and OneDrive locations. Note that we can still filter this with a different include scope or by adding exclusions.
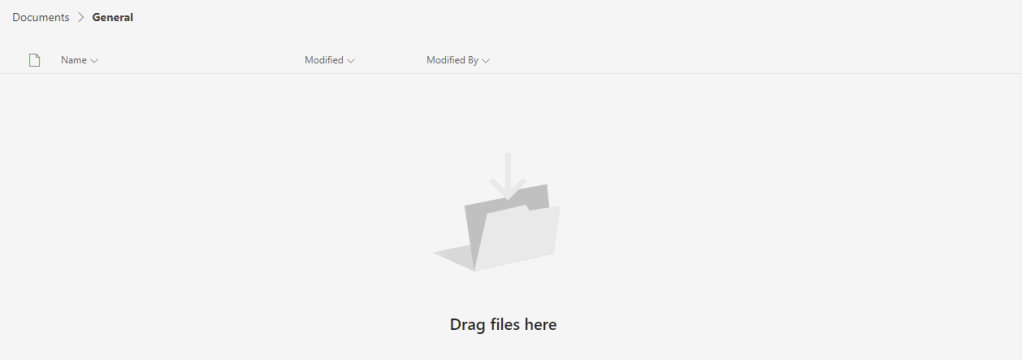
To test this, I’ve uploaded a document containing the company credit card details to a Team with external users. On the senders side, we see that the document has the sensitive information icon beside it in the files tab (Figure 8), letting us know this has triggered the policy.

If we check the recipient side, the file cannot be viewed (Figure 9).
As I mentioned above, DLP can apply to many different types of data egress and there are other configuration options for it such as alerting and notifications but they don’t specifically relate to Teams. For a full view of the scope of DLP, I recommend checking out my previous post here.
Plan for conditional access and MFA for Microsoft Teams
If you’ve been going through this exam guide this won’t be a surprise but Conditional Access applies to whole lot more than just Teams. Conditional Access allows administrators to specify rules to be processed when a user signs in to Azure AD / Office 365. For example you can specify that when users sign in from unmanaged devices, they are only allowed to access via browser and get proxied via Microsoft Defender for Cloud Apps session control. An extremely common use case for Conditional Access is to require MFA for user access to services. For a full run down of Conditional Access, check out this post but as before, let’s look at a specific Teams requirement example:
“Any user signing in to Microsoft Teams must be prompted for Conditional Access unless they are on an Intune Compliant device”
This is a very common requirement and very easy to configure. From the Azure AD portal, create a new Conditional Access policy targeted at all users (Extra points for having a naming convention for Conditional Access policies!). For the Cloud Apps section, choose Microsoft Teams as shown in Figure 10.

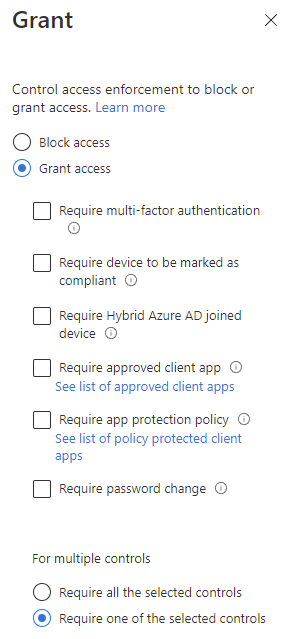
For the actions of the policy, under the “Grant” section, we want to select both Require multi-factor authentication and Require device to be marked as compliant. Because we only want MFA on non-compliant devices, choose the option to Require one of the selected controls as shown in Figure 11.
Now enabled the policy and hit save and the next time a user signs in to Teams from a non-compliant device, they will be prompted for MFA (Figure 12).

Obviously, Conditional Access and MFA should be looked at in a much wider scope, including all apps, not just Teams but for specific Teams requirements, they can be met by targeting the Teams cloud app.
One thing to note on Teams Conditional Access policies is that because Teams relies on several other Office 365 services, policies for Exchange Online, Stream, SharePoint and Skype should be aligned with Teams requirements to prevent unexpected behaviour. For example, blocking Exchange Online via Conditional Access will also block Teams, even if it’s not targeted. Best practice for generic policies such as MFA is to apply them to either All cloud apps or to the Office 365 app.
Plan information barrier policies
Information Barriers (IBs) are available as part of the E5 Compliance licensing add-on (and also bundled with other licensing SKUs – particularly for educational licensing). IBs are used to separate users within a single tenant, effectively preventing communication between two or more groups of users, for example – separating faculty and students within a school. This is achieved by grouping users into segments and then configuring IB policies to block communication.
Notes:
- Before configuring Information Barriers, it’s required that no Exchange Address Book Policies (ABPs) exist in the tenant. If you use ABPs, they need to be fully removed and deleted before configuring IBs
- Scoped Directory Search in Teams should be enabled to prevent users in Teams from searching for users in different IB segments
As with everything else in this topic, IBs don’t just apply to Teams and can prevent communication via SharePoint Online, OneDrive and Exchange (For Exchange they work similarly to Address Book Policies and block visibility but not email). Within Teams specifically, IBs can control:
- Searching for a user
- Adding a member to a team
- Starting a chat session with someone
- Starting a group chat
- Inviting someone to join a meeting
- Sharing a screen
- Placing a call
- Sharing a file with another user
- Access to file through sharing link
IBs are configured from the Microsoft 365 Compliance Portal and the first step, under “Information Barriers” -> “Segments” is to create some segments (or user groupings). In this example, let’s use the following common requirement:
“Students in the school cannot interact with any member of staff via Teams, SharePoint or OneDrive and vice versa. They should also have a separate address list to staff in the global address list”
To get started with IBs, they should be activated in your tenant by running the below commands in Azure AD PowerShell:
##Declare IB Processor App ID
$appId="bcf62038-e005-436d-b970-2a472f8c1982"
##Get IB Processor Service Principal
$sp=Get-AzureADServicePrincipal -Filter "appid eq '$($appid)'"
##If it doesn't exist
If($sp -eq $null) {
##Create the Service Principal
New-AzureADServicePrincipal -AppId $appId
}
##Prompt for Consent
Start-Process "https://login.microsoftonline.com/common/adminconsent?client_id=$appId"
When this runs you will be prompted to grant consent to the IB Processor to access the required aspects of your tenant (Figure 13).

In my environment, all student accounts have been given a department value of Student to help identify them. I have created a new segment for faculty, filtering the membership to users who do not have their department set to Student as shown in Figure 14.

Likewise, the second segment is named Students and has the opposite filter (Figure 15). This is a very simplistic segment configuration with only two groups but multiple segments can be created to meet your requirements.
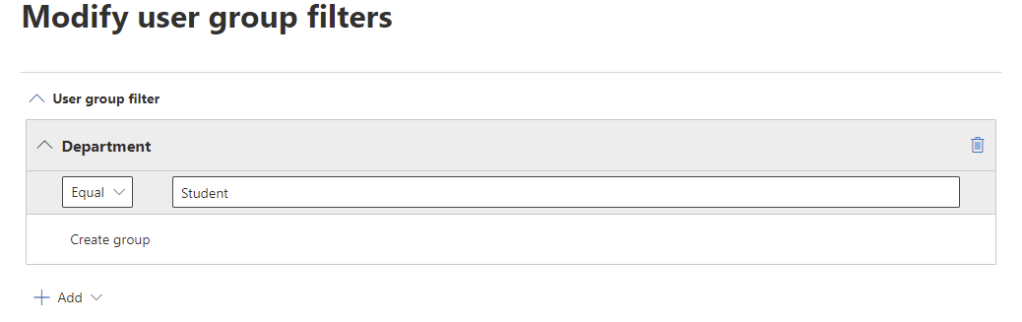
This can also be done via PowerShell using the Security and Compliance PowerShell module and running the commands below:
##Create Faculty Segment
New-OrganizationSegment -Name "Faculty" -UserGroupFilter "Department -ne 'Student'"
##Create Student Segment
New-OrganizationSegment -Name "Students" -UserGroupFilter "Department -eq 'Student'"
With the two segments ready, we can create a new policy and select the Students segment as shown in Figure 16.

Next, we specify that communication and collaboration is blocked (We could also create a policy to allow communication which would prevent communication to segments not specified) and add the Faculty segment as shown in Figure 17.

Next, enable and save the new policy to finish. This can also be done in PowerShell with the below command:
##Create Information Barrier Policy
New-InformationBarrierPolicy -Name "Separate Staff and Students" -AssignedSegment "Students" -SegmentsBlocked "Faculty" -State Active
For every policy created, a second policy needs to be configured to specify the reverse so we’ll also create the following policy:
##Create Information Barrier Policy
New-InformationBarrierPolicy -Name "Separate Students and Staff" -AssignedSegment "Faculty" -SegmentsBlocked "Students" -State Active
The the policy created and active, the last step is to apply it by opening the “Policy Application” page and clicking “Apply all policies” (Figure 18) or by running the below command:
##Apply IB policies
Start-InformationBarrierPoliciesApplication

Once the policies apply (This may take a few hours depending on the amount of users) users will be blocked from communicating and collaborating in Teams, SharePoint, OneDrive and Exchange Address Books. For example, attempting to add a user from the Students segment into a Team with users from the Faculty segment results in the message shown in Figure 19.

Summary
This post is the last in the series focusing on security and compliance features in Teams. Over the past three posts, I’ve gone through a lot of topics that can really add value to a Teams deployment. As I’ve mentioned throughout these topics, the security and compliance features covered span beyond just Teams and should be considered from a holistic tenant perspective. For more on these features from this perspective, I recommend checking out my MS-500 Study Guide, even if you’re not focusing on that exam. I’ve also linked some relevant articles I wrote previously below covering the topics in this post.

Pingback: Study Guide Series – Exam MS-700: Managing Microsoft Teams – Sean McAvinue