
This post is part of the overall MS-500 Exam Study Guide. Links to each topic as they are posted can be found here.
This post will cover the following exam topics listed under the “Manage Data Loss Prevention (DLP)” section:
- Plan a DLP solution
- Create and manage DLP policies
- Create and manage sensitive information types
Plan a DLP Solution
Data Loss Prevention (DLP) in Microsoft 365 is a fantastic tool to allow us to provide a secure but effective external collaboration experience to our end users, seamlessly protecting the data that is most important to the organization. DLP occurs when an item is shared externally via email or file sharing and depending on our configuration, can scan and detect business sensitive data within the content (based on various factors) and apply real time protection based on the rules we configure.
Data Loss Prevention is implemented via DLP Policies, these policies can be configured to protect:
- Exchange Email
- SharePoint Sharing
- Teams Sharing (As part of SharePoint)
- OneDrive Sharing
- Teams Chat and Channel Messages
Outside of Office 365 the following locations can also be protected using DLP:
- DLP can also be configured for Endpoints (although this functions slightly different, I have detailed this previously here.
- Non Microsoft apps via Microsoft Cloud App Security
To structure our Data Loss Prevention Policies, we should keep the following in mind:
- The locations we want to protect – From the above location list
- The content we want to protect – We need to define the data we consider sensitive
- The amount of data required to trigger our policy – Do we allow a small amount of sensitive data but block bulk sharing
- The actions we want to take when sensitive data is detected – Should we report or block
- The notification settings – If we should send notifications and alerts and to who
Create and Manage DLP Policies
To get started creating a DLP policy, open up the Microsoft 365 Compliance Center and navigate to “Solutions” -> “Data Loss Prevention”. On the Data Loss Prevention page, select “Create Policy”.

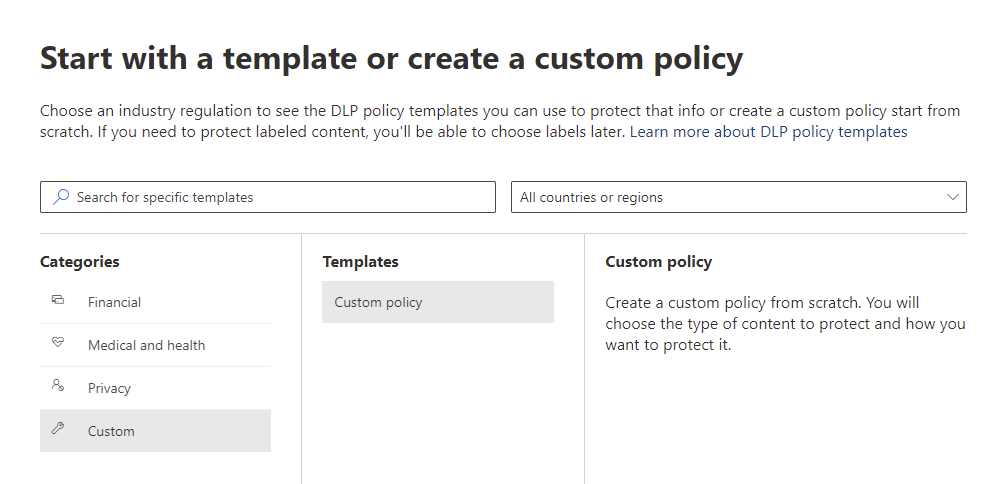
First we need to choose what content we want to protect. We can use the procreated Microsoft Policy Templates which contain set’s of sensitive information types based on the type of data we want to protect or we can use a custom policy to define this ourselves. For our policy, let’s select a custom policy.
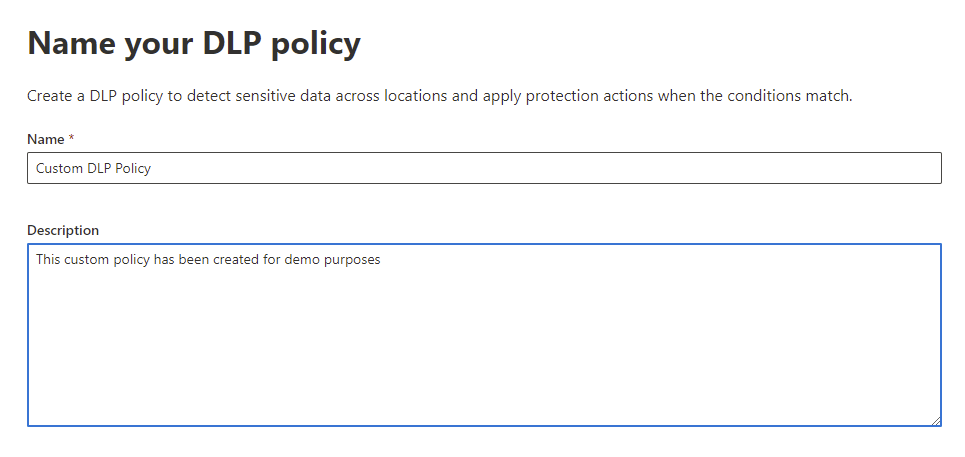
Give the policy a name and description and click next.
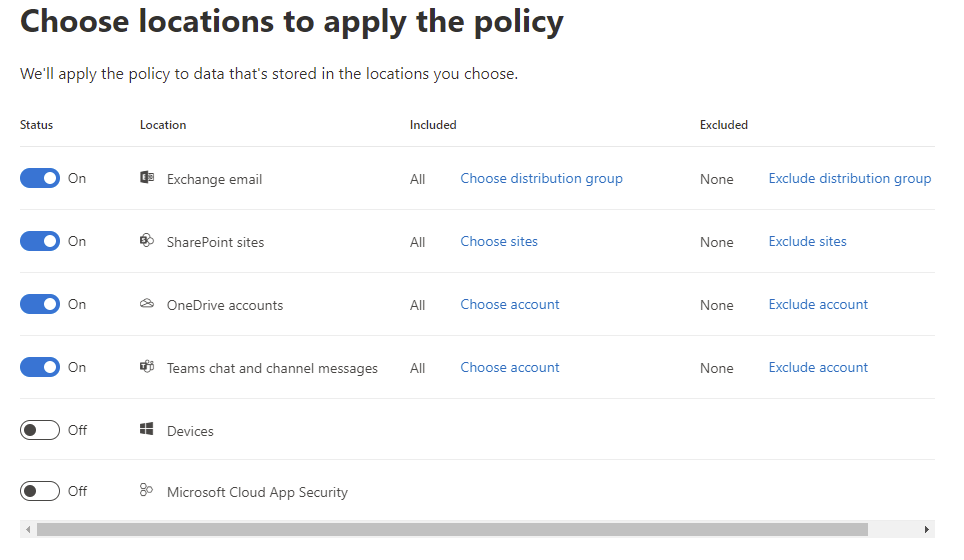
Next select the locations we want to protect with our policy, for this policy we will select:
- Exchange email
- SharePoint sites
- OneDrive accounts
- Teams chat and Channel messages
We can leave the default values to include all sites, users, accounts or Teams. Here we could target the policy or exclude certain objects.
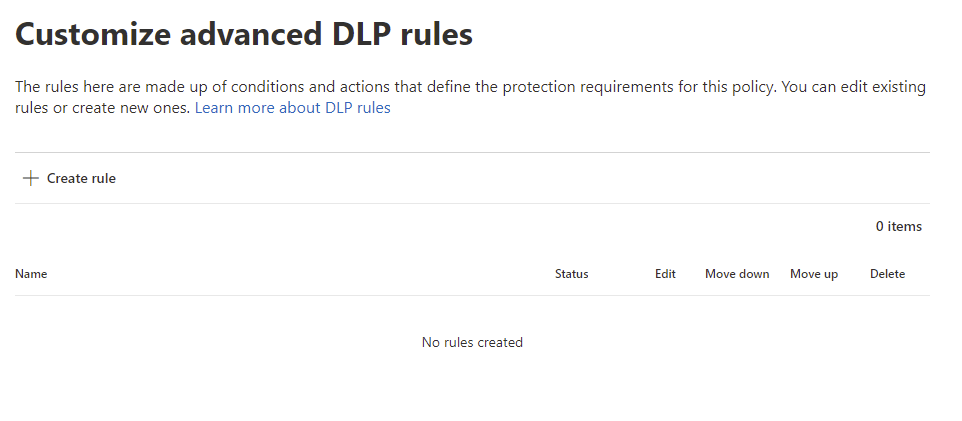
Next we can choose to review and customize the template we chose or to create a custom policy. As we didn’t use a template at the start, the only option available to us is to Create or customize advanced DLP rules.

Now we can build out our DLP rules. Click “Create Rule” to get started with the first rule.
When creating a DLP rule, we have a lot of options available to us which I have listed below:
- Name – Give the rule a name
- Description – Give the rule a description
- Conditions – Add the conditions which cause the policy to trigger, if multiple conditions are added, they must all be met. Conditions can be:
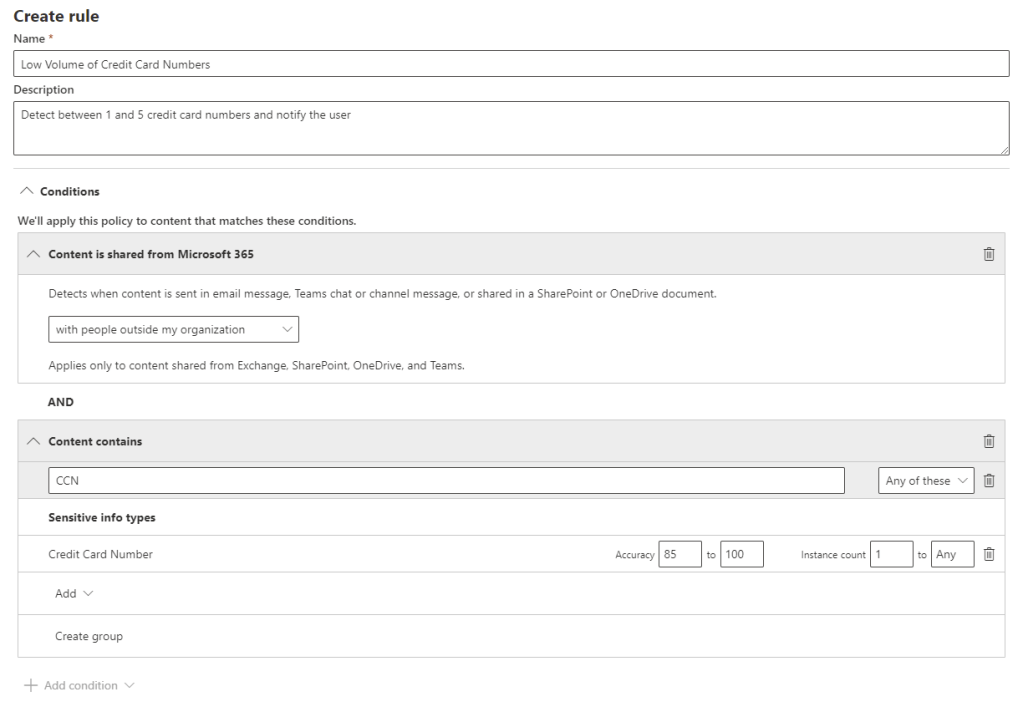
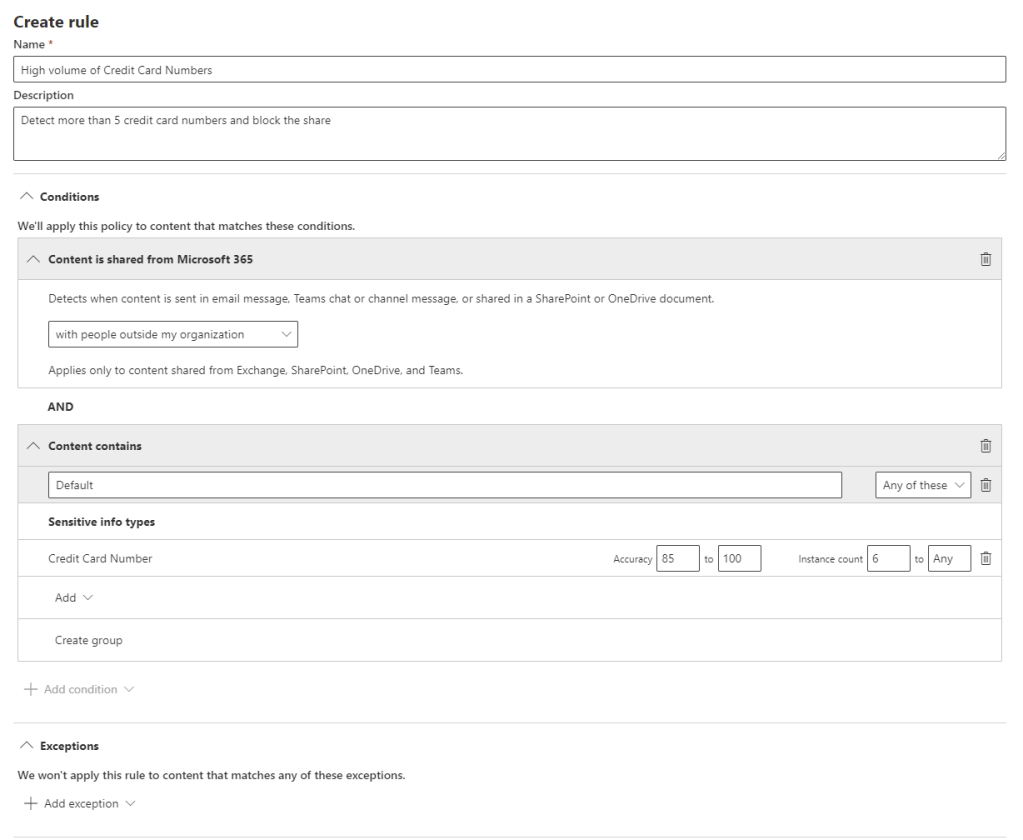
- Content Contains – When particular data is located in the content that is shared. Multiple sensitive information types can be specified using the group function here. We can also specify the accuracy range of each sensitive information type and the count of instances we want to trigger this rule for. For example, when we detect between one and five instances of a particular sensitive information type, we can take a warning action however when there are more than five, we can trigger a full block
- Content is shared from Microsoft 365 – When content is shared either internally or externally
- Exceptions – Add in any exceptions where we would like to bypass this rule, this is configured in the same manner as conditions
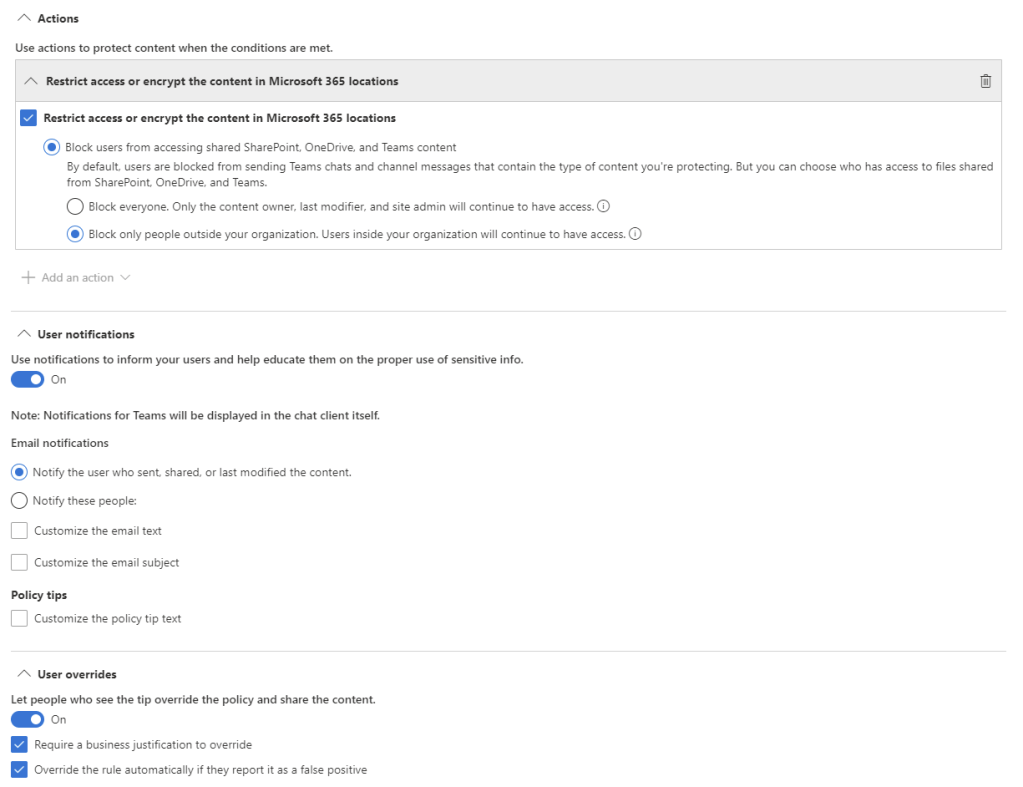
- Actions – What we would like to happen when the rule is triggered
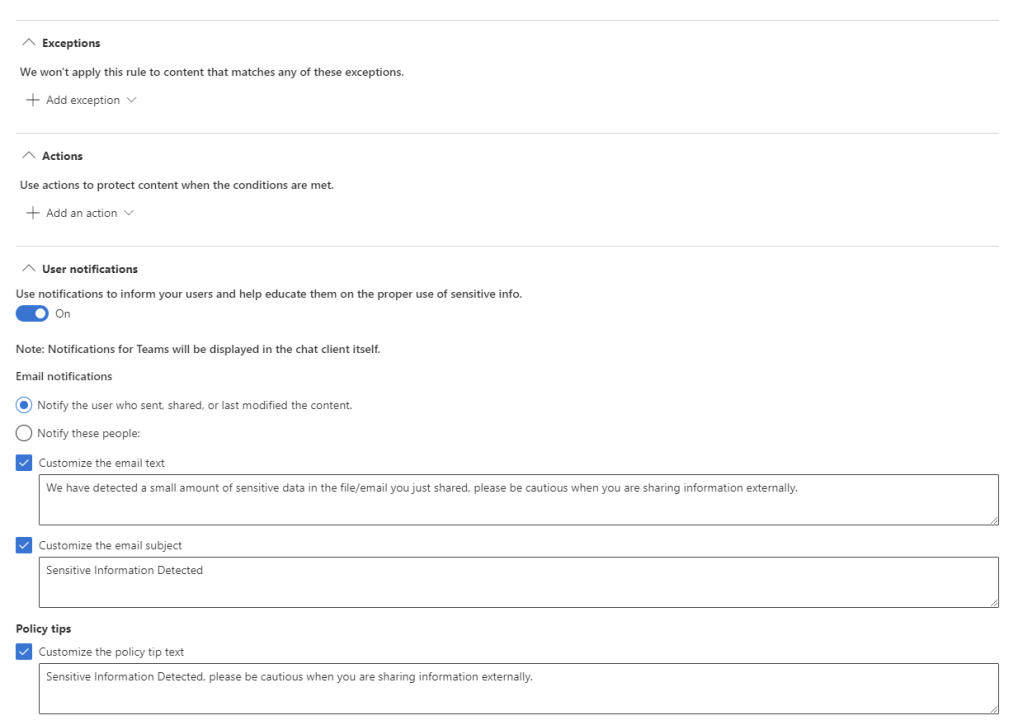
- User notifications – Configure what notifications the user will receive when this rule is triggered, we can configure the type and contents of the notifications
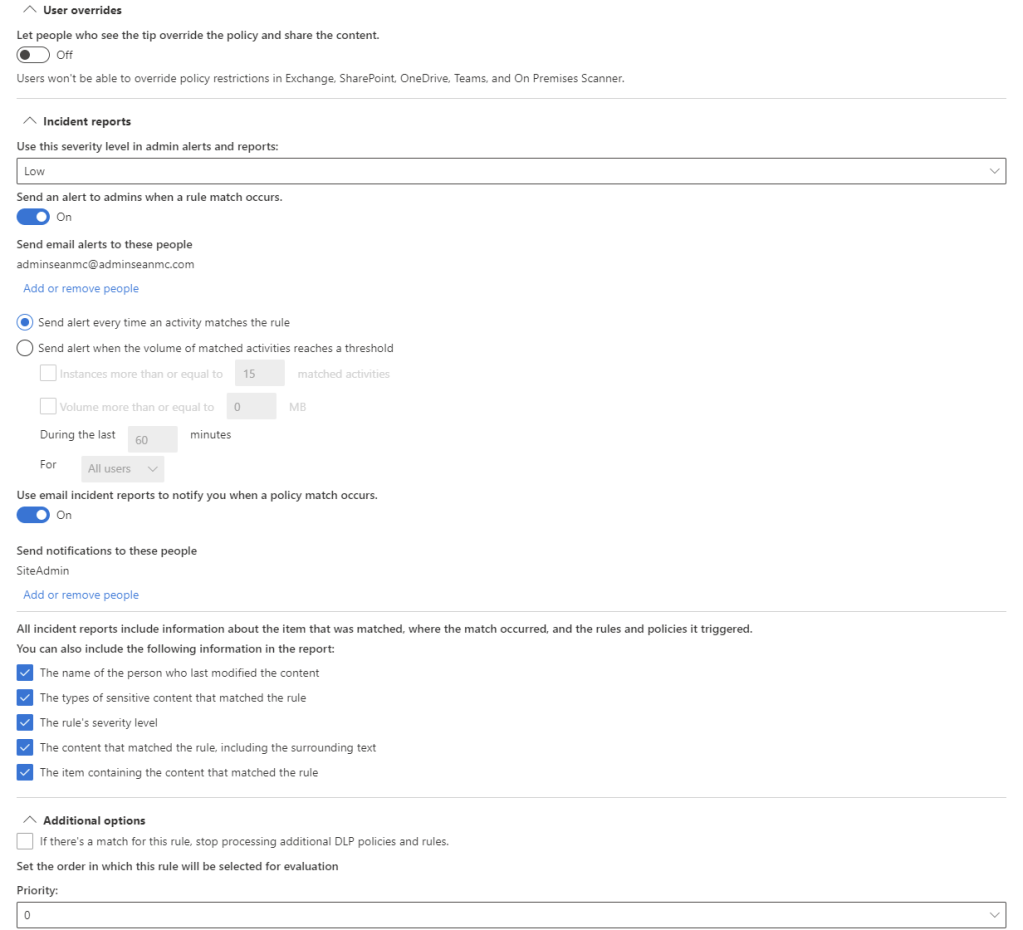
- User Overrides – Configure if the user can override the policy, the user can be given a policy tip to override or we can automatically override if the user flags it as a false positive. We can also choose to require a business justification if the user chooses to override the policy
- incident Reports – Configure the severity level and alert recipients when this rule is matched. We can also choose what information to include in the alerts/reports
- Additional Options – We can configure the option to stop processing more rules if this rule is matched and also set the priority of the rule
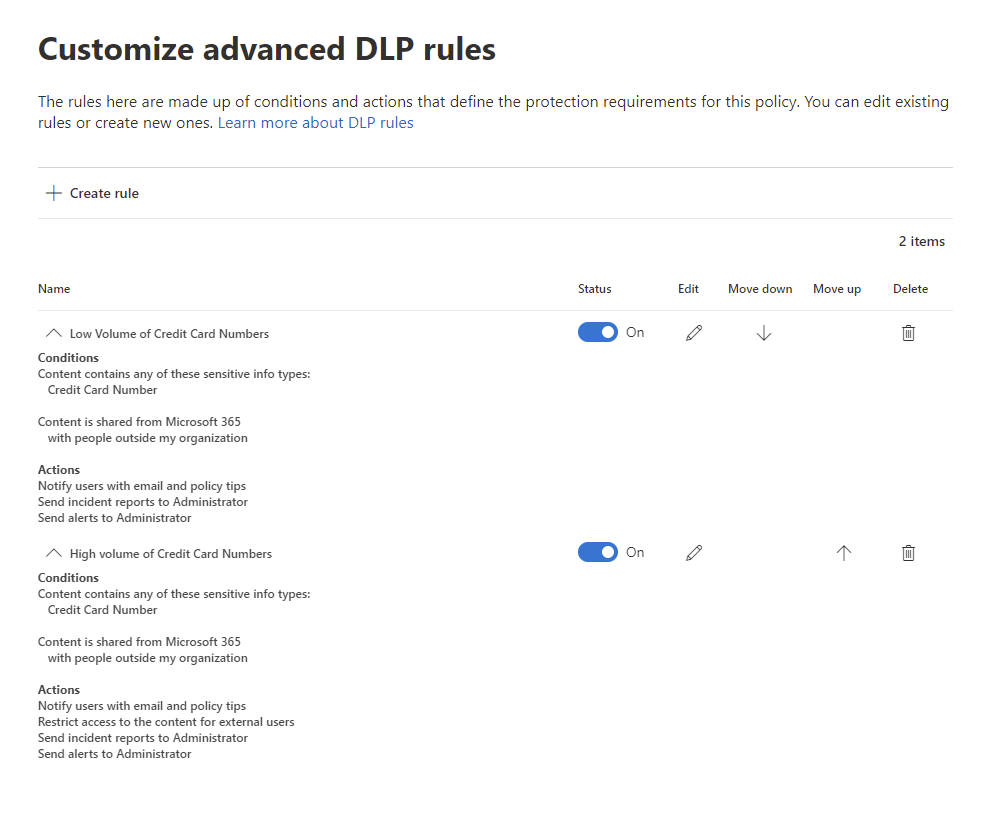
In the below examples, I have created two rules:
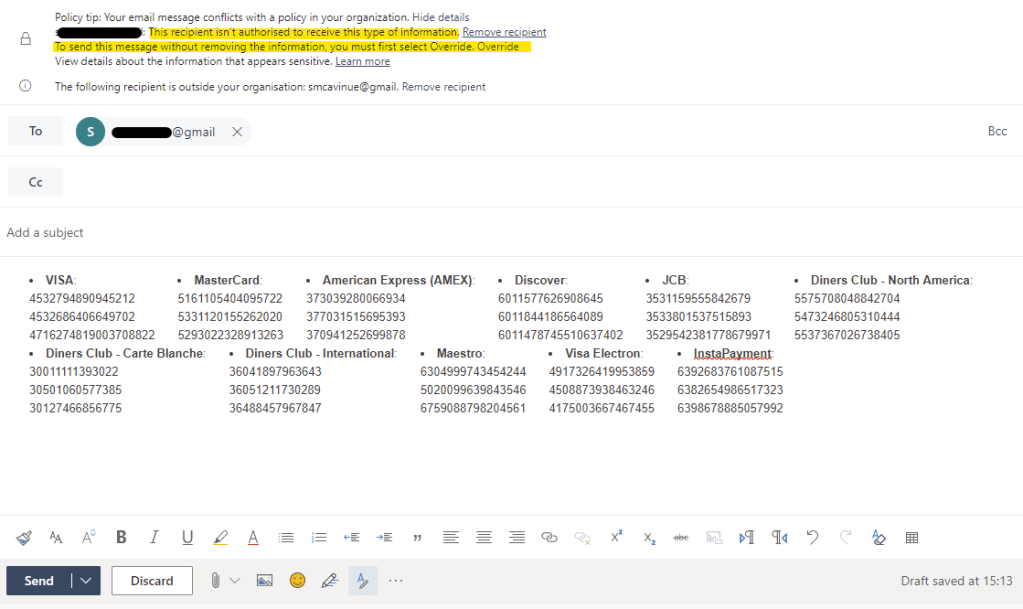
This rule will detect between one and five occurrences of Credit Card Numbers in a document, email or message, notify the user and also send an alert and report with low severity to the admin.
The second rule will detect between more than five occurrences of Credit Card Numbers in a document, email or message, notify the user, block the sharing attempt and report with low severity to the admin.

When the rules are configured, we can review them and click next to continue.
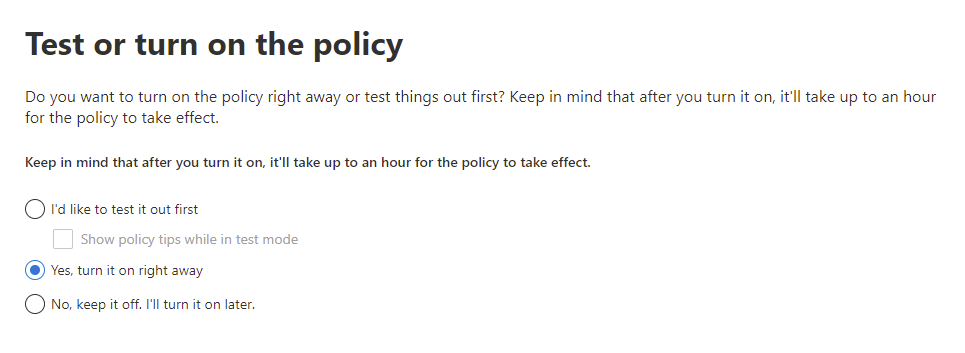
On the next page we can choose to turn on the policy immediately, run it in a test mode which will generate logs or turn it off for now. I very much recommend using the testing functionality in a production environment but to save time, we’ll just enable our policy for now.
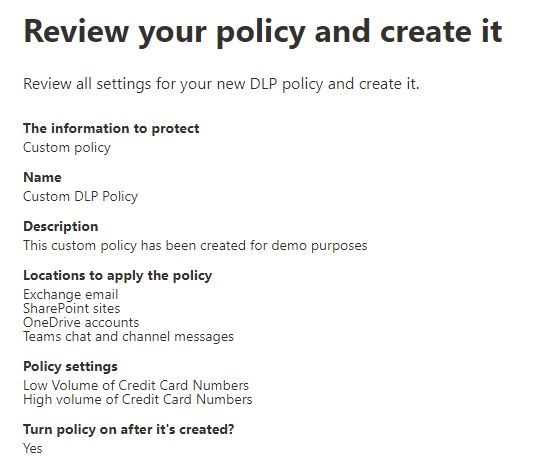
Finally, review the settings and hit “Submit” to create the policy.
Now when users attempt to send email or share documents externally, if there are credit card numbers detected in the content, the user will be met with out configured response.
Create and Manage Sensitive Information Types
When we created our policy above, we used the Sensitive Information Type for Credit Card Numbers to identify our content. We’ve also seen Sensitive Information Types when we looked at Sensitivity Labels. Microsoft have created a wide range of Sensitive Information Types (detailed here) that we can use out of the box, however there are usually business cases for protecting sensitive data that don’t fit with the predefined types available (for example, internal product codes). Luckily, for this scenario, we can build out our own information types to target this data.
To create our own Sensitive Information Type, open up the “Data Classification” section of the Compliance Center and select the “Sensitive Info Types” page.
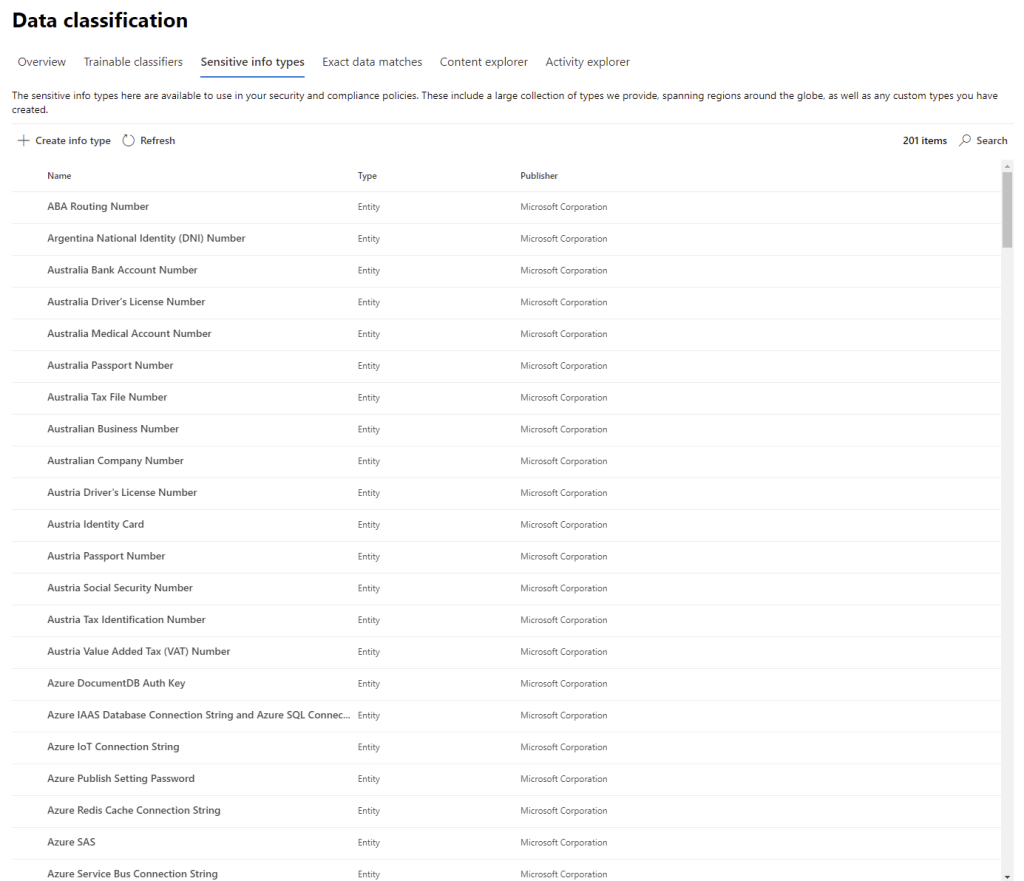
On this page we can see the built-in information types and even test data against them. To create a new entry, select the option to “Create info type” and fill out a name and description for the information type.

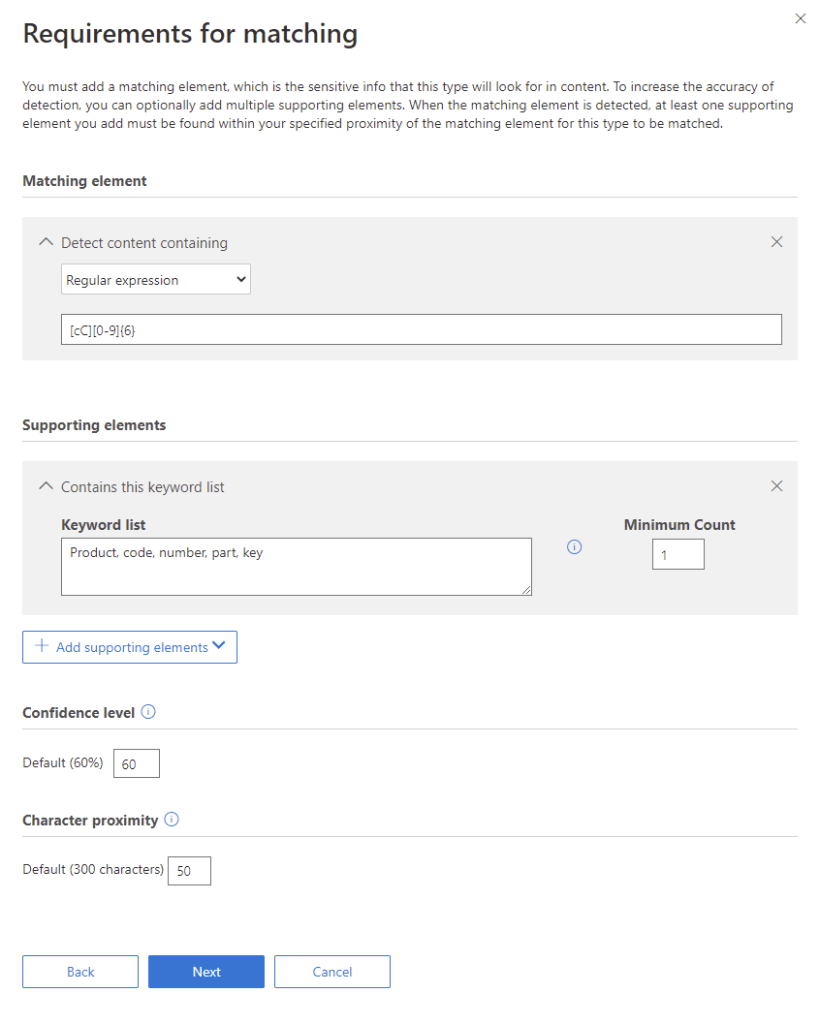
Next we need to define our rules for checking the content. We can use keywords, regular expressions and dictionary (which is just a large set of keywords) to define our initial checks. To add a level of confidence to the match, we can also add supporting elements. Supporting elements are not sensitive in themselves, however if they are located close to the suspected sensitive information, they will confirm a potential match.
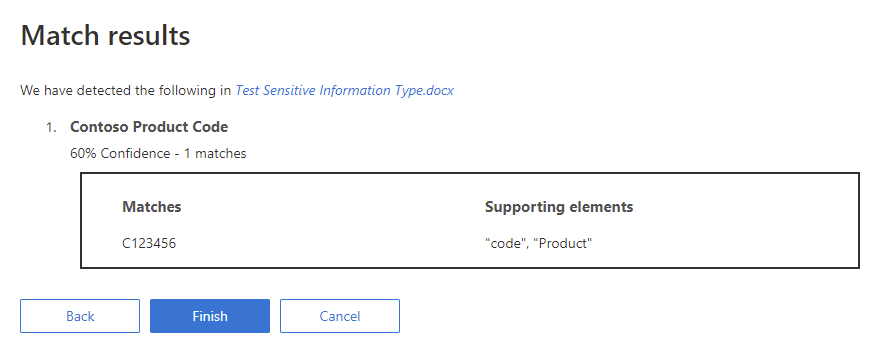
In the below example, we will take a company product code which is the letter “C” followed by six digits (for example “C123456”). We also have supporting elements from a keyword list that we expect within 50 characters of the information type.
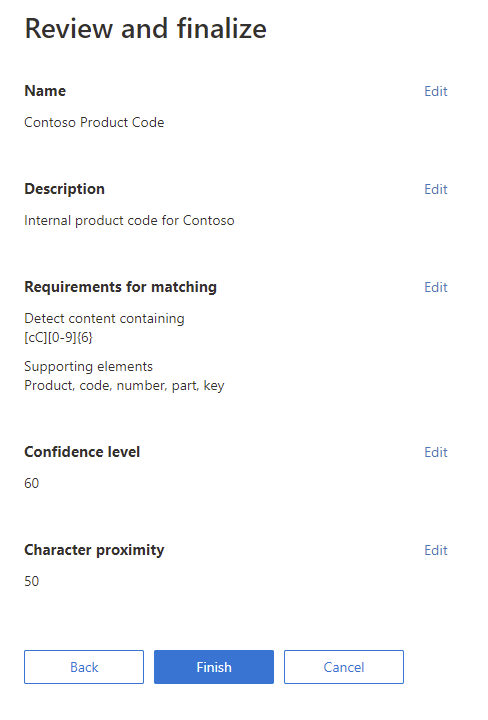
Next we can review the sensitive information type and save it.
Once save we will get the opportunity to test it, we can also test it at any stage by opening it from the main page.
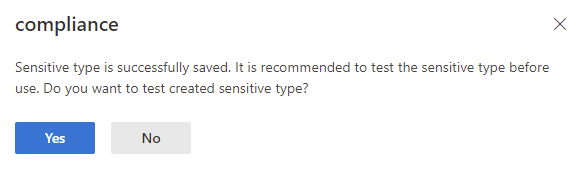
To test, we can upload a file and click test to check it for matches.

Once the test completes we can see our results displayed and the matching and supporting elements:
Once we are happy with our Sensitive Information Type, we can hit finish and start using it in our policies and labels.
Summary
Now that we’ve created our DLP policies, tested them out and even created our own custom sensitive information types, in the next post we will move on to monitoring and managing DLP alerts. For more information around what was covered here, check out the below links:
Protect Corporate Data With Microsoft Endpoint DLP – Sean McAvinue
Overview of data loss prevention – Microsoft 365 Compliance | Microsoft Docs
Data loss prevention and Microsoft Teams – Microsoft 365 Compliance | Microsoft Docs
Sensitive information type entity definitions – Microsoft 365 Compliance | Microsoft Docs

Pingback: Study Guide Series: Exam MS-500 – Manage Data Loss Prevention (DLP) (Part 2) – Sean McAvinue
Pingback: Study Guide Series – Exam MS-500: Microsoft 365 Security Administration – Sean McAvinue
Pingback: Study Guide Series: Exam MS-500 – Implement and Manage Microsoft Cloud App Security (Part 5) – Sean McAvinue
Pingback: Securing External Access to Files in Teams: The Two Most Important Basic Configurations – Sean McAvinue