
Implementing Privileged Access Management on Server 2016/2019: Part 3 – Deploying the MIM/PAM Server
It’s been a few weeks since the last post in this series due to an issue with my lab environment. In this final post, we will go through the last configuration pieces and test our PAM installation!
Prerequisites:
* Ensure that the priv domain is accessible from the corporate domain and resolves in DNS. You’ll remember in part 1 of this series we set up a DNS delegation for the priv domain in our corporate domain. Verify this is functional by performing a ping or NS lookup against the priv domain FQDN from the corp domain.
Set up management policy rules in MIM Portal
In the MIM Portal, open the “Management Policy Rules” Page, search and select the management policy rule “User management: Users can read attributes of their own” and uncheck the “Policy is disabled” checkbox, then click ‘OK’ and “Submit”


Next ensure Windows firewall is allowing TCP ports 5725, 5726, 8086 and 8090. In my lab I have disabled the Windows Firewall on the MIM server.
Set up a Sample Web Application for the MIM PAM REST API
First download the contents of the Identity Management samples files and unpack the contents of the folder “identity-management-samples-master\Privileged-Access-Management-Portal\src” to the directory “C:\Program Files\Microsoft Forefront Identity Manager\2010\Privileged Access Management Portal” of the MIM Server. You will need to create this directory as it doesn’t exist by default.
Now create a new web site for the sample portal, open an administrative PowerShell window and run the below command:
New-WebSite -Name “MIM Privileged Access Management Example Portal” -Port 8090 -PhysicalPath “C:\Program Files\Microsoft Forefront Identity Manager\2010\Privileged Access Management Portal\”
To allow the new web application to redirect users to the MIM PAM REST API, open the web.config file in the directory “C:\Program Files\Microsoft Forefront Identity Manager\2010\Privileged Access Management REST API” and add the below entries in the <system.webServer> section. This can be added just under the “<validation validateIntegratedModeConfiguration=”false” />” entry. Ensure to take a backup of the original file before editing.
<httpProtocol>
<customHeaders>
<add name=”Access-Control-Allow-Credentials” value=”true” />
<add name=”Access-Control-Allow-Headers” value=”content-type” />
<add name=”Access-Control-Allow-Origin” value=”http://<MIM Server Name>:8090″ />
</customHeaders>
</httpProtocol>
Next open the file “C:\Program Files\Microsoft Forefront Identity Manager\2010\Privileged Access Management Portal\js\utils.js.” and change the value for the PAM API URL “pamRespApiUrl” to ‘http://<PAMServerFQDN>:8086/api/pamresources’ (eg. http://mim.priv.lab.corp.net:8086/api/pamresources)
After replacing the values above, perform an IISReset.
Browsing to ‘http://<PAMServerFQDN>:8086/api/pamresources/pamroles/’ should now initiate a download of the pamroles.json file.
Establish a PAM Trust
Log on to the MIM server and run the following powershell commands to establish a new PAM trust from the server
$ca = get-credential
New-PAMTrust -SourceForest “lab.corp.net” -Credentials $ca
Log onto the PRIV Domain Controller and run the following commands from an administrative command prompt to modify the trust settings for the corporate domain admin account.
netdom trust lab.corp.net /domain:priv.lab.corp.net /enablesidhistory:yes /usero:lab\adminseanmc /passwordo: <password>
netdom trust lab.corp.net /domain:priv.lab.corp.net /quarantine:no /usero:lab\adminseanmc /passwordo: <password>
netdom trust lab.corp.net /domain:priv.lab.corp.net /enablepimtrust:yes /usero:lab\adminseanmc /passwordo:<password>
Prepare an Admin Workstation
On an admin workstation, mount the MIM2016 install files and copy the “Add-ins and extensions” directory to the local machine. Run the appropriate ‘Setup.exe’ to install the MIM PAM requester cmdlets.
The only software we need to install is the ‘PAM Client’

At the next page, enter the FQDN of the PAM server.

Click ‘Finish’ on the next window and when the installer completes, reboot the workstation.
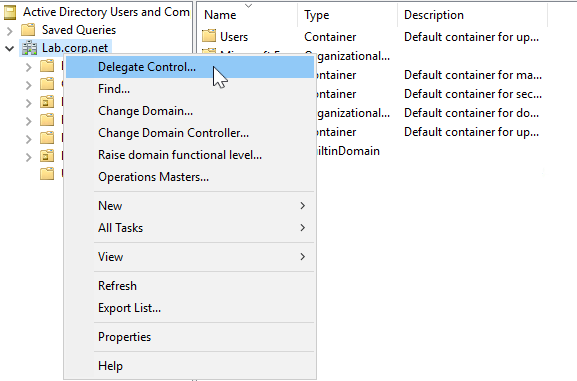
Delegate read access to the priv domain
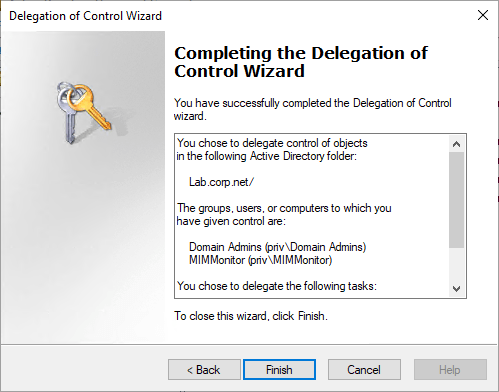
On the corp domain controller, open Active directory Users and Computers, right click the top level of the domain and select ‘Delegate Control…’
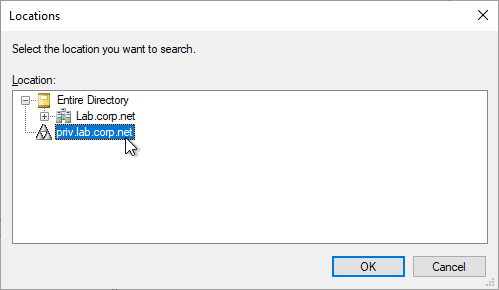
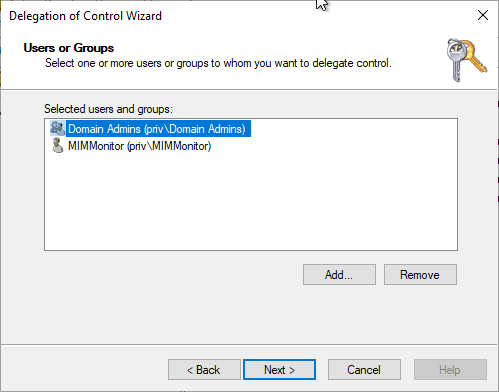
On the ‘Users or Groups’ page, select the ‘Locations’ option and change to the priv domain.

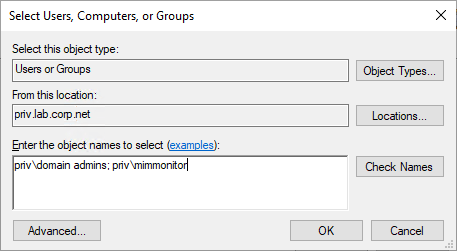
Add ‘priv\domain admins’ and ‘priv\mimmonitor’ to the object field then click ‘check Names’ and when prompted, enter the password for the priv domain administrator and click ‘OK’
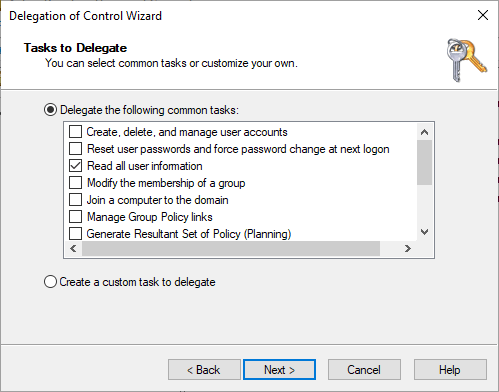
Click ‘Next’. On the ‘Tasks to Delegate page, select the option to delegate the ‘Read all user information’ task and click ‘next’ and ‘finish’ to complete the delegation
Next Create a security group for auditing purposes on the CORP domain with the below PowerShell commands (The group name should be the NetBIOS name of your corporate domain followed by ‘$$$’):
import-module activedirectory
New-ADGroup –name ‘LAB$$$’ –GroupCategory Security –GroupScope DomainLocal –SamAccountName ‘LAB$$$’
Start the PAM services if they are not already started
Use the below commands in an administrative command prompt on the MIM server to start the PAM services:
net start “PAM Component service”
net start “PAM Monitoring service”
Create privileged Accounts, Groups and Roles
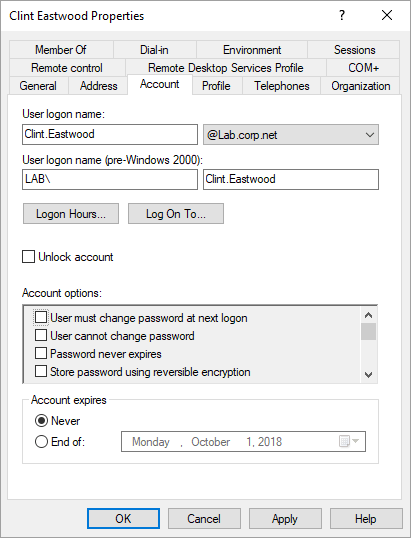
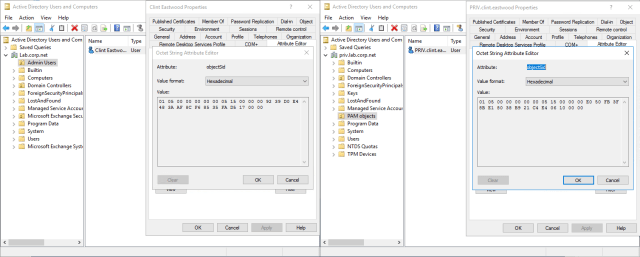
To create privileged accounts for our admins, lets first create an account in the corp domain that we will want to add to PAM. I’ve create the below user ‘LAB\Clint.Eastwood’ in my corporate domain.
Now lets create a corresponding account in the PRIV domain for the user. Log on to the MIM server and open an administrative PowerShell (ISE) Window.
Run the below Powershell commands to create a new PAM user and user object in the PRIV domain to represent our CORP domain user, this will also maintain the user SID which is key to the PAM process. Below we can see both user accounts have an identical ObjectSID value.
Import-Module MIMPAM
Import-Module ActiveDirectory
$PAMUser = New-PAMUser –SourceDomain lab.corp.net –SourceAccountName clint.eastwood
$SecurePassword = ConvertTo-SecureString “Password2018” –asplaintext –force
Set-ADAccountPassword –identity priv.clint.eastwood –NewPassword $SecurePassword
Set-ADUser –identity priv.clint.eastwood –Enabled 1
Now let’s select an administrative group to test with. For demo purposes I have created a “Password Admins” group and delegated out password reset access to the group. Run the below PowerShell commands in the same window that we used to create the user account to add the group to PAM and to set up a new role containing the group and adding our user to the role. When prompted, enter the credentials for the admin of the CORP forest.
$credentials = get-credential
$PAMGroup = New-PAMGroup –SourceGroupName “Password Management” –SourceDomain lab.corp.net –SourceDC dc2019.lab.corp.net –Credentials $credentials
$PAMRole = New-PAMRole –DisplayName “LAB Password Admins Role” –Privileges $PAMGroup –Candidates $PAMUser
Elevating a users access with PIM
Now that everything is configured and ready, lets try to request the Password Admins role.
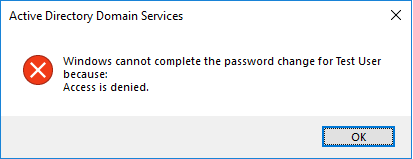
First lets try to reset a users password using the priv.clint.eastwood account. We can do this by opening an MMC console as priv.clint.eastwood on our corporate workstation and trying a password reset.
To open an MMC as priv.clint.eastwood, log onto the CORP PC using the regular clint.eastwood account and run:
runas /user:Priv.clint.eastwood@priv.lab.corp.net mmc
We get an access denied error when we attempt a password reset.
Now let’s request the role we want, open a PowerShell window as priv.clint.eastwood using the run command:
runas /user:Priv.clint.eastwood@priv.lab.corp.net powershell
And then request the role as below:

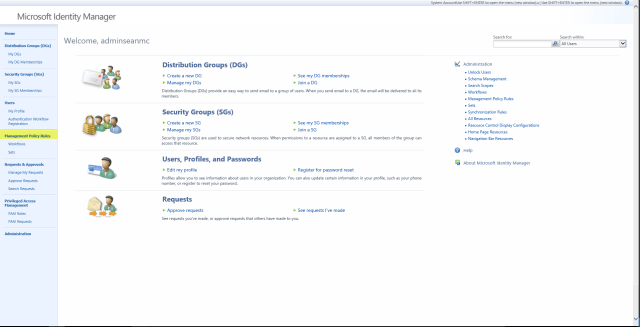
We can also use the PAM Sample Portal to request this role:

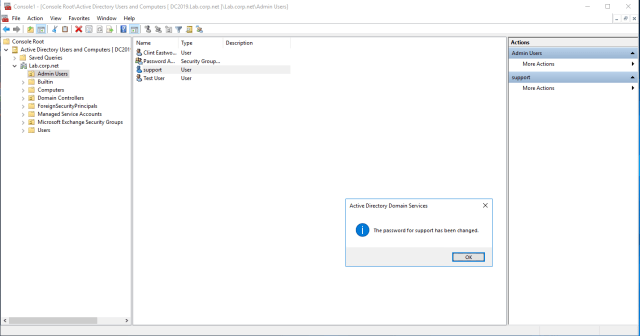
Now the user is in the “priv\LAB.Password admins” group. Relaunch an MMC console as the user priv\priv.clint.eastwood and retry a password reset. This time our password reset is successful.
That is the basic configuration of PAM using MIM 2016. From here we can configure approval, TTLs and customize the web portal from the Example portal template.
Setting up PAM is a lengthy process and the past four posts and I found that a lot of the resources online were confusing so I hope this series of posts proves helpful in configuring PAM for Windows Server 2016/2019.

There’s certainly a bit of work in setting up but your walkthrough makes it child’s play.
Nice one Sean.
LikeLike