
With so many organizations moving to Microsoft Teams in the past year in order to support a remote working scenario, many are beginning to move to Microsoft Teams in place of their legacy on-premises phone system or have already moved. When considering leveraging Microsoft Teams for calling functionality, there are two options:
- Calling Plans and Communications Credits allow organizations to essentially by credits from Microsoft to make calls via Teams. This can also allow organizations to order new phone numbers or port existing numbers to the Microsoft service and assign to users
- Direct Routing allows organizations to use their existing SIP provider or on-premises configuration and route calls to Microsoft Teams via a Session Border Controller (SBC) which is usually an on-premises or hosted third-party appliance
In this post we will look at how we can configure Microsoft Teams to work with our SBC and assign to users.
Session Border Controllers
Before starting, we will need to have a compatible SBC to route calls. The below link lists the SBCs that are compatible with Microsoft Teams Direct Routing and the configuration of each will be different based on the manufacturer and model.
Session Border Controllers certified for Direct Routing – Microsoft Teams | Microsoft Docs
High-Level Steps
The following are the high-level steps we will look at for configuring Direct Routing in Microsoft Teams:
- Register and validate the FQDN of the SBC as a Domain in Office 365
- Add a test user & assign appropriate licensing
- Create a PSTN Usage Record
- Add the SBC to Teams
- Create a Voice Routing Policy
- Create a Voice Route
- Assign the Voice Routing Policy
- Assign a Phone Number to the test user
Register and validate the FQDN of the SBC as a Domain in Office 365
When building any SBC, we need to make it available publicly via an FQDN with a matching certificate. In order to add it to Teams, we need to validate ownership of the FQDN. We do this by adding it as a domain in Office 365. Navigate to the Office 365 Admin Portal and open “Settings” -> “Domains”. Here, select the option to “Add Domain”. Enter the FQDN of the SBC and click “Add this domain”

Next, select the verification method for the domain, I find the easiest way to verify is using a TXT record in DNS.
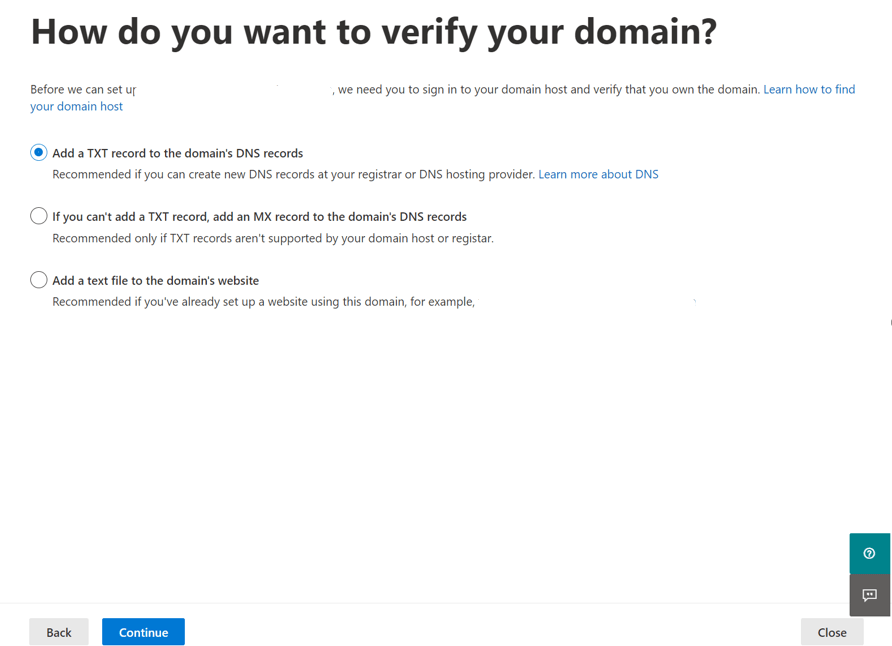
We will be provided with the TXT record to create (Or details for the other methods), simply publish them in your public DNS and wait for replication.

Once replicated, click the “Verify” option at the bottom of the page to confirm domain ownership.

Add a test user & assign appropriate licensing
With the Domain registered, create a new user in the Office 365 portal and assign the UPN matching the new domain that was added.

Next, ensure that the user has a minimum of Microsoft Teams and Microsoft PhoneSystem licensing assigned.

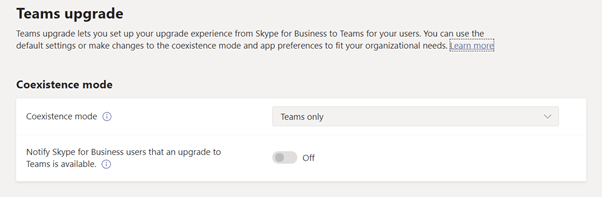
Finally, ensure that the organization or user is set for Teams Only Mode in the Teams Upgrade Policy assigned.
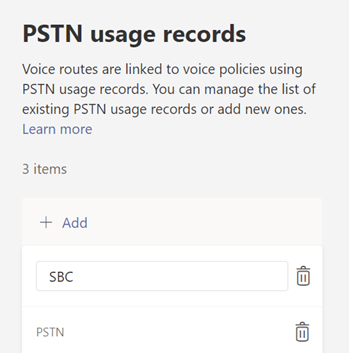
Create a PSTN Usage Record
A PSTN Usage record is used to link between Voice Routes which are established for Direct Routing and Voice Routing Policies which are assigned to users.
To create a PSTN usage record, open the Microsoft Teams admin portal and navigate to “Voice” -> “Direct Routing”. At the top right of the page, select “Manage PSTN usage records” and in the slide out window, add a new PSTN usage record with a name like “SBC” or something to help you recognise it and then hit “apply” to save it.
Add SBC to Teams
Next we need to register the SBC in the Teams Portal. From the “Direct Routing” page, on the “SBCs” tab, click “Add”. The FQDN for the SBC should be the FQDN we registered in the previous step and the configuration should match the config set by the SBC manufacturer. Below is an example:

Create a Voice Routing Policy
With the SBC added, we can go ahead and create a voice routing policy. Navigate to the “Voice Routing Policies” page and create a new policy. Give the policy a name and link it to the PSTN Usage Record that we set up previously.

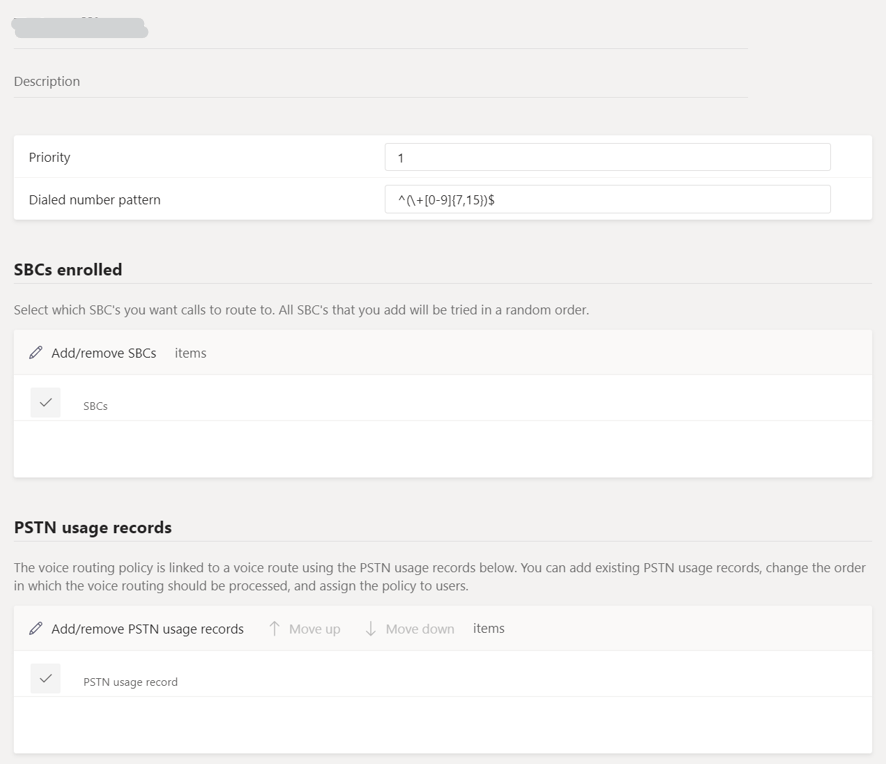
Create a Voice Route
Finally, we need to set up a voice route. A voice route determines what dialled numbers are routed to what SBC. In this case we only have one SBC but if we had more we could route differently based on different destination numbers.
Create a new Voice route under the “Direct Routing” page on the “Voice Routes” tab and configure it with a descriptive name, a regular expression to capture the right dialled numbers (in this case, to capture all traffic we can use: “^(\+[0-9]{7,15})$”), add the SBC we created and add the PSTN usage record.
With all of this configuration in place, we may need to wait a few days for everything to replicate before moving on to the next step.
Assign the Voice Routing Policy
When we are ready to test, we need to update a users Voice Routing Policy to the one we created. This can be done by finding the user in the Teams Portal under “Users” and under “Policies”, click edit and update the Voice Routing Policy to the one set up previously.

Assign a Phone Number to the test user
Next we need to assign a number to the user. This needs to be done through PowerShell using the Microsoft Teams PowerShell Module. If you don’t have the module installed, open an admin PowerShell window and run the following command:
“Install-Module MicrosoftTeams”
If you already have the Teams module installed, ensure you have at least version 2.0.0 but running the command:
“Get-Module MicrosoftTeams”
Verify the version in the output as below:

If you don’t have version 2.0.0, update the module as per this article:
Once the module is up to date, connect to the Microsoft Teams service by running the command:
“Connect-MicrosoftTeams”
And log on with your admin account. Once logged in, run the following command to assign the number to a user:
Set-CsUser -Identity <username> -OnPremLineURI tel:+<PhoneNumber> -EnterpriseVoiceEnabled $true -HostedVoiceMail $true

With everything in place, we can test our calling with the user within 24 hours! For additional information on configuring Direct Routing, check out the below Microsoft documentation:

Pingback: Configure Teams Direct Routing, Simple Deployment via PowerShell – Sean McAvinue
Pingback: Configure Microsoft Teams Common Area Phones – Sean McAvinue