
Sensitivity Labels in Office 365 can provide a fantastic level of protection to our tenant. We can use them to protect a range of services from files to Teams and Sites. One pain point I’ve seen a lot of customers struggle with in the past is the initial deployment of Sensitivity Labels. There is a natural tendency to try and solve for every use-case from day one, this leads to over-engineering of the initial solution and a change management nightmare for end users.
It’s great having a wide variety of Labels and Sub-labels that users can use to cover every level of protection they need, but the more labels that are there from day one, the more likely a user is to become confused about which to use and either classify a file with the wrong Label, or not label at all. Classification through Sensitivity Labels is often a new concept for users and when we throw too many options at them, we’re not setting them up for success.
Keeping it Simple!
When we are assessing Sensitivity Labels for initial rollout, it’s best to keep things simple. It’s important to understand that when we configure Sensitivity Labels with permissions applied, we protect based on a known audience. This means that we need to know the users/groups and permission levels before we create and deploy a label. Due to this, I recommend that we keep it simple. We do this by creating labels for the high-level use cases we know the organization will have with a view to tailoring specific labels after our users are familiar with the basic concepts. Let’s break down the high level use cases that almost every organization will have for an initial rollout:
- Documents that are accessed by anyone
- Documents that are internal only
- Documents that should be read-only
- Documents that are private to an individual
- Documents that require ad-hoc permissions
With this short list of high-level requirements we can easily help users to adopt Sensitivity Labels without overcomplicating it for them. Taking these use cases, we can translate directly into the following labels:
| Label Name | Label Description | Encrypt | Permissions | Marking |
| Public | This data is accessible by anyone who receives it, there are no restrictions | None | N/A | |
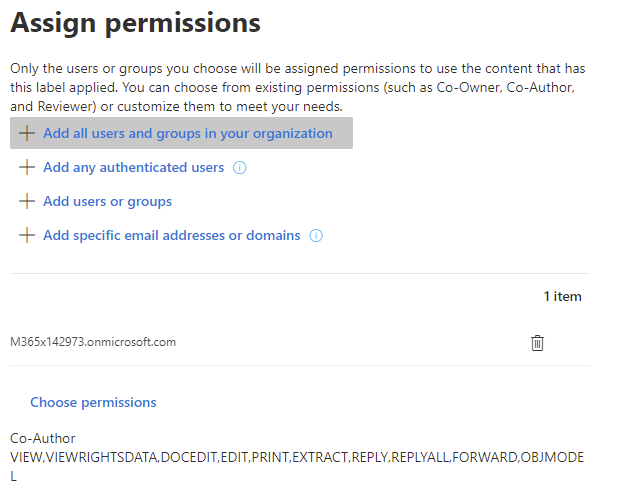
| Internal | This data is only accessible by internal users. Nobody external can view the contents. | Encrypt | Users and Groups in the Organization : Co-Author | Footer |
| Internal Read-Only | This data is only accessible by internal users and will be read-only for everyone. | Encrypt | Users and Groups in the Organization : Viewer | Watermark |
| Private | This data is private to the owner and the contents can only be viewed by them. | Encrypt | Tenant Admin : Co-Owner | |
| Custom | This data requires a custom permission set | Encrypt | Custom |
From the above table, we can see that each label has a clear name and description and is not overly complicated. This goes a long way towards helping people adopt and understand what may be a very new concept.
Piloting can be Troublesome
When piloting Sensitivity Labels, we can often come across a pitfall where we can’t use the traditional pilot user group method as while we can deploy our labels to specific users, we can’t say for sure that the documents our pilot users classify, won’t be accessed by other users in our organization. This means that even during a pilot, any user could be affected by deploying Sensitivity Labels to even a small subset.
Because of this, while we can still pick a pilot group for the initial rollout of labels, we need to communicate the change to the entire organization even if it is just a brief note to explain what they may see. It’s even more important then to educate our pilot users as the the effects of labelling data and ensuring the recipients understand what is happening.
This communication will cut down majorly on support calls and help with the concepts of classification and protection.
The Default Label
The Default Label for a policy can be a tricky one. I’ve seen customers who, with the best of intentions, set the default label to a restrictive label such as our “Internal” one. These deployments often end up being rolled back once users start sending documents externally that partners and customers can’t access. I find the best path for a default label is by applying the “Public” label and highlighting the importance of classifying data through appropriate comms and training.
The Custom Label
I like adding a label that allows the user to configure custom permissions during our initial pilot. Configuring this label allows users to define the audience and permission levels when they assign the label. This also helps us to minimize the amount of labels and permission variance we need to define and deploy.
Group and Site Labelling
For an initial rollout of Sensitivity Labels, ideally group based labelling is run as a separate effort, again we are simplifying the rollout and minimizing potentially disruptive change. I am a huge fan of this functionality and it should absolutely be a component of any Teams / Groups configuration but not something I recommend deploying along with file labelling, at least initially.
Automatic Labelling
Automatic labelling is a fantastic addition if you are licensed for it. The key to getting this right is excessive testing and communication. I wouldn’t recommend deploying automatic labelling from day 1 as our users will need some time to get familiar with the concepts
Creating the Labels
Once everything is decided for the initial rollout, we can create the labels as I have detailed in my previous posts here (Part 1) and here (Part 2).
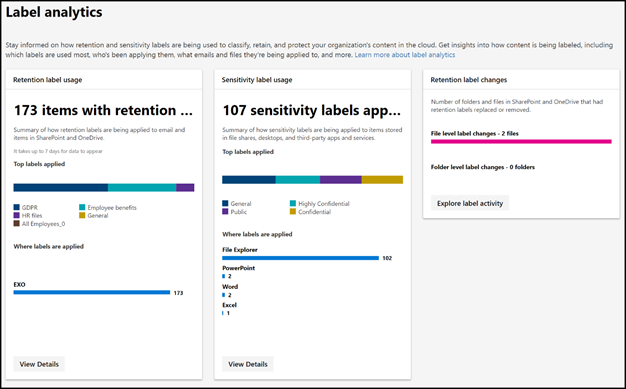
Use Label Analytics
During our deployment, make sure to set up and monitor the Label Analytics Dashboard to track usage across the organization. This can be a great metric to track to measure the success of label adoption.
Expanding on a Good Foundation
After we deploy our initial labels, the best way to go forward is to discuss with the end users how they have been using the labelling and what requirements they have. It’s very important that we don’t end up creating a label for every use case our users can come up with but we will see requests for labels such as “HR Only” or “Finance Only” that will be really beneficial. At this point, when we create a new label and communicate to our users, they already understand the concept and mechanics of Sensitivity Labels so the deployment becomes easy.
Summary
Sensitivity Labels are a great tool and add a lot of value to any Microsoft 365 deployment. It’s important to consider the user impact and ensure appropriate training and communication is provided to allow users to understand and adopt labelling as standard practice. When deploying Sensitivity Labels, I believe it’s best to start small, keep it simple and grow from there.
You can find more details on configure labels in my previous posts below:
Study Guide Series: Exam MS-500 – Manage Sensitivity Labels (Part 1) – Sean McAvinue
Study Guide Series: Exam MS-500 – Manage Sensitivity Labels (Part 2) – Sean McAvinue
Protecting Office 365 Groups and Microsoft Teams with Sensitivity Labels (Preview) – Sean McAvinue
I also wanted to mention the Cloud Conversations Podcast which had a great piece on delaying Sensitivity Labels among other topics. I highly recommend following it!
