
This post is part of the overall MS-500 Exam Study Guide. Links to each topic as they are posted can be found here.
This post will cover the following exam topics listed under the “Manage Sensitivity Labels” section:
- Plan a sensitivity label solution
- Configure sensitivity labels and policies
Plan a Sensitivity Label Solution
Sensitivity Labels in Microsoft 365 allow us to classify and protect data by defining a set of prebuilt “Labels” which we make available to our users. Labels can be applied manually by end users or leverage automatic labelling policies to classify and protect data based on content.
While labelling of content with a view to classifying data is a great start, with Sensitivity Labels, we can also apply RMS-based encryption and protection to specific labels, allowing us to secure sensitive content seamlessly. Sensitivity Labels can be used in the Office Web Apps or supported versions of the Apps for Business Suite.
Some other uses for Sensitivity Labels that I have detailed in the past are labelling Microsoft 365 Groups (and by extension Teams and Team sites) to control various factors about the security of the group and Using Sensitivity Labels as a condition in DLP policies. For more information on both of these use cases, check out my previous posts below:
Protecting Office 365 Groups and Microsoft Teams with Sensitivity Labels (Preview) – Sean McAvinue
Using Sensitivity Labels as Conditions in DLP Policies (Preview) – Sean McAvinue
When planning a Sensitivity Label solution, it’s important to be aware of the structure of Label deployment, keep the following points in mind when planning:
- Sensitivity Labels are defined in the Compliance Portal
- Sensitivity Labels classify data at a document level, labels follow the document
- Sensitivity Labels can also trigger encryption and protection
- Encryption and Protection configuration for label requires us to predefine the audience that will be able to interact with the document
- For supported document types, we can define granular permissions, with the capability to block actions such as printing, screenshots etc.
- Sensitivity Labels can be applied automatically using Auto-labelling policies
- Encryption for Sensitivity Labels supports Hold-your-own-Key/double key encryption
- Protection levels available for different file types differs between file types.
Configure Sensitivity Labels and Policies
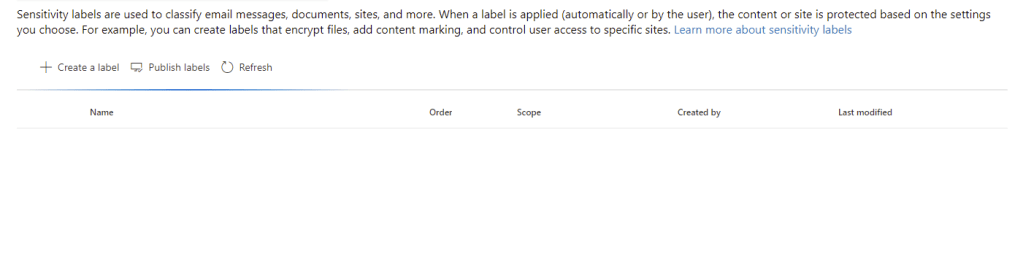
Create a Sensitivity Label
To start configuring Sensitivity Labels, open up the Microsoft 365 Compliance Portal and under the “Solutions” heading, open up “information Protection”. From here, we can use the “Create Label” option to create our first label.
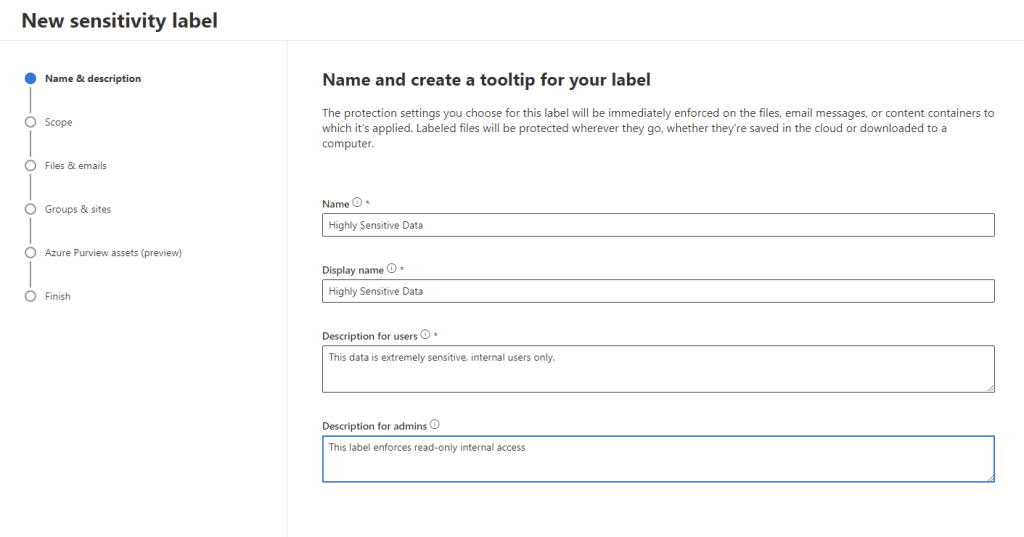
On the “New Sensitivity Label” page, enter in the basic details name, display name, user description and admin description and hit next.
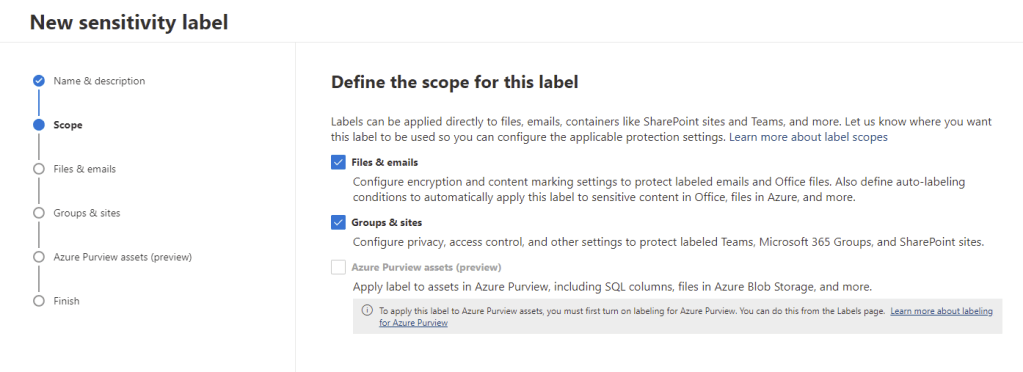
Next we configure the scope for the label, we can configure the label for “Files & Emails” or “Groups & Sites”. We’ll select both here so we can test both setups. Azure Purview is available in preview however it is not in scope of this exam so we’ll exclude it here. For more information on that check out this link.
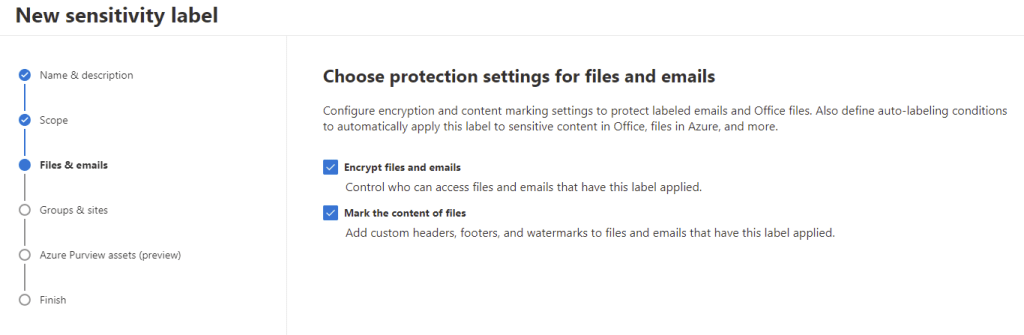
Now we configure our Files & Emails protection settings. If we select nothing here, our label will just classify the data with no protection. The options we have are:
- Encrypt – We can encrypt the content and make it available to particular users with specific permissions
- Mark – We can add markings to the document such as a watermark
Let’s do both, select both checkboxes and hit next.
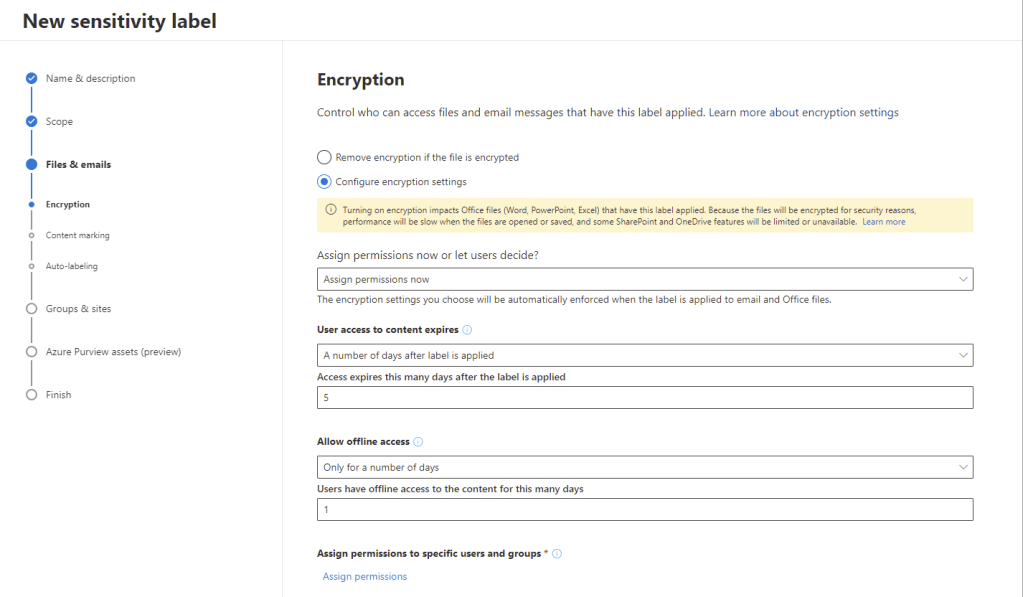
As we selected the encrypt option above, we now choose our encryption options. We can choose the option to remove encryption to data classified with this label or configure our encryption settings. In the encryption settings we have the following options available:
- Assign permissions now or let users decide – If we select “Let users assign permissions…” then we won’t preconfigure permissions and the user will be prompted for enter in their audience and permissions when the label is applied
- User access to content expires – Define if access should expire after a number of days or on a certain date
- Allow offline access – Should users be able to access the data while not connected to the Information Protection Service Online and if so, for how long
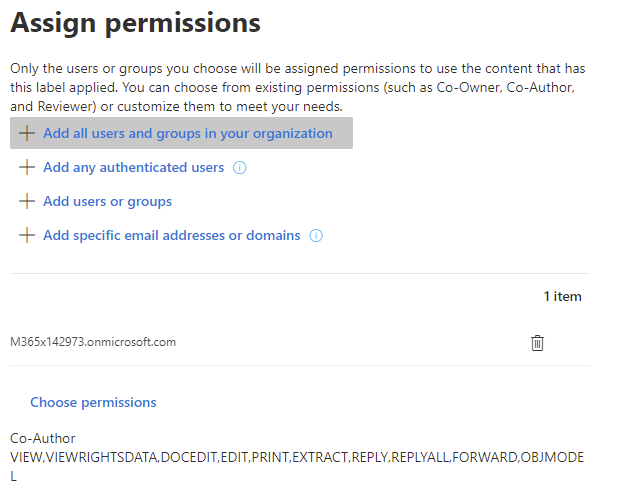
To choose our audience and permission levels, we select the “Assign Permissions” option. Here we can add the following types of users:
- Add all users and groups in your organization – This will add permissions for all users in your tenancy
- Add any authenticated users – This will add permissions to any user who authenticates with Microsoft
- Add users or groups – This will allow you to specify specific internal / external users
- Add specific email addresses or domains – This allows you to add specific addresses or domains such as partner domains
For our label, we will choose all users and groups in the organization. To specify the level of access click on “Choose permissions”. We can select multiple permission sets here with different levels of access to tailor our permissions.
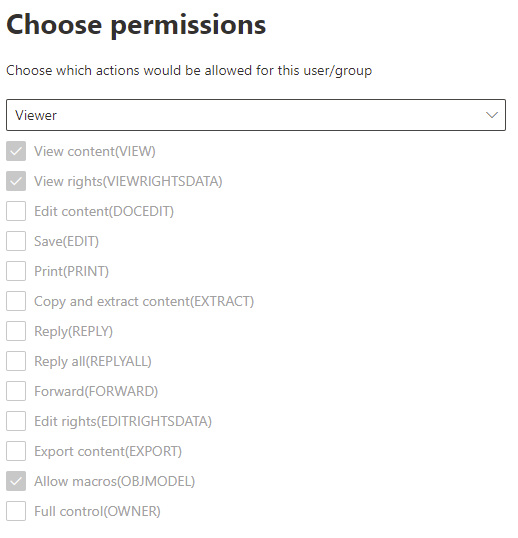
On the choose permissions page, we can choose from predefined permissions or create a custom permissions set.
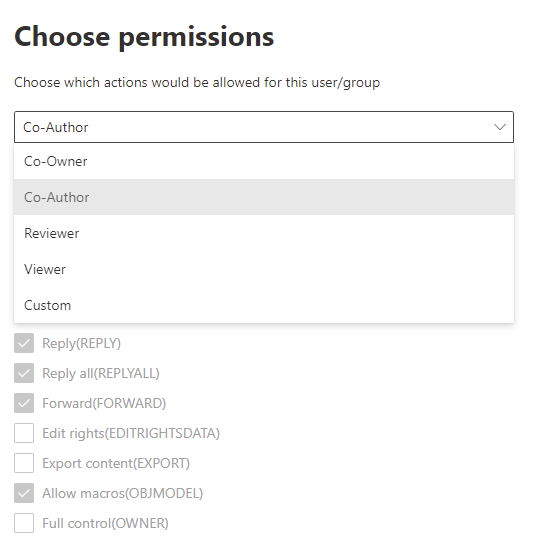
We’ll choose “Viewer” permissions for our label which will allow us to provide read-only permissions, blocking saving, printing, editing etc.
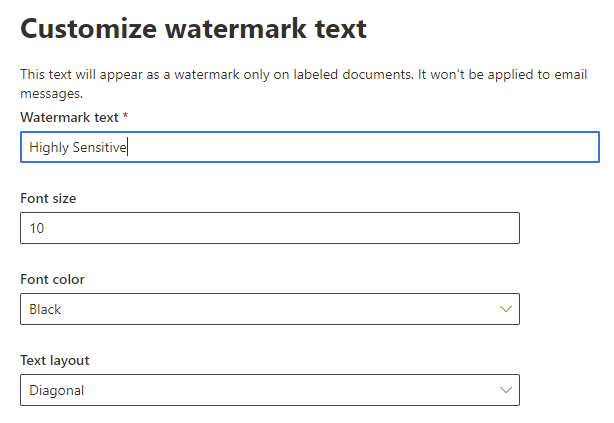
Next we configure our Content Marking settings, we can add the following to our documents:
- Watermark
- Header
- Footer
Tick the box beside the desired option to add the test and formatting you want.

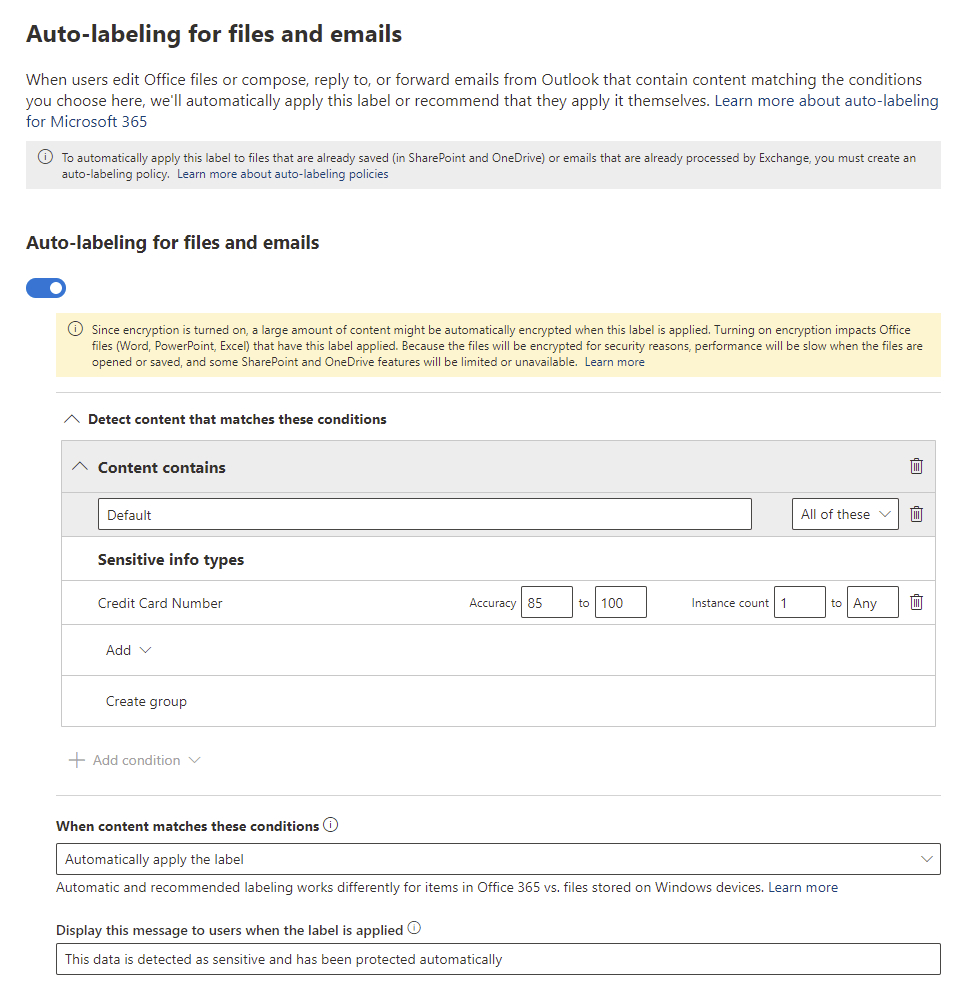
On the next page we can configure our auto-labelling settings. Auto labelling allows us to define criteria for this label to be automatically applied, rather than relying on users to label the files.
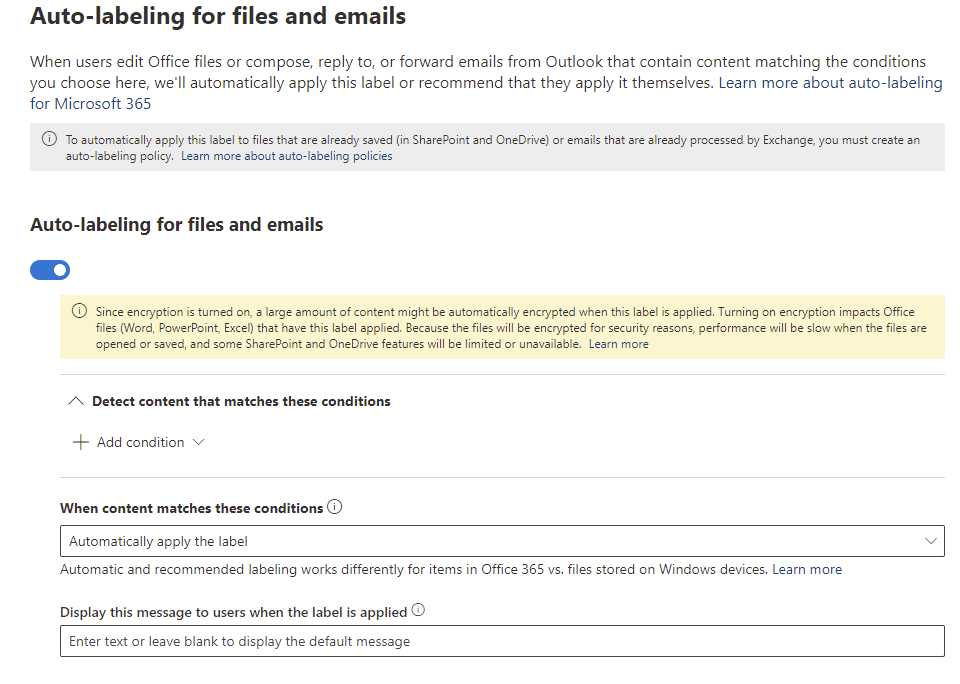
To enable Auto-labelling, first we define the labelling conditions, click “Add condition” -> “Content Contains”. From here we can add multiple criteria for Sensitive Information Types or Trainable Classifiers. For now we’ll add the “Credit Card Number” Sensitive Information Type. In the Accuracy we will leave it at 85 to 100 and for instance, we will leave the minimum of 1. We can also use groups to layer different criteria if we like.
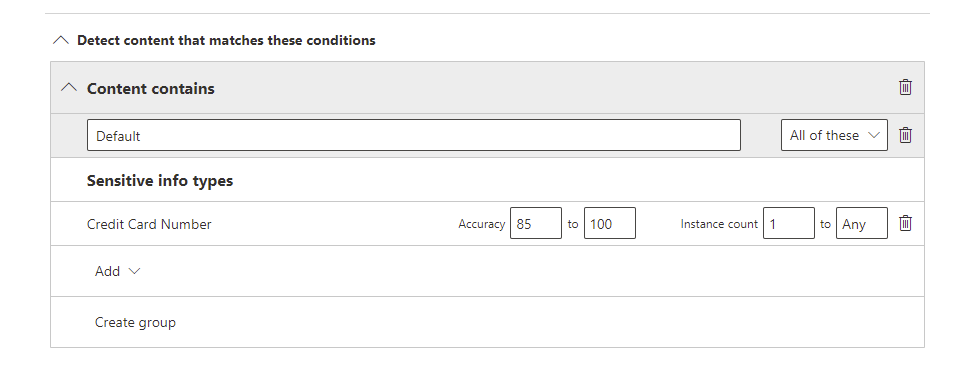
Next we configure the below options:
- When content matches these conditions – Define if the label should be recommended or enforced when the conditions are met
- Display this message to users when the label is applied – Enter a note to users when the label is applied
Once everything is configured, the auto-labelling policy will look similar to the below:
On the next page, if we selected to protect Groups and Sites, we can enable the below options for group and site protection:
- Privacy and external user access settings – Sets the privacy of a group, defining if we allow guests to access the group
- Device access and external sharing settings – Configure the capability of External Sharing and unmanaged device access of the group
For our label, let’s select both.

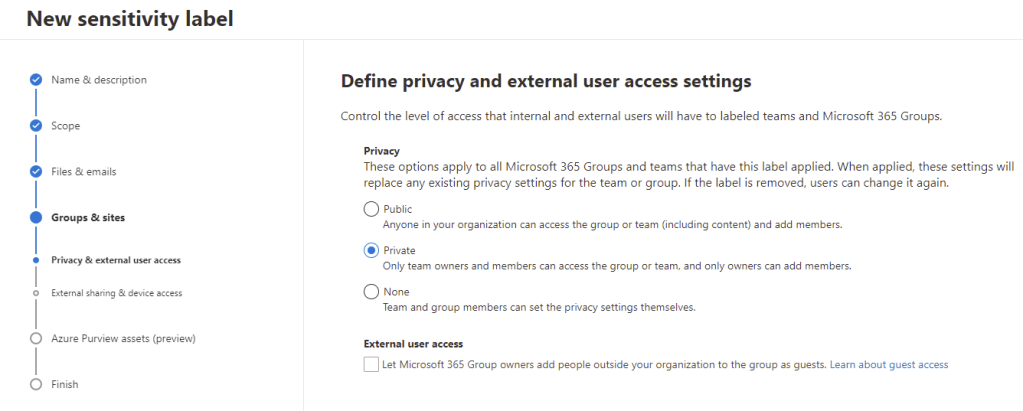
First, we define the privacy and external user access settings. We can set the privacy level to:
- Public – Anyone in the organization can join
- Private – Team owners must add users to the group
- None – The privacy can be managed by the group owners
Then we either enable or disable external user access, this setting controls if guests can be added to the group. For our label, our group will be private and we will not permit guests.
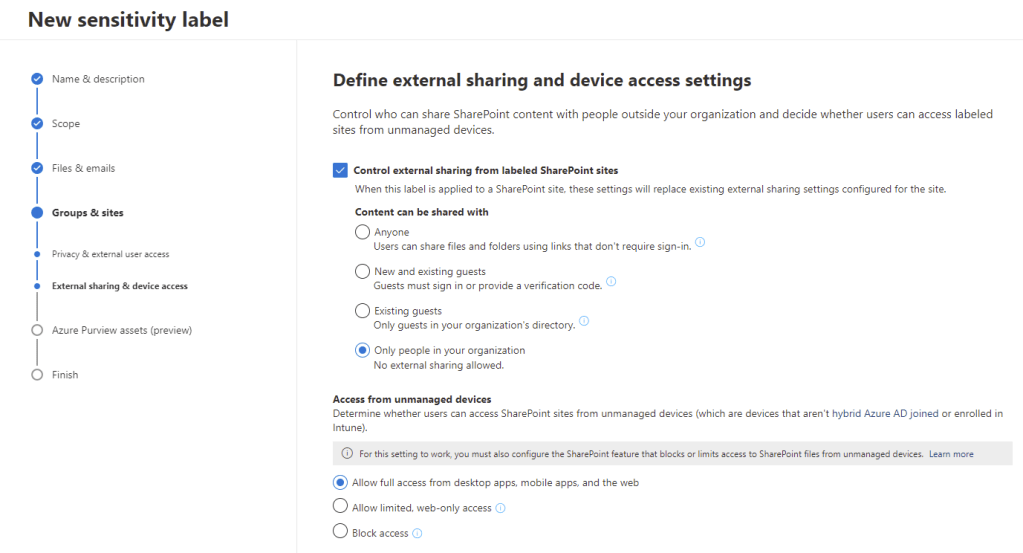
On the next page, we can decide if we want to allow external sharing from groups / sites classified with this label. We can also configure access from unmanaged devices, setting access levels to Full Access, Web-Only or Blocked based on if the device is managed by our tenancy.
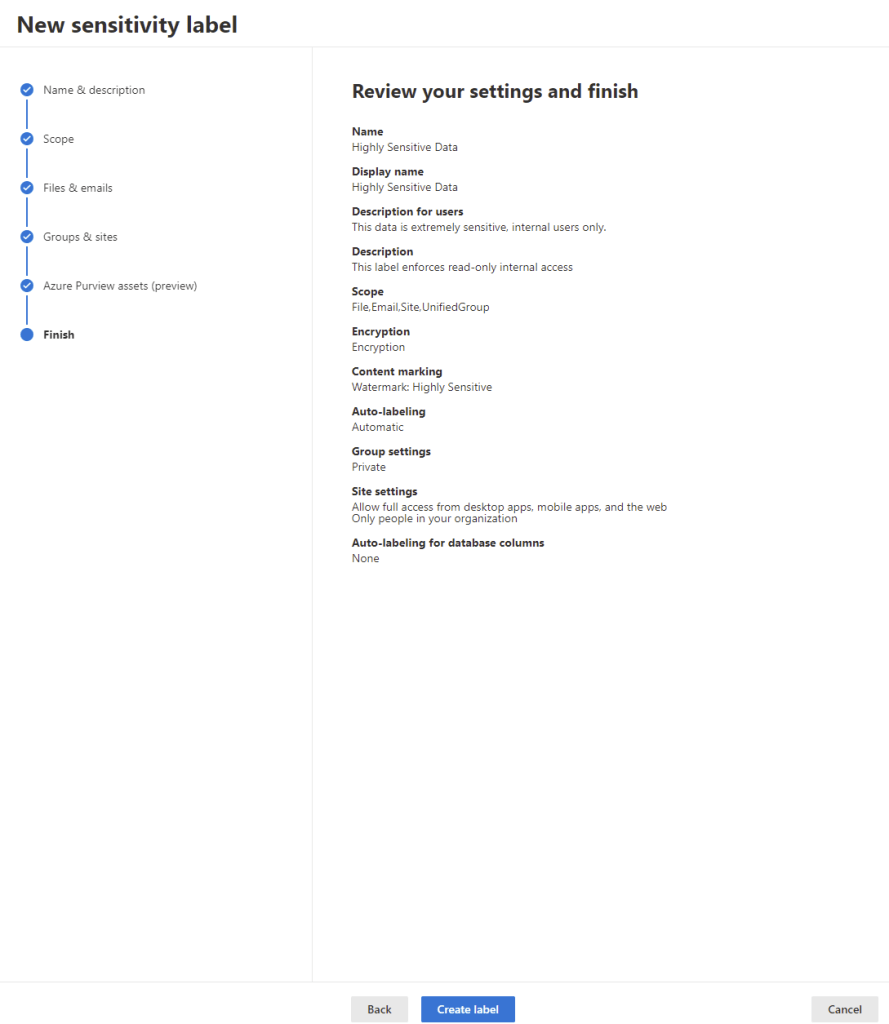
And that’s it, our label is configured and we can hit “Create Label” to save it.
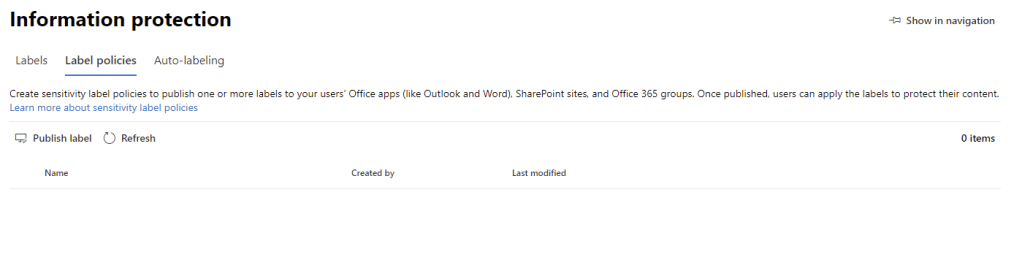
Deploy a Sensitivity Label with a Label Policy
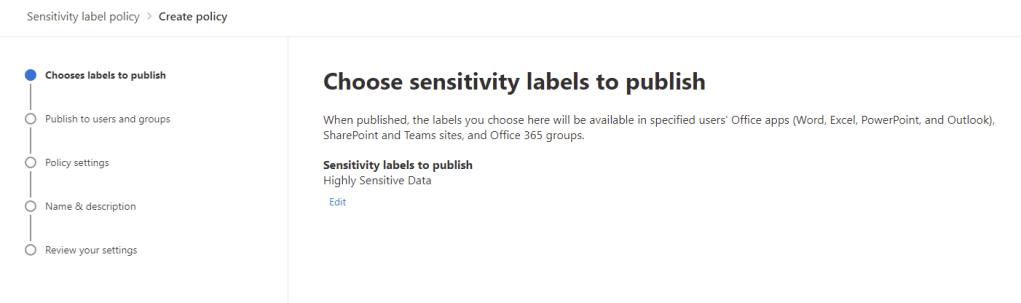
With our Label created, the next step is to deploy it to our users with a label policy. On the “Label policies” page, click “Publish Label” to create a new label policy.
On the first page, select the label(2) to publish and click next.
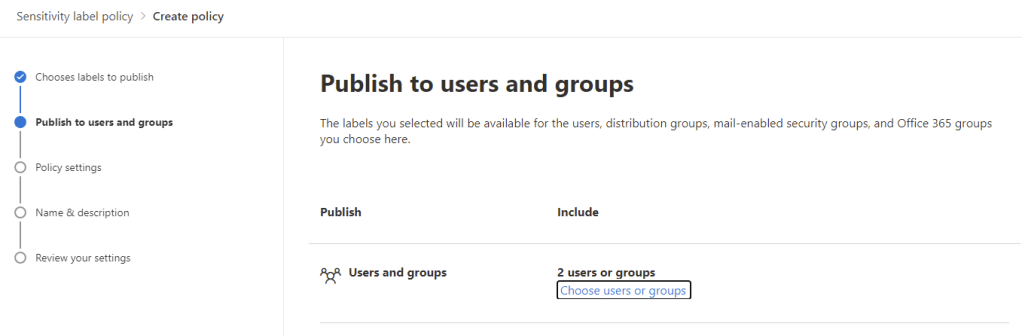
Next, we choose the users / groups we want to publish the label to, publishing the label makes it available for use to users but publishing is not required for users to be able to open labelled files.
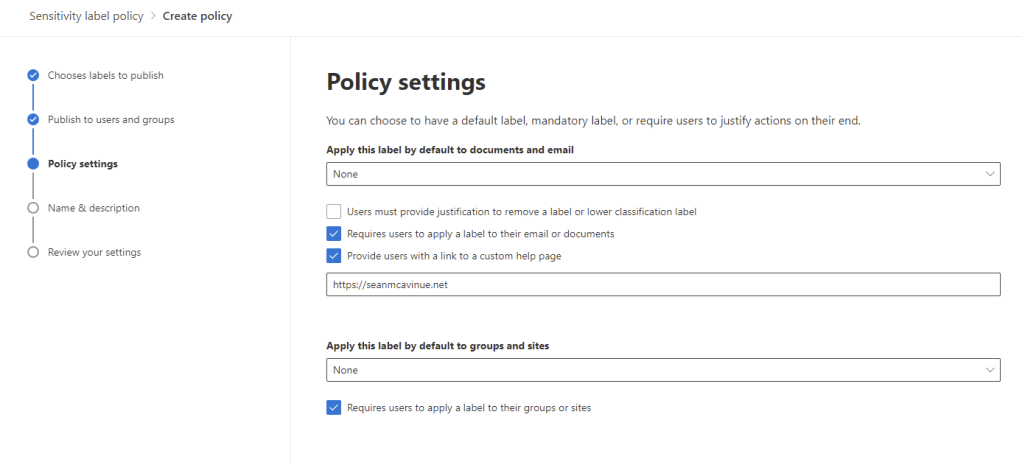
On the next page, we can configure the following options:
- Apply this label by default to documents and email – Choose a default label that will be initially applied to all documents
- Users must provide justification to remove a label or lower classification label – If enabled, users will be prompted for a justification when they attempt to remove or lower the classification of an item
- Require users to apply a label to their email or documents – If enabled, users will not be able to save items until they have been classified
- Provide users with a link to a custom help page – Add a support link to help users who are having issues
- Apply this label by default to groups and sites – Choose a default label that will initially be applied to all groups/sites
- Require users to apply a label to their groups or sites – If enabled, users must apply a label when creating a new group/site
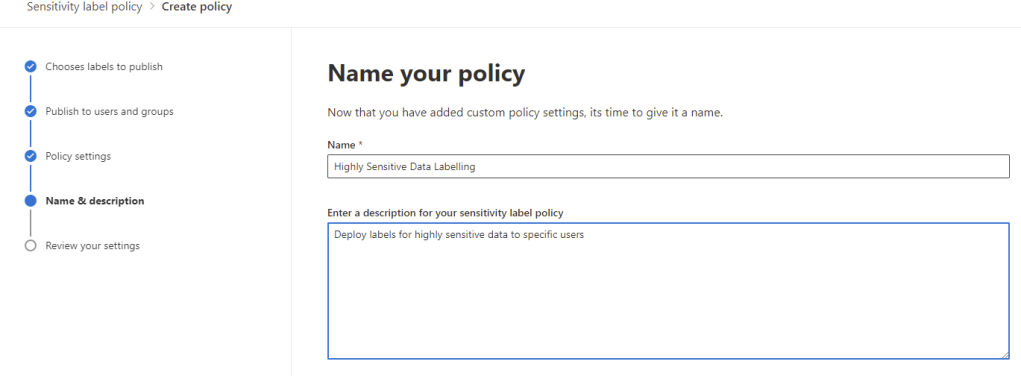
Add the name and description on the next page and click next to review and create the policy.
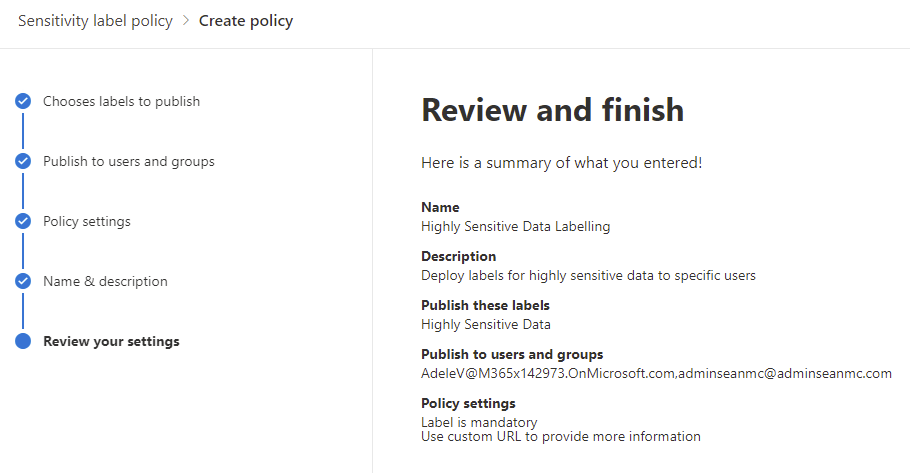
Once the policy is saved, our users should get the labels deployed within 24 hours.
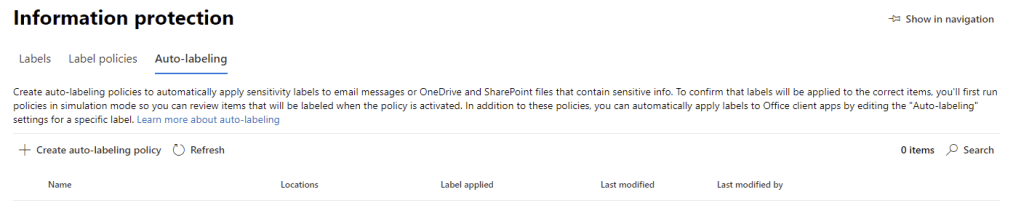
Deploy Auto-Labelling Policies
Auto-labelling policies differ from auto-labelling in the label settings as they impact the labelling of data at rest in our environment (SharePoint, OneDrive, Teams, Exchange) rather than the labelling initiated when a user interacts with a document. We configure Auto-labelling policies to run initially as a simulation to determine the impact of running the policy, and then we can enable them.
To get started, open up the “Auto-labelling” page and select “Create auto-labelling policy”
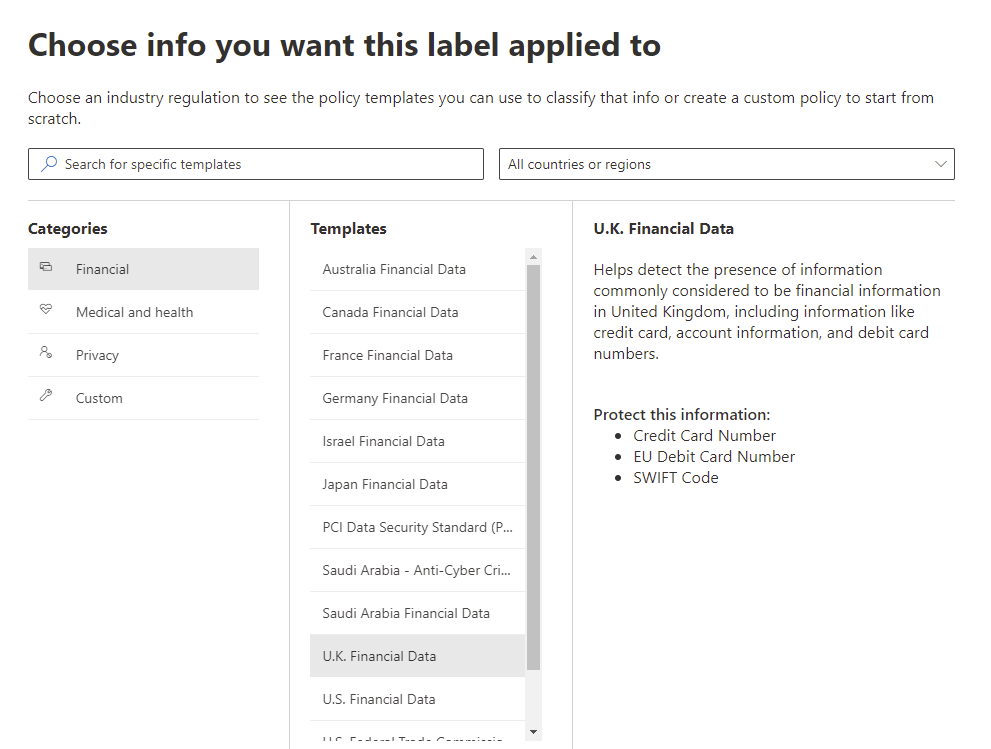
First, select the Sensitive Information Types we want to detect and label. For this policy I have selected U.K. Financial Data.
Next, give the policy a name and description

Select the locations to scan, we can specify individual mailboxes and OneDrive or SharePoint sites (by URL)

Next we can customize the policies rules using advanced rules, for example we could treat data detected in SharePoint differently to Exchange by implementing advanced rules. For now we will use common rules across all three sources.
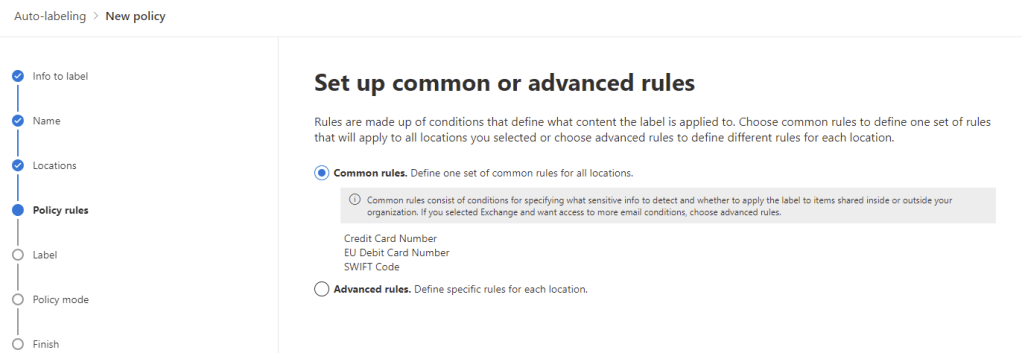
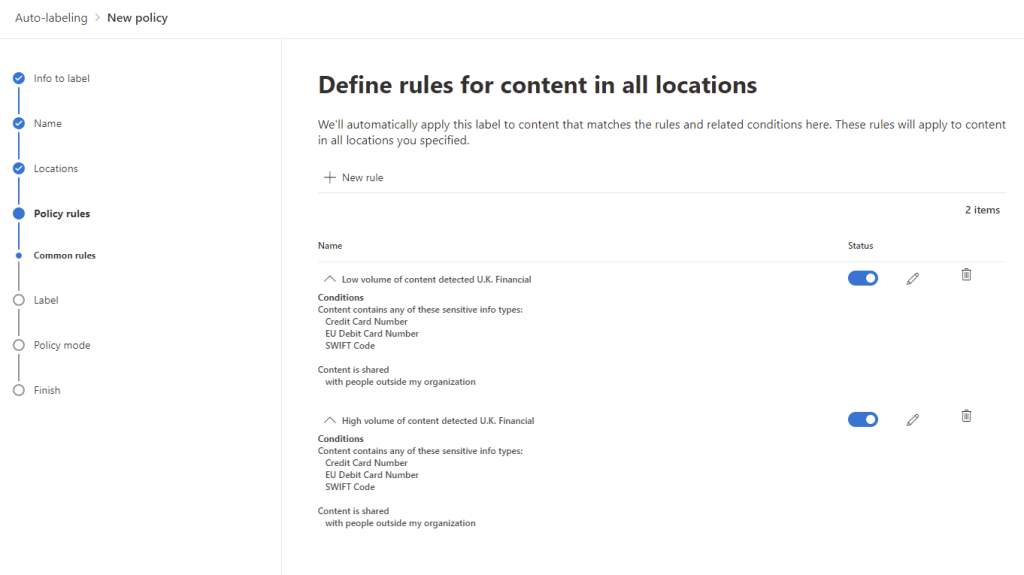
We can now define our policy rules, we can customize the default to detect different scenarios. As we are using a pretty straightforward example, we don’t need to customize the rules that are in place.
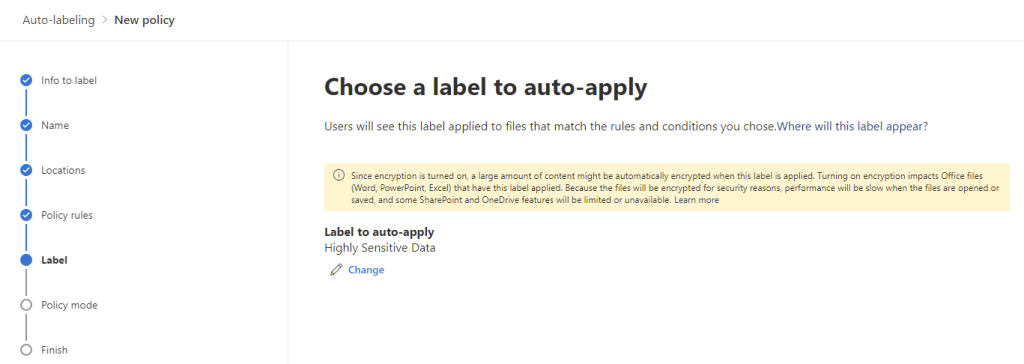
On the next page, we select the label we want to apply when content matches out auto-labelling policy rules.
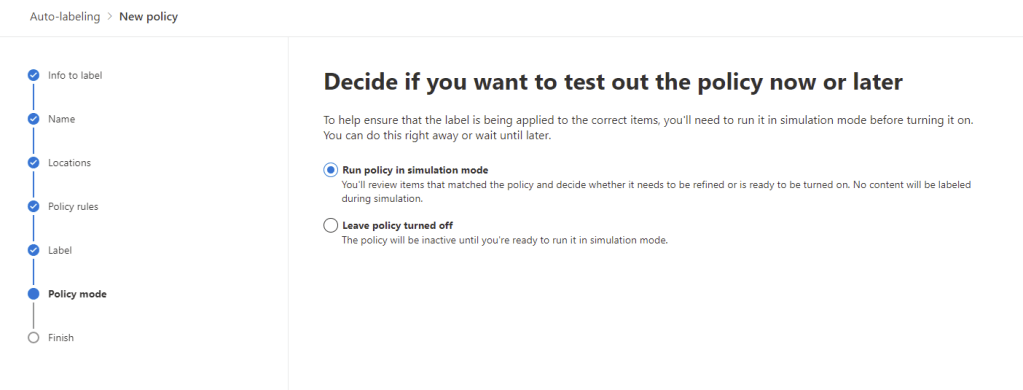
Next we configure the policy for simulation mode, this is required before we can enforce the policy. We could also choose to leave it turned off until later if we want.
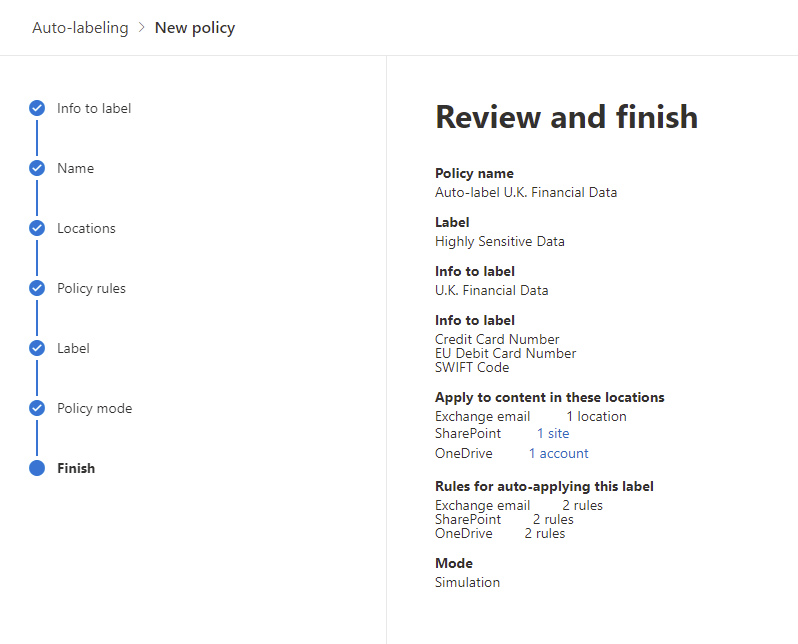
We’ve finished setting up our auto-labelling policy and we can hit “create policy” to finish and enable the policy in simulation mode.
Summary
In this post we’ve created a sensitivity label complete will all the configuration available to us, we’ve also deployed the label through a label policy and even looked at auto labelling our Microsoft 365 content with Auto-labelling policies. In the next post we’ll look at how we can monitor Sensitivity Label activity and how the labels interact with our client apps.
For more tutorials on different aspects of sensitivity labels, check out some of my previous posts below:
Protecting Office 365 Groups and Microsoft Teams with Sensitivity Labels (Preview) – Sean McAvinue
Using Sensitivity Labels as Conditions in DLP Policies (Preview) – Sean McAvinue
Using Cloud App Security Session Controls to Protect Sensitive Data – Sean McAvinue

Pingback: Study Guide Series – Exam MS-500: Microsoft 365 Security Administration – Sean McAvinue
Pingback: Securing External Access to Files in Teams: The Two Most Important Basic Configurations – Sean McAvinue
Pingback: Deploying Office 365 Sensitivity Labels for the First Time – Keep It Simple, Stupid! – Sean McAvinue