
This post is part of the overall MS-700 Exam Study Guide. Links to each topic as they are posted can be found here.
In this post we look at creating channels and different channel types. The areas covered in this post are:
- Plan for channel types
- Create channels
- Manage Microsoft Teams channel settings
- Create and manage Microsoft Teams policies for private channels
- Manage private channel membership
Shared channels, which are currently in preview are bound to show up on the exam too so in the second part of this topic I will look at shared channel creation and management. Even if it’s not currently in the blueprint, I imagine that will change soon so I’ve chosen to cover it in this guide.
Plan for channel types
There are three different types of channels that can be added to a Team (Figure 1).

Standard channels, private channels and (In preview currently) shared channels. In the outline below, I detail the characteristics of each channel type meet and some specific use cases you may come across.
- Standard Channels
- The most common, basic type of channel you will see in Teams
- Every Team is provisioned with an initial standard channel named General
- Storage for standard channels is hosted in a folder in the Team Document Library
- Accessible by any member of the Team
- Used when all users in a Team require access to the channel
- Private Channels
- Files are stored in a separate SharePoint site / Document Library
- Membership is a subset of the overall Team membership
- Members of the Team who are not members of a private channel will not see it in the channel list
- Used when only a subset of Team members should have access to the channel
- Shared Channels
- Storage works the same as a private channel
- Shared Channels can be be added to multiple Teams (both internal and external)
- The Team a shared Channel is created in is known as the Host Team – this is the Team in which the channel is stored
- Membership of shared channels is similar to private channels but also includes inherited Team membership
- Used when multiple Teams or users (Internal or external) require access to a channel
Create channels
Channels can be always created in a Team by a Team owner. Members can, by default, create channels in a Team also however this can be disabled in the Team settings as shown in this post on Managing Teams. To create a channel, click the ellipses (…) beside a Team name in the Teams client and select the option to Add a channel. In the subsequent dialog you can choose the channel name, description, type and if the channel should automatically appear in all users channel list (Figure 2).

A Team can have up to 200 channels present and 30 private channels. This number includes deleted channels which will remain in the deleted channels section of the Team for 30 days before being purged fully. It’s important to note this when looking at the channel count limits.
The full list of object count support is available in the Microsoft Documentation.
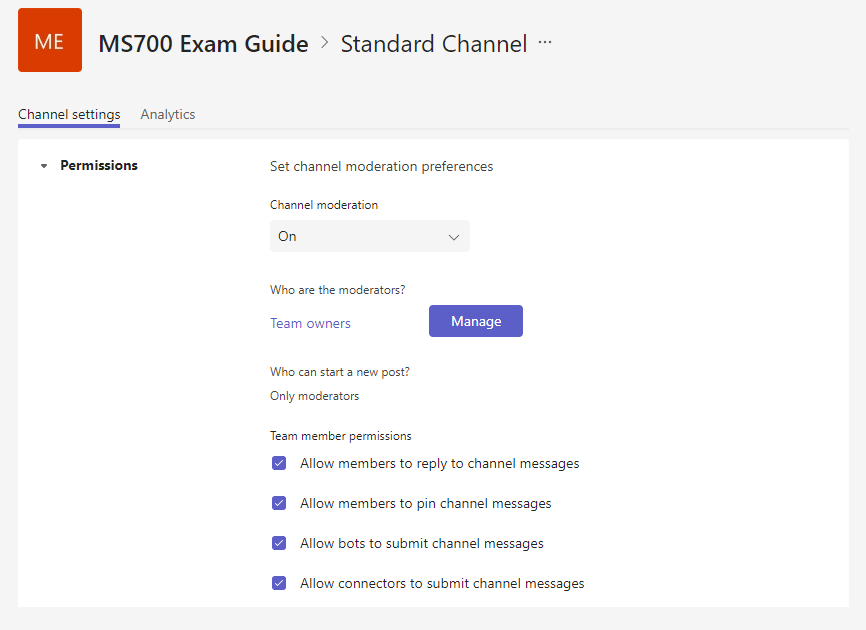
Manage Microsoft Teams channel settings
As we saw in the Create Teams topic, each Team has a number of settings that can be customized. Likewise, each channel can have custom settings. Channel settings can be accessed by clicking the ellipses (…) beside a channel in the Team and selecting Manage Channel. From the settings menu of a standard channel (Figure 3) the permissions of that channel only can be modified. The settings available can control the features available within the channel and configure moderation where required. Moderation can be particularly useful when you don’t want any member to be able to post new messages in a channel. For example, if the moderators post a new message for an announcement you can allow members to reply to it only using the Allow members to reply to channel messages option. Moderation is not currently available for the General channel.
Private and Shared channel settings are slightly different (Figure 4) and contain some settings usually set on a Team level. Some features such as moderation are not available on private or shared channels.

Create and manage Microsoft Teams policies for private channels
While private channels can be useful, due to the additional components created, some organizations may not want to make private channels (or shared channels) available to all users. The ability to create Private and shared channels is managed by the confusingly named Teams Policy in the TAC. From the Teams policy section, you can modify the existing Global policy or create multiple policies for assignment to different users.

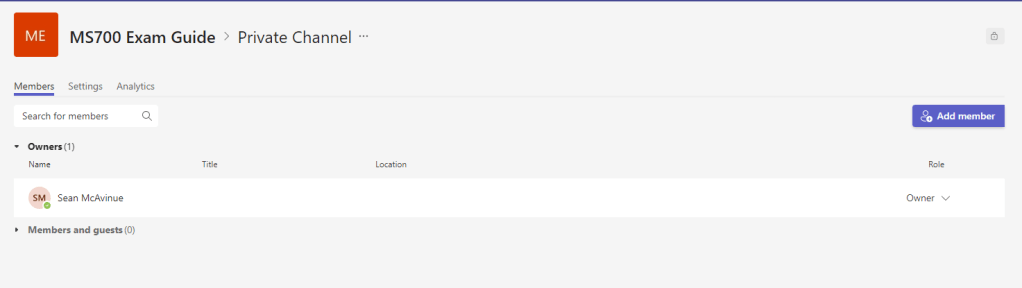
Manage private channel membership
As mentioned above, private channels contain a subset of users from the hosting Team. Private channels will only appear to users who are members of the channel. To manage private channel membership, open the Manage Channel page and select the Members tab. From here, you can add members the same way as you would with a normal Team (Figure 6) however you can only add people who are already a member of the parent Team.
Summary
In this post I have detailed the different types of channels and how to set up and control them in Teams. Shared channels are a new addition and not currently on the exam blueprint but in the next post I will look at shared channels as I expect they will soon be added to the exam.

Pingback: Study Guide Series: Exam MS-700 – Plan and manage channels (Part 2) – Sean McAvinue