
This post is part of the overall MS-700 Exam Study Guide. Links to each topic as they are posted can be found here.
In this section I will go through the following topics relating to security and compliance settings for Microsoft Teams.
- Plan alerts for Microsoft Teams
- Choose appropriate administration roles
- Plan threat policies
As Microsoft Teams is underpinned by other apps in the platform such as SharePoint Online, the Security and Compliance features available for Microsoft Teams often overlap with features you may already be familiar with. In this section of the study guide, I will be focusing on the features as they relate to Teams but if you are interested in a more holistic view of Security and Compliance in the Microsoft 365 platform, I suggest checking out my previous exam guide for the MS-500 exam: Microsoft 365 Security Administration.
Plan alerts for Microsoft Teams
As I mentioned previously, Microsoft Teams sits on top of other services such as SharePoint Online for file storage and Exchange Online / Office 365 groups. As such, many monitoring and alerting requirements will actually relate to those services. For example, monitoring the membership of a particular Team actually requires you to monitor the membership of the underpinning Office 365 group. Monitoring can be configured for most aspects of Teams in this fashion using the Microsoft 365 Compliance Center by configuring Alert Policies as detailed here.
The membership monitoring requirement mentioned above for example, can be configured as an alert policy in the Compliance Center as shown in Figure 1.

Alert policies are great for monitoring and alerting on common occurrences like this; however, for very specific activities, Microsoft Defender for Cloud Apps activity policies give much more granularity allowing you to finely tune your alerts. As an example, let’s take a private Team that is extremely business sensitive such as an acquisition project. You might want to know for this particular Team if the privacy setting is changed. This level of granularity can be achieved using an activity policy as shown in this post. Setting up an activity policy with the Access Level Change template as shown in Figure 2 can monitor this specific setting.

The template can then be customized to meet the exact requirements. One more area where reports for Teams are managed is in the Teams Admin Center (TAC) “Notifications & Alerts” page. I believe this may be the main area for this exam topic but at the time of writing, there is only one alert rule available under the “Rules” section and in the documentation, “Device State Rule”. There are obviously plans to build out what’s here so it’s definitely worth covering.
Within a rule, you can customize the alerting configuration and scope of the results, sending notifications to Teams channels for example. The rule can also be enabled and disabled from here as shown in Figure 3.

As I mentioned, I expect this functionality to be build out in the near future and that may expand how Teams specific alerting can be configured however for now at least, it’s important to understand the different areas available to monitor and alert on Teams activity.
Choose appropriate administration roles
Like most of the Microsoft 365 apps, Teams fully supports role based access control (RBAC) to help adhere to the principle of least privilege. Along with global roles such as Global Admin and Global reader, there are also a number of Teams specific roles available within Azure AD / Microsoft 365 Admin Center. The roles (shown in Figure 4) allow varying access to different aspects of Teams and can be used when dedicated Teams access is required while not exposing other elements of the platform.
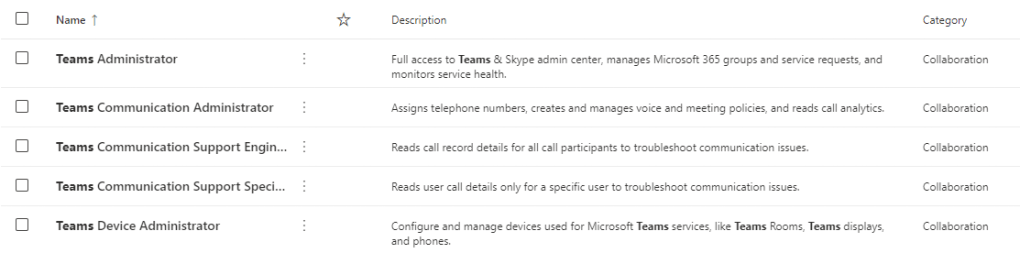
A detailed breakdown of the functionality available within each role can be found here and it’s important to understand the different roles available and plan the correct level of access for Teams administrators.
Plan threat policies
Threat policies (specifically Safe Links and Safe Attachments) in Microsoft Defender for Office 365 can be expanded to provide protection to Microsoft Teams, OneDrive and SharePoint workloads in addition to Exchange Online. The policies are configured from the Microsoft 365 Security Center under “Policies” -> “Threat Policies” -> “Safe Links” / “Safe Attachments”. I’ve detailed the configuration of Safe Links and Safe Attachments previously here but it’s important to understand how these policies apply to Teams.
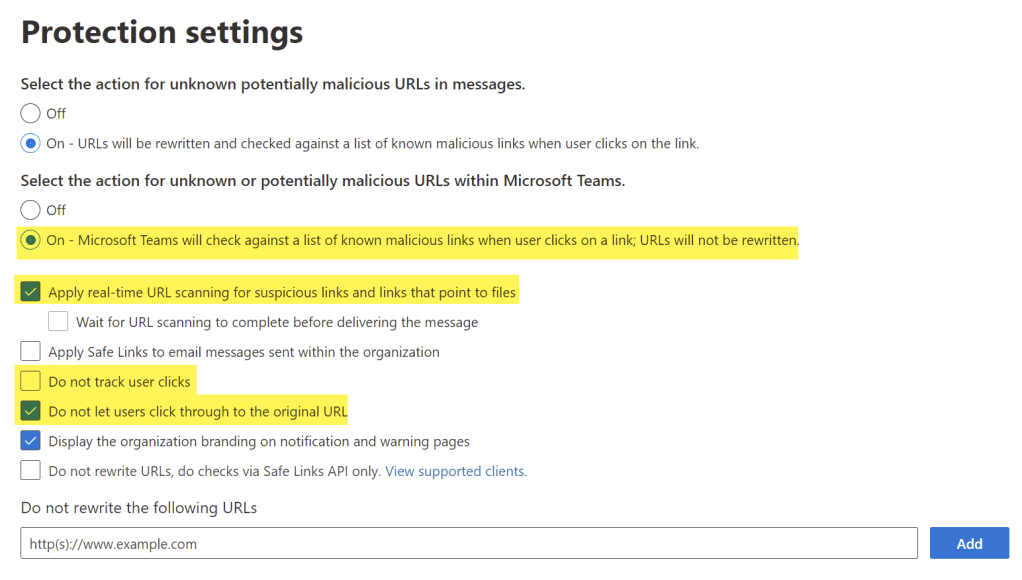
Safe Links will scan links found in Teams messages similarly to how it does in email messages. When a message is sent with a link in it, after a successful scan of the link payload, the end user will be able to reach the backend site in Teams. If the link is found to be malicious, the user will be prevented from navigating to it (depending on the setting “Do not let users click through to the original URL”).
Within a Safe Links policy, the options highlighted in Figure 5 impact Safe Links in Teams.
Safe Attachments in Teams, OneDrive and SharePoint provides file scanning on a SharePoint level. As Teams is SharePoint based for it’s file storage, this protection extends to Teams naturally. This is managed via the global settings page for Safe Attachments by enabling the setting shown in Figure 6.

When a file is detected as malicious within Teams storage, users will be blocked from opening, moving, copying or sharing it however by default, they can still download it. To prevent this, the “Disallow Infected File Download” setting should be enabled in the SharePoint Online tenant settings. This is done using the SharePoint Online Management Shell and running the below command:
Set-SPOTenant -DisallowInfectedFileDownload $true
Summary
In this post I’ve looked at some of the security and compliance settings relating to Teams but there are a lot more to work through. In the next post, we’ll go through some bigger topics, looking at retention and sensitivity of data within Microsoft Teams.
